Transfer Programs from Windows 7 to Windows 11/10
How can I easily transfer programs from Windows 7 to Windows 11/10
You can easily transfer your programs from Windows 7 to Windows 10 using the built-in feature called "Windows Easy Transfer" or by using third-party software like Laplink's PCmover. These tools will help you transfer your installed programs, settings, and files to your new Windows 10 installation, saving you the hassle of reinstalling them manually.
Microsoft has stopped supporting Windows 7, which means no more technical support, software updates, or security fixes. This leaves computers running Windows 7 more vulnerable to viruses and malware.
Here are the two choices to upgrade to Windows 11/10 from Windows 7:
- Before upgrading to Windows 11/10, make a safe backup and ensure you have enough unused space, then follow the instructions on the link provided for an internal upgrade from Windows 7 to Windows 10.
- If you're upgrading to a new computer, consider taking advantage of the opportunity to replace your old PC with a new one. To do this, you'll need to use a program migration tool to transfer installed programs, crucial data, and user settings to the new computer. This can be done by following the instructions on the website "Transfer programs from Windows 7 to Windows 10 New Computer".
Which tool can help to transfer programs from Windows 7 to Windows 11/10
To efficiently transfer programs from Windows 7 to Windows 11/10, I recommend using Qiling Disk Master, a full-featured tool that can help you migrate programs and files from the previous OS to the new OS after upgrading to Windows 11/10 in a new or local computer. You can download and try it to save time and effort.
Steps to transfer programs from Windows 7 to Windows 11/10
Method One: Internal upgrade from windows 7 to Windows 11/10
1.Backup important data
The process involves creating a backup file of the data, programs, and settings you want to transfer in Windows 11/10. This backup file can be used to restore lost items if errors occur during the upgrade, allowing you to quickly retrieve the data you need.
Step 1. Create a backup file.
1. Connect your USB (flash) drive/external hard drive to your source computer, then launch Qiling Disk Master and click "Backup & Restore > File sync" on the main page.

2. To create a backup file, hover over the "Applications", "Files" and "Accounts" columns to select the specific data, applications, etc. you want to include, then click "Proceed" to initiate the backup process.

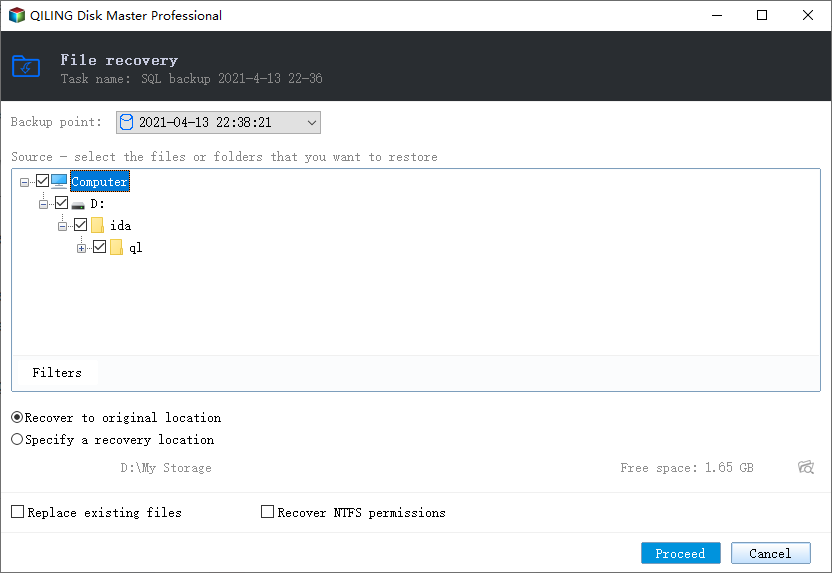
Step 2. Recover via the created backup file.
1. Insert your USB drive, which contains the created backup file, into the target PC and open Qiling Disk Master. Then, navigate to the "Backup & Restore" page.

2. To restore the image, click on the "Browse" button to select the image file, and then click on the "Restore" button to proceed with the restoration process.

3. Now, you can select Applications/Files/Accounts you want to restore.
To transfer data, go to Applications, Files, or Accounts and select the specific data you want to transfer. Click "Restore" to confirm, or click the browse icon to change the target path to recover and save the files.
2. Free up space for Windows 11/10 installation
Windows 10 requires 10-15 GB of storage space for an upgrade, whereas Windows 11 necessitates at least 64 GB.
You can free up space on your computer by using external storage and local PC settings, but the process can be time-consuming. If your C drive is running out of space, you can use App Migration from Qiling PCTrans to transfer applications to another drive, making it easier to upgrade your OS.
Upgrade steps (Windows in-place upgrade/new computer):
Step 1: Purchase Windows 11/10 Edition.
Step 2: Start > Settings > Update & Security > Windows Update > Check for updates
Method 2: Transfer programs from Windows 7 to Windows 11/10 New Computer
We introduce an alternative method for transferring programs from one PC to another. Briefly, files can be stored or transferred to an external hard drive, but applications cannot be migrated via copy and paste.
Qiling PCTrans allows you to migrate programs, data, and user settings from one computer to another without re-installing, supporting the transfer of Microsoft Office, Skype, Adobe software, and other common programs from Windows 7 to Windows 11/10.
Step 1. Run Qiling Disk Master on both PCs
On the source PC, select "File sync" on the main screen of Qiling Disk Master and proceed.
Step 2. Connect two computers
1. To connect your target PC, select it from the list of available devices by either using its IP address or device name. Then, click the "Connect" button.
2. To confirm the login password of the target PC, enter the password and click "OK".
If you didn't see the target PC in the listed devices, you can also click "Add PC" to manually connect the target PC by inputting its IP address or device name.

Step 3. Select apps, programs, and software and transfer to the target computer
1. You can pick and choose what you want to transfer from the current computer to the target PC.
2. To transfer desired applications and programs, select them and click "Transfer" to initiate the process.

- Tip
- Windows Easy Transfer is not available in Windows 11/10 and does not transfer programs from Windows 7 to Windows 11/10.
Video Tutorial: Transfer Everything to New Windows 11/10
Related Articles
- [Really Help] Move Adobe Acrobat to a New Computer
- Transferring and Migrating Microsoft Visual Studio 2010 Tools to a New PC
- How to Move Programs from HDD to SSD in Windows 11/10
- How to Transfer Twitter from One Account to Another
- Are There 1TB Free cloud storage Available? See What We've Found
We found some cost-effective cloud storage plans offering 1TB cloud storage, although we couldn't guarantee a provider with 1TB free cloud storage. Some plans offer 1TB storage for a lower cost, while others provide 5GB to 250GB free cloud storage with no preconditions. - Free PC Mover to Transfer Programs to New Computer Free Windows 11/10/8/7
You can download a free PC mover, specifically Qiling PC mover, to easily transfer programs and data from one computer to another, compatible with Windows 11/10, 8, 7, with just a few clicks.