Windows 11/10 Migration Assistant Download
If you're looking for a Windows 11/10 migration tool, Qiling software offers a solution with their Qiling Disk Master, a professional Windows 11/10 migration assistant that allows you to transfer data, including files and applications, along with settings from previous Windows 7/8/XP/Vista to the latest Windows 11/10 operating system.
How toDownload Qiling Windows 11/10 Migration Assistant Pro Version
Downloading the Windows 11/10 migration assistant is a simple process. To get started, just left-click the blue download icon, and the application will be downloaded in seconds. Give it a try!
Qiling Disk Master Is Trustworthy to Download
Qiling Disk Master was developed as a clean, safe, and easy-to-use data transfer assistant, ensuring trustworthy downloads with no bundled malware or unsolicited programs.
Qiling data transfer software offers an easy and automated method for Windows 11/10 data transfer, with a step-by-step interface for migrating user account settings and files, making it ideal for various scenarios.
- Upgrading from Windows 7, 8, XP, or Vista to Windows 11 or 10 on the same computer can be done by creating and restoring a backup file. This process allows users to transfer their existing operating system, settings, and applications to the new version of Windows, creating a seamless transition.
- You can transfer data from an old Windows PC to a new one by connecting them via a network and using the built-in "File and Settings Transfer Wizard" in Windows 7/8/XP/Vista, or by using a backup file created with the Windows Backup and Restore tool. Alternatively, you can use a USB drive to transfer data from the old PC to the new one.
Get the Qiling Windows 11/10 migration assistant for a quick and seamless download, and try it out with a free trial to see how it can help you with your migration needs.
PC to PC Transfer via the Connected Network
Run the Qiling Disk Master on two PCs, select "File sync", and connect the PCs by detecting each other or manually inputting the IP address. Once connected, you can choose specific data, folders, or applications to transfer between the two PCs.

Transfer via a Backup File
Step 1. Create a backup file.
1. Connect your USB flash drive or external hard drive to your source computer and launch Qiling Disk Master. From the main page, click on "Backup & Restore" to proceed.

2. Select location to move on.

3. To create a backup, hover over the "Applications", "Files" and "Accounts" columns to select the desired data, applications, etc., and then click "Proceed" to generate a backup file.

Step 2. Recover via the created backup file.
1. To restore a backup, plug your USB drive containing the backup file into the target PC and open Qiling Disk Master. Then, navigate to the "Backup & Restore" page.

2. To proceed, click the "Browse" button to select the Image file you want to use, then click "OK" to confirm your selection and move on to the next step.

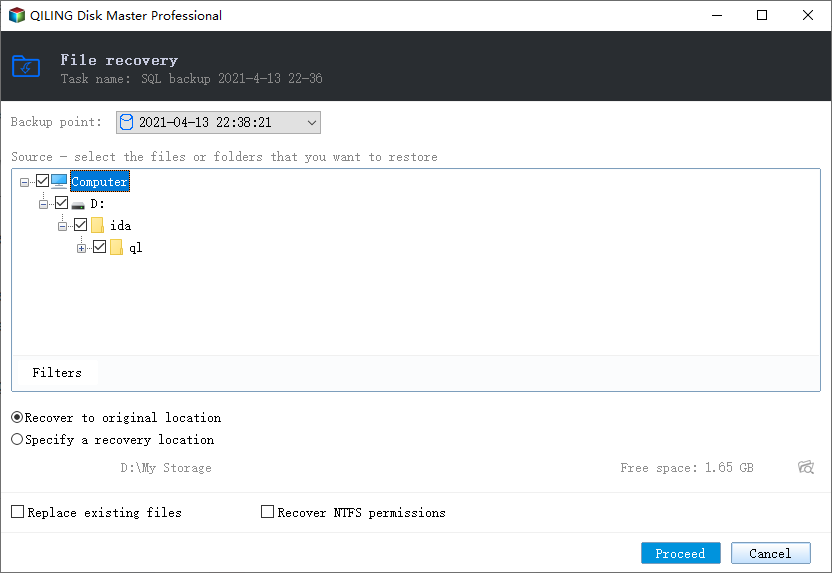
3. Now, you can select Applications/Files/Accounts you want to restore.
To transfer data, go to Applications, Files, or Accounts and select the specific data you want to transfer. Click "Proceed" to confirm. Alternatively, you can click the browse icon to change the target path to recover and save the files.
Video Tutorial: Transfer Everything to Windows 11/10
The video tutorial on transferring files and software to Windows 11/10 using Qiling Disk Master is a valuable resource for learning the process.
Related Articles
- Transferring Installed Programs from One Computer to Another Windows 11/10 - Here Is the Best Way
- Top 5 Free File Transfer Software & Best Free PC to PC File Transfer Software
- How to Share Files with Dropbox [Step-by-Step Guide]
- How to Move Tencent Games to Another Drive/PC
- How to Move World of Warcraft to Another Drive/Computer
If you need to transfer World of Warcraft to a new computer or move it to a different hard drive or solid-state drive (SSD) due to insufficient space, you can use Qiling Disk Master to migrate the application to a new location or computer at once. - How to Move Zoom to Another Drive in Windows 10
This article discuss ways in which you can move the Zoom application to another drive using the right tool without having to reinstall it all over.