Windows 11/10 Won't Boot? Try 6 Fixes and Protect Your Data!
"Got Windows 11/10 when first came out......Has worked fine up until 2 days ago. I rebooted computer it got the screen with the picture and time and stopped. Will not go any further. Nothing I do works. What can I do to fix the problem."
It's frustrating when your computer keeps crashing and won't boot, but fortunately, Windows 11/10 won't boot can be fixed with several solutions. None of your data will be lost, and we have listed some effective ways to solve this, including boot repair solutions, as well as a data migration tool to transfer your data to a safe place.
- 1 - Run Startup Repair to Repair Windows 11/10 Won't Boot
- 2 - Remove External Flash Drive and Disks
- 3 - Repair Windows Boot Record via Command Prompt
- 4 - Fix Windows 11/10 Won't Boot In Safe Mode
- 5 - Check Your Hardware Connection
- 6. Migrate Data to New PC and Reset Old PC
1 - Run Startup Repair to Repair Windows 11/10 Won't Boot
Step 1. Boot Windows from installation media.
To install Windows, you'll need to boot from the installation disk. This means inserting the disk into your computer and setting it to boot from the disk instead of the hard drive.
Step 2. Click "Repair your computer" to enter the Windows Recovery Environment.
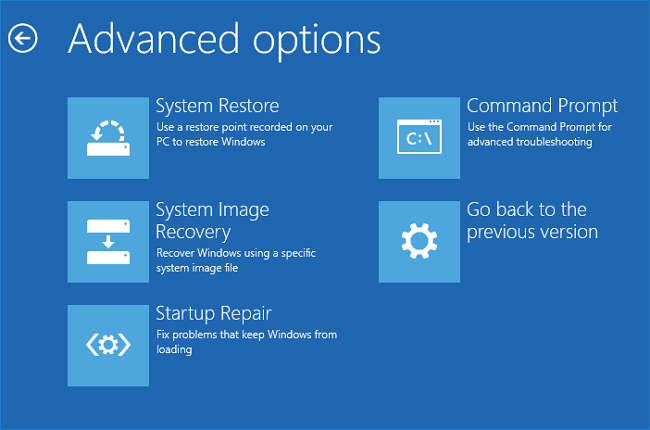
Step 3. Go to "Choose an option screen", click the "Troubleshoot" option.
Step 4. On the "Troubleshoot" screen, click the "Advanced options".
Step 5. Choose "Startup Repair" > Select the target OS to fix.
Step 6. Windows will start the repair and then restart your PC.
If you don't have installation media, you can turn on and off your computer at least three times to enter the "Automatic Repair" screen, then navigate to "Advanced options" > "Troubleshoot" > "Advanced options" > "Startup Repair".
2 - Remove External Flash Drive and Disks
To ensure a smooth Windows startup, it's recommended to remove any external storage devices such as USB flash drives or external hard drives before starting your computer. This prevents any conflicts or booting issues that may arise from the computer trying to boot from the external device. Simply disconnect the external devices, and your computer should boot normally.
3 - Repair Windows Boot Record via Command Prompt
If Windows fails to boot, the main reason is often a Master Boot Record (MBR) error, which can cause a boot issue. To resolve this, you can try running a command line on the recovery environment.
Step 1. The first step in installing an operating system is to insert the installation disk or bootable USB into the PC. Then, you need to boot the PC from this installation media.
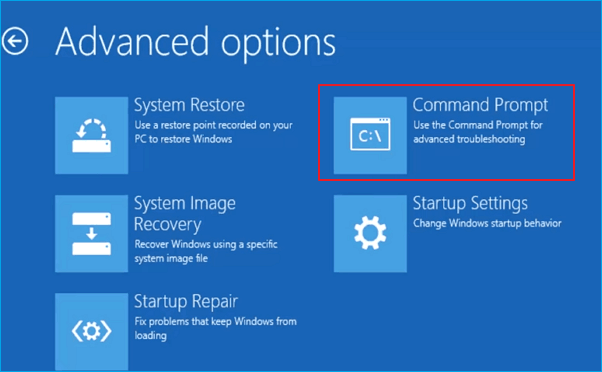
Step 2. Navigate to "Repair your computer" > "Troubleshoot" > "Advanced options" > "Command Prompt".
Step 3. Type the command lines and press Enter after each command line.
bootrec /fixmbr
bootrec /fixboot
bootrec /rebuildbcd
Step 4. Type Exit and restart your computer.
4 - Fix Windows 11/10 Won't Boot In Safe Mode
Safe mode can resolve issues within your operating system. If your Windows won't boot, you can access safe mode to boot from essential drivers and startup files.
Step 1. Restart your PC.
Step 2. To access the boot options, press the F8 key on your keyboard as soon as your computer starts booting up. This will bring up a menu where you can select the boot device or operating system you want to use.
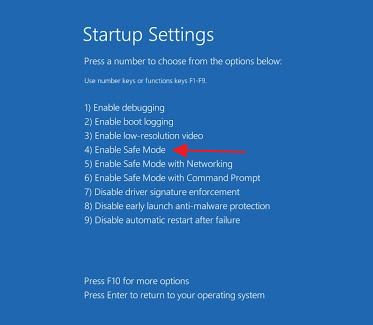
Step 3. Navigate to "Troubleshoot" > "Advanced options" > "Startup Settings" > "Restart".
Step 4. Press the 4 key to enable safe mode.
5 - Check Your Hardware Connection
If your Windows system fails to boot and displays a blank screen, ensure that all hardware components connected to the motherboard, such as the hard drive, RAM, and PCI-E card, are properly plugged in.
Hard drive: If your computer won't boot, check that the hard disk is properly connected to the PC. If it's not, unplug it, replug it, and ensure the SATA cable is securely connected.
PCI-E card: A PCI-Express device, such as a network card, modem, sound card, or video card, can be installed in a PCI-E slot to add functionality to a computer. This allows for the addition of GPUs, WiFi cards, RAID cards, and other peripherals. To ensure proper installation, verify that the device is securely connected to the slot.
RAM (Memory): If your laptop is experiencing a blank screen issue, try removing the memory stick and reinserting it to see if it resolves the problem, as a loose memory connection can sometimes cause this issue.
6. Migrate Data to New PC and Reset Old PC
If the solutions in this guide don't work, we recommend migrating all data to another computer and resetting your PC.
Process 1 - Rescue your data with Qiling Disk Master
The reset will remove all third-party programs and games, so it's best to rescue your data to another computer as soon as possible. Qiling Disk Master's "Data Rescue" feature can migrate applications, files, settings, and configurations from PC to PC.
- Notice:
-
3 tips to check if system files are damaged can be summarized as follows: Check if system files are damaged by running a system file checker, such as the System File Checker (SFC) tool, to scan and replace corrupted system files, check if system files are damaged by checking the Event Viewer logs for errors related to system files, and check if system files are damaged by running a disk check to identify and fix any disk errors that may be affecting system files.
- 1. The partition where the system is located has a drive letter assigned to it, which is used to identify and access the partition. This drive letter is typically a letter such as C:, D:, E:, etc.
- 2. The system partition's system and programs file is present and the directory is accessible.
- 3. The Registry is not damaged
How to Rescue Your Data with Qiling Disk Master:
Step 1. Take out the disk from the old PC.
- To safely shut down your laptop or any other device, first disconnect the power supply. If it's a laptop, also remove the battery. This ensures that there's no residual power that could cause any issues during the shutdown or maintenance process.
- Open the case to see the hard disk in the old PC.
- To disassemble the shell of a device and locate the hard disk, you can follow these steps: First, use a screwdriver to remove the screws that hold the shell in place. This will allow you to access the internal components of the device.
- Disconnect the hard disk and cable, then take out the hard disk.
Step 2. Connect the hard disk to the new PC.
Multiple connection methods:
- Use a USB hard disk drive enclosure to connect an old hard disk to a new PC via USB.
- A USB hard disk drive adapter is a device that connects a traditional hard disk drive to a modern computer's USB port, allowing the transfer of data from the old hard drive to the new one. It acts as a bridge between the two, much like a cable, with one end plugged into the hard disk and the other end plugged into the USB port on the new PC. This makes it easy to access and transfer files from the old hard drive to the new one.
- If the new PC is a desktop, the old disk can be connected as a secondary disk.
Step 3. Recover/Migrate the applications, files, accounts from the old disk.
1. Download and launch Qiling Disk Master. Choose "File sync" mode.
2. Click browse icon to select desination to save the data.

3. Check that your disk is connected to your PC, then select the old disk that you want to recover from.

4. Select the desired applications, files, and accounts you want to rescue.
5. Click the "Proceed" button and wait for a few seconds to complete the data transfer.
Process 2 - Reset your computer
Step 1. Boot from Windows 11/10 installation media.
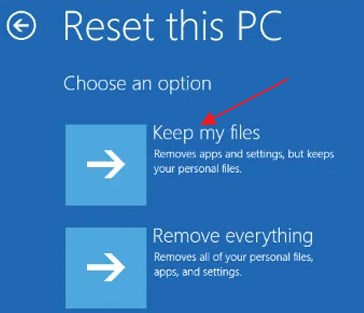
Step 2. Go to "Troubleshoot" > "Reset this PC" > "Keep my files".
Verdict
If Windows 11/10 won't boot, there are 6 solutions to try. The first three methods are commonly used, but if they're not available, you can use data transfer software to migrate files from the unbootable system, assuming the system is not damaged. If you have any questions or need further assistance, you can contact us via online chat or email at support@idiskhome.com.
Read also:
Related Articles
- Transfer Zoom App for Windows|Moving Zoom to New PC
- Fix 'Unable to Uninstall Program' in Windows Server 2012/2016/2019
- How Do I Transfer CCleaner to New Computer?
- How Do I Transfer Photos from Verizon Cloud to My phone
- [Easy and Fast] How to Put a Program on a Flash Drive
To put a program on a flash drive, Windows users can simply copy the program files to the flash drive using a tool like Qiling Disk Master, allowing them to run the program directly from the USB drive and save space on their computer. - For Beginner's: Put a Windows 11 PC to Sleep
To put a Windows 11 PC to sleep mode, you can use the Start menu, Command Prompt, or Powercfg command. You can also use the Power button on your keyboard or the Start menu to put your PC to sleep.