Windows Server 2016 Upgrade or Migrate to 2019/2022
This article covers in-To upgrade your server or migrate server data from an old PC to a new one, start by identifying your target: what do you want to achieve with the upgrade or migration? Are you looking to improve server performance, increase storage capacity, or enhance security? Once you've determined your target, you can choose the best approach: either upgrade the old server with new hardware and software, or migrate the data to a new server, which may involve using specialized software or services to ensure a smooth transition.
If you want to start an in-place upgrade from Windows Server 2016 to Server 2019 or 2022, and keep all existing apps and files, locate Part 1.
If you want to change old devices and plans to migrate applications, databases, domain accounts, user profiles from one server to another, see Part 2.
| Workable Solutions | Step-by-step Troubleshooting |
|---|---|
| Part 1. How to Upgrade Windows Server to 2019/2022 | Start Server setup > Click setup.exe...Full steps |
| To migrate Server 2016 to Server 2019 or 2022, follow these steps: | Download Qiling Disk Master > Click "Backup"...Full steps |
Should You Upgrade or Migrate to Windows Server 2019/2022?
Microsoft announced that Windows Server 2016 will continue to receive updates until January 12, 2027, while Windows Server 2019's end of life is set for January 9, 2029, with Windows Server 2022 being released in September 2021.
Although Windows Server 2016 is still widely used, we recommend upgrading to the latest version for enhanced security and improved performance.
Comparison of Windows Server 2016 vs. 2019
Windows Server 2019 updates the Storage Migration Service, adds Kubernetes platform support, introduces unified management, enables virtual network peering, enhances Windows Defender ATP, and more, whereas Windows Server 2016 removes features like iSNS, business scanning, remote desktop connection broker, remote desktop virtualization host, print components, and others.
Read Microsoft guide about editions comparison window server 2019.
Comparison of Windows Server 2019 vs. 2022
Server 2022 introduces four advanced security features, including Hypervisor-based code integrity, secured-core server, hardware-enforced stack protection, and Transport Layer Security (TLS 1.3) enablement.
The new version of Windows Server provides improved platform flexibility, a new Windows admin center, upgraded Hyper-V Manager, Hybrid Cloud Support, and Enhanced Kubernetes Experience.
Learn more: check editions comparison server 2022.
Part 1. How to Upgrade Windows Server to 2019/2022
A step-by-step guide to performing In-Place Server Upgrade:
Phase 1: Start Server setup.
Step 1. To start the installation process, go to the Windows Server 2019 setup media and click on the setup.exe file.
Step 2. Click Yes to Confirm the setup process.
Step 3. Select the "Download updates, drivers and optional features (recommended)" option and click "Next".

Step 4. Wait for setup to check the device configuration. When it finishes, select Next.
Step 5. You need to enter the Server license key to proceed. If you're unsure about where to find the Windows Server product key, you can refer to a guide on how to locate it.
Step 6. Select the wanted Windows Server 2019 image and then click "Next" to proceed.
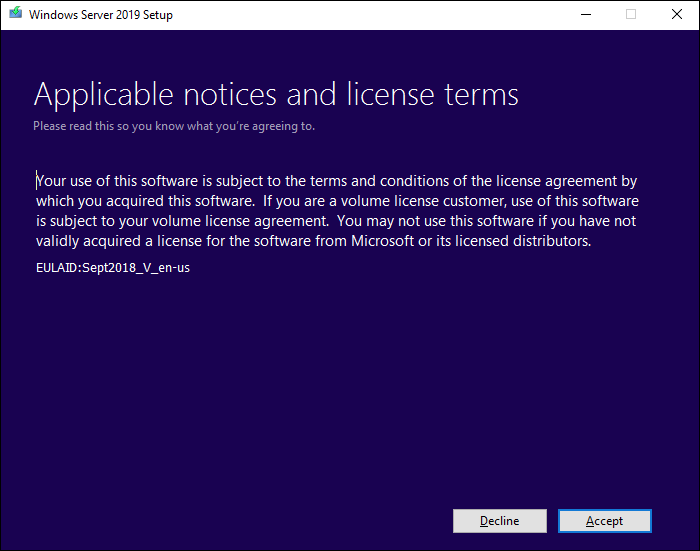
Step 7. Click "Accept" to agree with the Applicable notices and license terms.
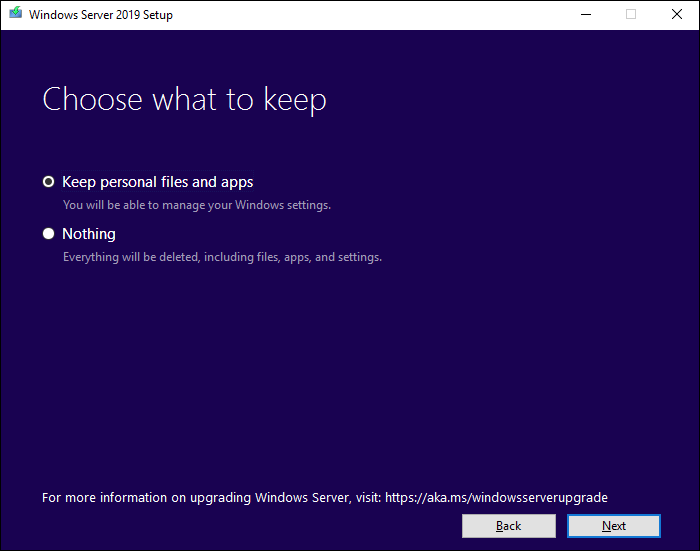
Step 8. Choose what to keep and click Next:
To keep your personal files and apps, choose the "Keep personal files and apps" option. This will allow you to retain access to your data.
"Nothing" will cause all data to be deleted, including files, apps, and settings.
Step 9. After analyzing finish, you can click "Install" to prompt.
Phrase 2: Check whether the system is successfully upgraded.
Type Registry Editor on the search box and click to open it:
Follow the path to see ProductName: Computer\HKEY_LOCAL_MACHINE\SOFTWARE\Microsoft\Windows NT\CurrentVersion
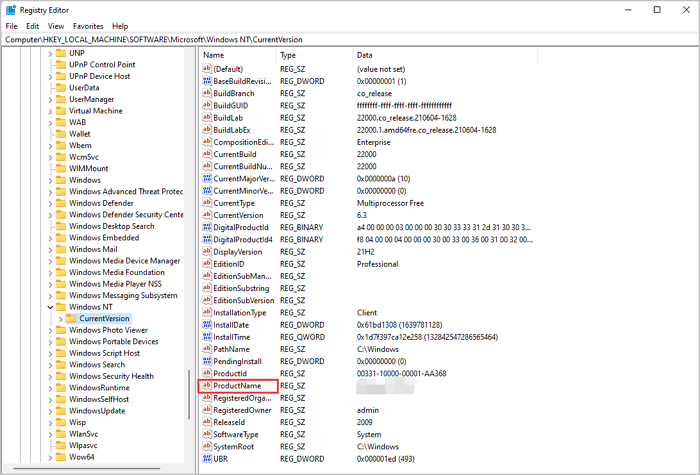
Your ProductName should be Windows Server 2019. It's essential to ensure all applications are running smoothly. If any apps or files are lost, Qiling Disk Master can help you create image files to keep everything safe.
If Windows Server is malfunctioning, navigate to the C:\Windows\Panther folder, compress the files into a zip, and reach out to Microsoft for assistance.
Part 2. How to Migrate Server 2016 to 2019 of 2022
If the in-For Server users, upgrading to a new PC can be a hassle, especially when it comes to transferring files and data, including user accounts and domain accounts, in a cost-effective and flexible manner.
You have the option to migrate all programs, files, and settings using the Windows Server migration tool. Alternatively, you can use the advanced Windows Server transfer utility, Qiling Disk Master Technician, which supports migration between various Server versions, including Server 2003, 2008, 2012, 2016, 2019, and 2022.
Qiling Disk Master Technician
- ☆ Deploy & install Qiling Disk Master on multipl
- Transfer unlimited files, programs, apps between Servers.
- Transfer account, domain account, and settings.
- Data rescue, find product key of installed programs.
- One license for multiple PCs.
If you're still unsure about using Qiling Disk Master, check out the video guide for more information. This advanced software is designed for Windows Server file and app transfers, and provides a comprehensive solution for your needs.
Steps about migrating to Windows Server 2019/2022:
Step 1. Launch Qiling Disk Master on your source and target computers, and connect both PCs via the internet.
1. To proceed, click on the "File sync" option within the "Backup and recovery" section.

2. Connect to a target computer via its device name, enter the account password or verification code, select the transfer direction, and click "Connect" to proceed.
You can check the verification code on the right top of the File sync main screen on the target computer.

Step 2. You can select the categories of data to transfer via the internet, such as Applications, Files, and Accounts, to synchronize them across devices.
To transfer data selectively, click "Edit" under each category and select the specific items you want to transfer.

Step 3. To transfer your apps/files/accounts from one computer to another via the Internet, click "Proceed" to start the process. This will initiate the transfer of your selected items, which may take some time depending on the size of the data and your internet connection.
Final Thoughts
Upgrading Windows Server 2016 to 2019 or 2022 can be done using the built-in Windows method, but it's essential to make a backup image using Qiling Disk Master to protect your data, as in-place upgrades can sometimes go wrong and result in data loss.
Data transfer is also the client's purpose, making it possible to enjoy direct migration to Server 2019 or 2022.
Related Articles
- How to Transfer Files from iCloud to OneDrive [Full Guide]
- How to Transfer Photos from Google Photos to Gallery? Follow the Guide!
- How Do I Transfer CCleaner to New Computer?
- 6 Ways to Transfer Large Files from PC to PC (Guaranteed)
- How Do I Transfer Files from Google Drive to OneDrive [Ultimate Guide]
Download the files from Google Drive to your local hard drive and upload them to OneDrive. Use Google Takeout and share feature to transfer files from google drive to OneDrive. - How to Transfer Files from Laptop to Laptop Using Bluetooth on Windows 10
To transfer files from PC to PC using Bluetooth on Windows 10, follow the step-by-step guides provided. Alternatively, you can also use PC data transfer software to transfer files from one laptop to another.