How Do I Fix External Hard Drive Not Showing Up on Mac (Big Sur)? Here Is The Guide
External hard drives are a crucial storage device for both Windows and macOS users, but they can experience issues, causing inconvenience and data loss.
If your external hard drive isn't showing up on your Mac, don't worry, this guide has got you covered. You'll learn how to fix the issue and access all your external disk files on Mac successfully.
Error - External Hard Drive Not Showing Up on Mac (Big Sur)
The error occurs when a Mac user connects an external hard drive, but it fails to appear on the computer. This is often due to the drive not being recognized by the Mac.
Symptoms:
- The external drive is not showing up on the Mac computer, and the saved content is inaccessible. This could be due to a variety of reasons, such as the drive not being properly connected, a software issue, or a problem with the drive itself. To troubleshoot, try restarting the Mac, checking the drive's connection, and ensuring that the drive is formatted for Mac compatibility.
- External hard drive not showing up in Mac disk utility
- External hard drive not showing up in Mac terminal
- External hard drive won't mount on Mac
Why is that? Let's find out the reasons. If you are having a similar issue on Windows computers, follow this link for help:
External Hard Drive Not Showing Up in Windows 10.
Causes - Why Is My External Hard Drive Not Showing Up on Mac
Many people have the same doubt about their external hard drive not being detected or recognized on Mac, which can be caused by various reasons. The external hard drive might not be properly connected, the USB port on the Mac might be faulty, or the hard drive itself might be damaged. The Mac's operating system might also be outdated or incompatible with the external hard drive, or there might be a software issue that needs to be resolved.
- Problematic connection - USB port or USB cable were broken, power supply issue.
- External disk partition issues can be frustrating, such as losing a partition or having it become raw. This can happen due to various reasons like disk corruption, power failures, or software glitches.
- Mac computer USB drive drivers are outdated.
- The external hard drive file system is not supported by Mac, which means that Mac cannot read or write data to the external hard drive. This is because the external hard drive uses a file system that is not compatible with Mac, such as NTFS or HFS+.
- The external hard drive is unmounted or not mounted on Mac.
If your external hard drive isn't showing up on your Mac, try checking the USB port, restarting your Mac, or using the Disk Utility to verify the drive's presence. You can also try reformatting the drive in a different file system, such as APFS or HFS+, to see if that resolves the issue. If none of these steps work, you may want to try using a different USB port or cable, or even resetting the System Management Controller (SMC) on your Mac.
How Do I Get My External Hard Drive to Show Up on Mac? Fixes Are Here!
If your external hard drive is not functioning, check if it's physically damaged or broken. If it is, send it back to the manufacturer or a local repair center for repair.
5 methods can help you fix the external hard drive not showing up on Mac error, including checking the drive, restarting the Mac, updating Mac, checking disk permissions, and using Disk Utility.
Method 1. Check Connection Cable, USB Port, and Power Supply
Step 1. Make sure the Mac computer is properly connected to a stable power source, checking the power cable for any issues.
Step 2. Check if the external hard drive USB connection cable
- If your external hard drive isn't showing up on your Mac, try unplugging the cable and then plugging it back in tightly to see if that resolves the issue. This simple step can sometimes resolve connectivity problems and get your drive recognized by your Mac again. If the issue persists, there may be other factors at play, but this is a good first step to try.
- Check if the cable is damaged or broken, and if so, replace it with a new one and reconnect it to your Mac.
Step 3.To change a USB port and reconnect the external hard drive to a Mac computer, first, locate the USB port on the Mac that you want to use. Then, plug the external hard drive into the new USB port.
Step 4. If the external hard drive is not showing up on the computer it's connected to, try connecting it to another computer to see if it appears. This can help determine if the issue is with the drive itself or the computer it's connected to.
If you tried all these steps and the external hard drive shows up, you may stop here. If the problem still exists, continue trying the fixes below one by one. You'll make the external hard drive showing up on Mac again.
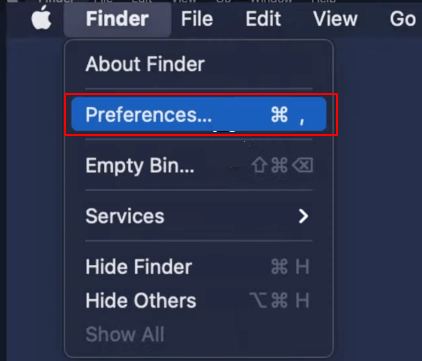
Method 2. Change Preferences Settings in Finder
Step 1. Open Finder > Click "Preferences..." on the menu bar.
Step 2. Go to the General Tab, and check "External disks".
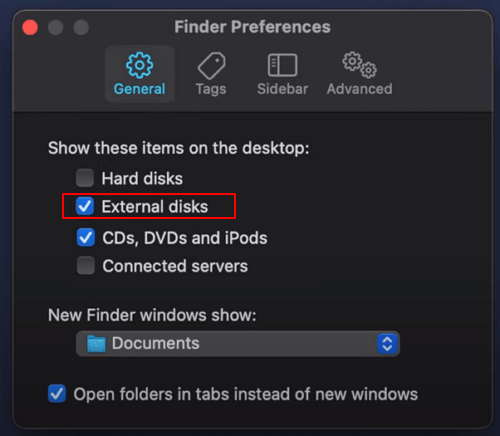
Step 3. You can see the external hard drive on your Mac's desktop after closing the Preferences settings.
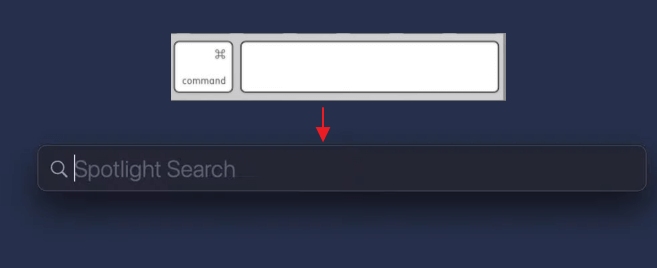
Method 3. Mount External Hard Drive on Mac Using Disk Utility
Step 1.To quickly search your Mac, press the Command key + Space bar to bring up the Spotlight Search menu.
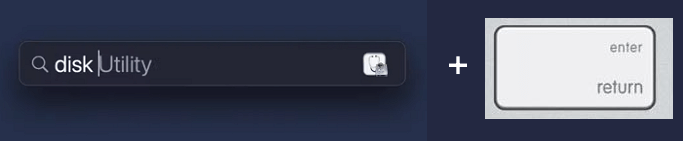
Step 2. Type disk utility and press the Return key.
Step 3. To access the external hard drive, click on it in the left menu, then click the "Mount" option on the right top menu.
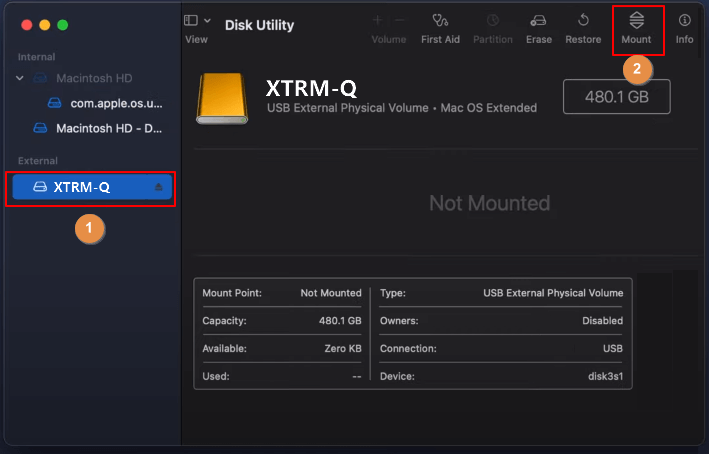
The external hard drive will automatically show up on the desktop later.
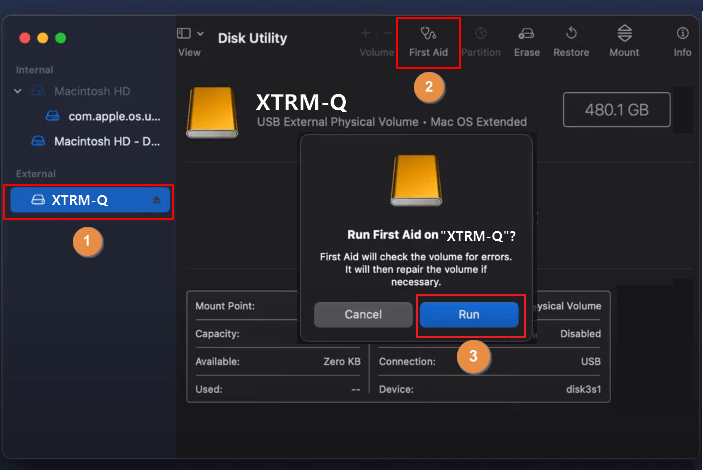
Method 4. Run First Aid on An External Hard Drive in Disk Utility
Step 1. Launch Disk Utility in the same way as shown above.
Step 2. The external hard drive that is not showing up on Mac should be selected and then the "First Aid" option should be clicked.
Click "Run" and wait for the process to complete.
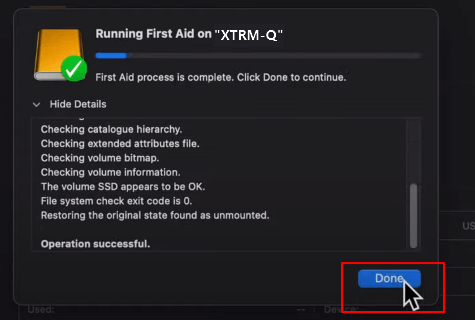
Step 3. Click "Done" and close the Disk Utility.
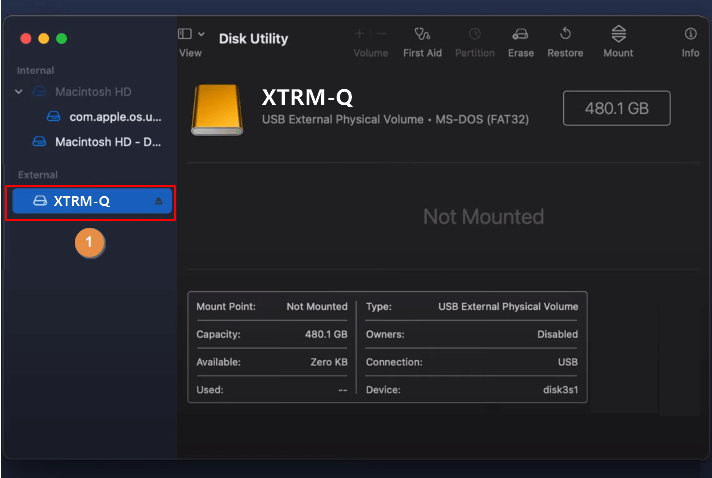
If the external hard drive doesn't show as unmounted, try mounting it again.
If the external hard drive shows up on the desktop, you can proceed with the next step. If not, check the USB cable connection and ensure it's securely plugged into both the external hard drive and the computer.
Method 5. Reformat External Hard Drive to A Mac-Supported File System
Be aware that formatting the external disk will erase all data on it. Before proceeding, retrieve your files using the data recovery tip provided below. This will ensure that your important files are safely recovered.
If an external hard drive is not showing up on a Mac, it may be due to an unsupported file system. To resolve this, you can check the drive's file system and reformat it to a Mac-compatible format such as APFS or HFS+.
Step 1. Open Disk Utility with steps as shown above.
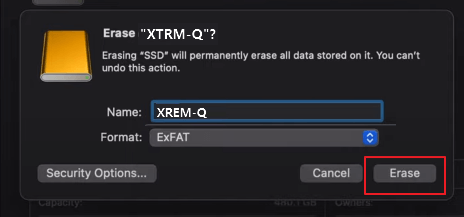
Step 2.To erase the external hard drive, select it from the left menu and click "Erase" on the top menu.
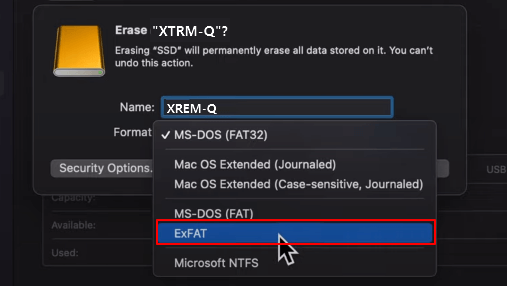
Step 3. Choose either APFS for Mac only or ExFAT for cross-platform use with Mac and Windows computers.
Step 4. Click "Erase" to complete the format.
Once the process is complete, the external hard drive icon will appear on the desktop.
So, these are the all solutions that work to fix the external hard drive not showing up on Mac issue. You can apply this to fix the same error on all brands of external hard drives and internal hard drives.
You May Also Like:
External Hard Drive Read Only on Mac
Bonus: How to Recover Data from External Hard Drive on Mac
Some users may encounter an issue where their external hard drive becomes inaccessible or they lose some useful files on the disk due to formatting or other reasons.
You can recover data from an external hard disk on Mac using reliable Mac data recovery software, such as Deep Data Recovery for Mac.
Step 1. Connect your external hard drive to your Mac, then launch Deep Data Recovery for Mac, select the desired file types and click "Next" to initiate the recovery process.

Step 2. Select the external disk and click "Scan" to let the software search lost files on it.

Step 3. After a quick scan and deep scan, all files found will be listed in the left panel in the scan results.

Step 4. Select the files you want to recover and click the "Recover" button. To avoid data overwriting, do not save the recoverable files to the external hard drive.
Bonus Tip: Keep External Hard Drive Showing Up/Detectable on Mac All The Time
To ensure your external hard drive is always detectable on your Mac, follow these steps:
Here are some tips that you can follow:
- Connect the external hard drive to Mac correctly.
- Enable external hard drive in Preference settings.
- Mount it on Mac.
- Set a supported file system to the external hard drive.
- Run antivirus regularly.
External Hard Drive Not Showing Up Error Is Fixable on Mac, Make Your Drive Work Now
When you experience an external hard drive, USB flash drive, or SD card not showing up error on your Mac, remain calm and follow these steps to troubleshoot the issue. Firstly, ensure that the drive is properly connected to the Mac and that the USB port is not damaged.
If you're having trouble accessing your external hard drive on Mac, follow the solutions on this page to fix the issue on your own. If you've lost files on the external hard drive, you can use Qiling Mac file recovery software to recover your data.
Related Articles
- How to Fix Excel File Open But Not Visible on Mac
- Mac Cache Recovery: How to Recover Deleted Cache Files on Mac
- Does Reinstalling macOS in Recovery Mode Delete Everything on Mac
- [Solved] Apricorn USB 3.0 External Hard Drive Not Recognized
Is your Apricorn USB 3.0 external hard drive not recognized in Windows 11/10/8/7? This page covers 7+ fixes for you to try and fix Apricorn USB 3.0 not recognized issue and make it detected again without losing any data. - How to Mount ISO File in Windows 10/11
You can access and mount the contents of an ISO image in several ways. In this guide, you'll learn to mount ISO images on Windows 10. A reliable file recovery tool is provided to help you restore ISO files if necessary. - MS SQL Recovery Software to Recover MDF/NDF File
MDF or NDF files can become deleted, damaged, or inaccessible due to various issues like hardware problems, SQL Server bugs, OS malfunctions, sudden system shutdowns, or virus attacks. In such cases, Qiling MS SQL Recovery can be a helpful tool to recover the MDF or NDF file with ease.