Fix External Hard Drive 'Read Only' Error on Mac Without Losing Data
Here are 3 reliable solutions to remove the 'read-only' error from your Mac external hard drive, making it readable again: you can try to reset the disk permissions, check the disk for errors, or reformat the external hard drive. These methods can help you access your device without losing any data.
| Workable Solutions | Step-by-step Troubleshooting |
|---|---|
| Fix 1. Reformat External Hard Drive | Open "Applications" > "Utilities" > Launch "Disk Utility" to "Erase" external drive > Restore formatted data...Full steps |
| Fix 2. Ignore Permissions | Right-click external drive > "Get Info" > "Sharing & Permissions" > Check "Ignore ownership on..."...Full steps |
| Fix 3. Repair Drive Errors | Open Disk Utility > Select the external hard drive and click "First Aid" > Click "Run"...Full steps |
The External Hard Drive Shows Up as 'Read Only' on Mac, Help!
"Hi there, do you know how to make the externalhard drive accessible again when it shows as 'Read Only' on Mac? I'm having this problem that my Seagate hard drive suddenly turned to read-only this morning when I connected it to Mac. I could only read and view saved data on the drive, but can't use the data on it. If you have any clue to fix this problem, please tell me. Thanks very much."
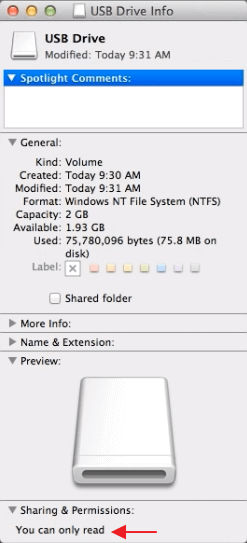
If your external storage device shows up as "Read Only" on your Mac, you can resolve the issue by clicking on it, selecting "Get Info," and checking if the phrase "You can only read" appears at the bottom. This is a common problem with external hard drives and other storage devices, but don't worry, there are steps you can take to fix it.
- Open the drive and view the files
- copy files from the external storage drive
You can't:
- Copy files to the device
- Delete files from the external drive
Why Is Your External Hard Drive Read-Only on Mac
You can only read the external hard drive connected to your Mac because of three possible reasons. Firstly, the external hard drive may be formatted in a file system that your Mac can't read, such as NTFS. Secondly, the permissions on the external hard drive may be set to only allow reading, not writing.
The File System Is NTFS
If you're having trouble writing to an external hard drive on your Mac, it's likely because the drive is formatted in NTFS, a file system that's optimized for Windows-based computers. While macOS can read files on an NTFS drive, it can't write to it because the way NTFS writes data is incompatible with how macOS handles it. To resolve this, you'll need to reformat the drive to a file system that's compatible with macOS, such as APFS or HFS+. This will allow you to write files to the drive, but it will erase all existing data, so be sure to back up any important files before reformatting.
The Permission Settings Is Not Ignored
External hard drives are subject to the access permission set up by OS X for all files and folders on the system, which may not be recognized or prevent access to the files on the hard disk when used on another computer with a different OS.
The Hard Drive has Formatting Errors
The external hard drive 'Read Only' problem on Mac may be caused by formatting errors on the storage device itself, resulting in a warning that the device is only being mounted in read-only mode, preventing files from being written to it.
To resolve the 'Read Only' error on your Mac, identify the cause: if the issue occurs when trying to save changes to a file, check if the file is locked or in use by another process. If the issue occurs when trying to install software, check if the disk is full or the installation process is being blocked by a firewall or antivirus software.
How Can You Solve the External Hard Drive 'Read-only' Problem on Your Mac
There are three potential solutions to the problem, each with its own reasoning behind it.
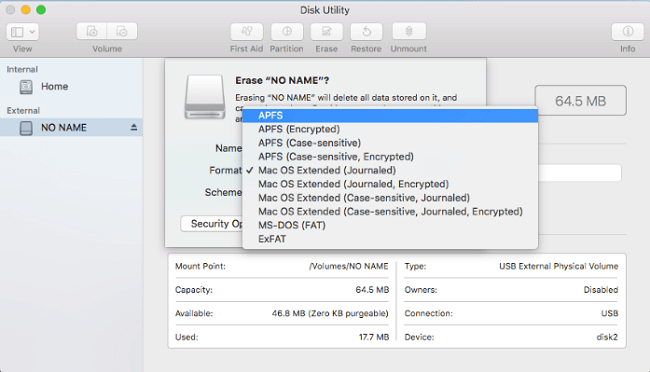
Fix 1: Reformat the External Hard Drive
If your external hard drive is read-only on your Mac due to its NTFS file system, you can fix it by reformatting the device to a Mac-compatible format with Mac Disk Utility after backing up its files.
Step 1:Launch "Disk Utility".
- Head to "Applications" > "Utilities".
- Or tap "Command + Space" and type Disk Utility.
Step 2:Select the problematic external hard drive from the list of available drives on the left, and then click the "Erase" option in the main window.
Step 3:To ensure compatibility between Mac and PC, choose a file system like MS-DOS (FAT) or ExFAT for your external hard drive, rather than APFS or Mac OS Extended, which are Mac-exclusive.
Step 4:Click Erase to reformatting your external hard drive.
Wait for the reformatting process to complete. Then, go to the information window, where you'll see the "You can only read" status has changed to "You can read and write", indicating you can now read and write the drive on your Mac normally.
If a storage device appears as read-only, you can still copy files from it. If you can't view all saved data on the drive, don't worry, as you can recover it after formatting. You can use professional Mac hard drive recovery software, such as Deep Data Recovery for Mac, to retrieve your lost data with simple steps.
Step 1. Select file types that you want to recover

Step 2. Select the disk location where the data was lost and click the "Scan" button to begin the recovery process.

Step 3. Deep Data Recovery for Mac will immediately scan your selected disk volume and display the scanning results on the left pane.

Step 4. To recover deleted files, select the desired file(s) from the scan results and click the "Recover" button. This will restore the files to their original location.
Direct Access and Open Read-Only NTFS External Hard Disk on Mac
To resolve the "NTFS external hard drive read-only on Mac" issue, you can use a reliable NTFS for Mac driver software, such as Qiling NTFS for Mac, which allows you to configure an NTFS drive as readable and writable on Mac with just a few simple steps.
Here is how to make your read-only external NTFS drive readable, writable, and accessible on Mac:
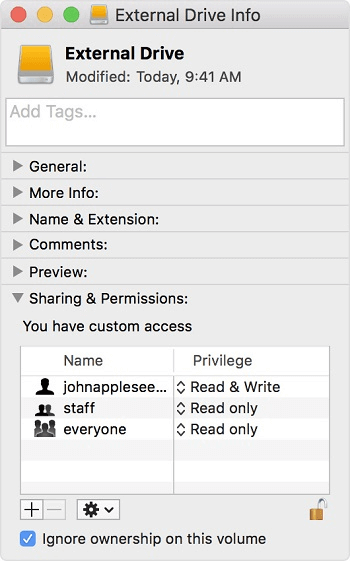
Fix 2: Ignore Permissions
If you're experiencing issues with a 'Read Only' external hard drive on your Mac, you may need to adjust the permissions settings to resolve the problem. To do this, you can try ignoring the permissions, which may allow you to access the drive as needed.
Step 1:Right-click your external hard drive shown on your Mac and select "Get Info".
Step 2:To share and set permissions for a Google Doc, first expand the "Sharing & Permissions" section, which can be found on the right-hand side of the document. Then, click on the lock icon to authenticate your Google account.
Step 3:Check "Ignore ownership on this volume".
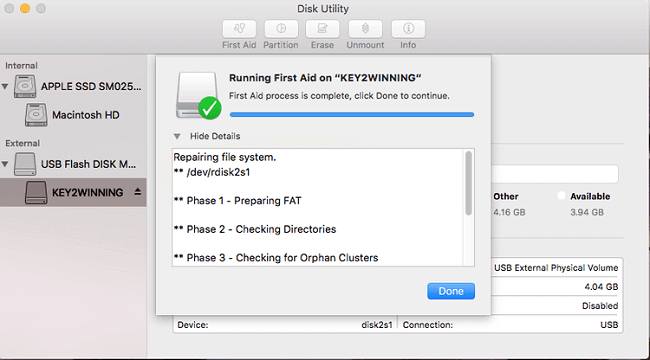
Fix 3: Check and Repair Hard Drive errors
If you have a formatting error on your external hard drive that makes it read-only, you can use Disk Utility to check for errors and repair the external storage device.
Step 1: Go to "Disk Utility".
- Head to "Applications" > "Utilities".
- Or tap "Command + Space" and type Disk Utility.
Step 2:To repair the external hard drive, first highlight it, then click 'First Aid' in the top center, and finally click "Run".
Related Articles
- How to Undelete Data on Mac OS X
- How Do I Fix Permission Denied on Mac
- How to Recover a Replaced File on Mac
- [macOS Guide] | How to Reinstall macOS
- How to Recover CDR Files on Windows PC and Mac
If you deleted or lost CDR files, then read the step-by-step guide for how to recover CDR files in Windows PC and Mac. - 3 Ways to Recover Chrome Browsing History
How to restore deleted or cleared browsing history from Chrome, Firefox, etc. Here are 3 ways to guide for how to recover deleted history on Chrome or how to restore Chrome history.