How Do I Fix Permission Denied on Mac
The Mac OS X operating system, based on Unix, allows Mac computers to run various files and execute terminal commands. However, when the "permission denied" error appears, it's often due to terminal commands being sent. This issue can arise from elementary and common reasons, but a comprehensive guide is available on this page to resolve the problem. To gain access to inaccessible files and folders, follow the steps outlined below.
| Workable Solutions | Step-by-step Troubleshooting |
|---|---|
| 1. Fix Permission Denied on Mac |
Method 1. Gain permission for files...Full steps Method 2. Check your permissions...Full steps Method 3. Change the ownership of...Full steps Method 4. Use sudocommands...Full steps Method 5. Assign permission for third...Full steps |
|
2. Restore Inaccessible Files on Mac |
Select the disk location (it can be an...Full steps |
Error: Permission Denied on Mac
If anyone faces a permission device error, they might see many different types of messages appear on the screen, but the meaning is the same, indicating a problem with accessing or using a device or system due to insufficient permissions. Examples include "Permission denied", "Access denied", "Insufficient permissions", and "Device not permitted".
1. The permission denied error on a Mac is likely due to the file or folder being locked, either because the user lacks administrator privileges or the file was created with lock permissions.
2. When adding a command in the terminal on a Mac, you may encounter a "permission denied" error. This issue can prevent you from opening files or directories mentioned in the command, causing various problems.
3. The "App permission denied" error occurs when the "Don't Allow" option is chosen, leading to a rejection of the application's feature-related request. This issue is commonly experienced with apps that require access to the camera, microphone, or file saving capabilities, as well as those that attempt to share the screen with others.
Method 1. Gain Permission for Files, Folders, or Disks on Mac
There is a permission setting available on the Mac computer that allows users to assign permission to all files and folders, which can be viewed and altered, and can be changed according to the requirement. This can be done by reaching the info window, where users can gain permission for files, folders, or disks on Mac.
Step 1.The command `getfattr` is used to get the extended attributes of a file or a folder. It can be used with the option `-n` to specify the name of the attribute to retrieve, or without it to get all attributes.
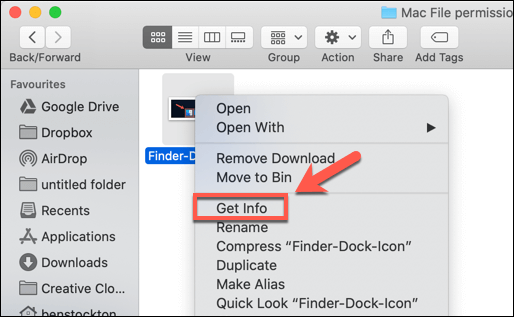
Step 2. If the selected permission is not visible in the info, click on the arrow symbol.
Step 3. After clicking the lock symbol, the user will enter the admin password and username to unlock it. Once unlocked, they will see the assigned permissions for the specific file and folder.
Step 4.To access the privilege option, click on the name column and select the privilege option from the menu.
- Read and Write
- Read Only
- Write Only
- No Access
Method 2. Check Your Permissions
As explained earlier, one possible reason you might see the permission denied error is that you don't have file access permissions. Follow the steps below to check your permissions.
Step 1. Launch the Terminal in the Mac from the utilities.
Step 2. You typed the command "ls -l" without hitting the Enter button. This command is used in Linux or Unix systems to list the contents of the current directory in a long format, showing detailed information about each file or directory, including permissions, ownership, and size. The "ls" part of the command stands for "list" and the "-l" option is used to specify the long format output. However, since you didn't hit the Enter button, the command is not executed and the system is waiting for further input.
Step 3. Drag the file or the folder into the terminal window.
Step 4. Now, hit Enter Button. Specific permission that is accessible to the current user will be visible on the screen.
Method 3. Change the Ownership of the Directory
To change the ownership of a specific file or folder, open the Terminal and enter the command `chown [username]:[groupname] [path/to/file/folder]`. Replace `[username]` and `[groupname]` with the actual username and groupname you want to assign, and `[path/to/file/folder]` with the actual path to the file or folder you want to modify. For example, to change the ownership of a file named `example.
Chown -R $USER:$USER /path/to/directory
* Change /path/to/directory with the path to where you want to write to.
Method 4. Use Sudo Commands
To run a command with administrator privileges, you can add "sudo" to the beginning of the command. This allows you to execute the command with elevated permissions for a short period of time, typically around five minutes. If you need to run a command repeatedly and keep getting denied, adding "sudo" to the beginning of the command can help you bypass the permission issues.
For example:
- sudo chmod 755 /dvtcolorconvert.rb
- sudo chmod 755 ~/Themes/ObsidianCode.xccolortheme
Method 5. Assign Permission for Third-Party Apps
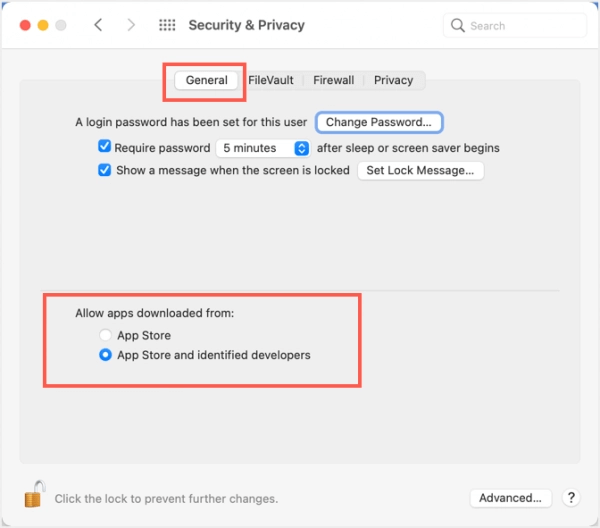
In most cases, the Mac will issue a notification to remind users to pass all permissions when installing the application. In some rare occasions, you need to give permissions to third-party apps on your own. Here are the detailed steps:
Step 1. To access and change the general security settings, go to the Security & privacy section, then click on the General tab.
Step 2. To access the editing screen, enter your administrator username and password.
Step 3. To select the radio buttons that are showing App Store and identified developers, you would click on the radio buttons next to the corresponding options, which would highlight them as selected. This would allow you to mark or choose those specific options.
Step 4. Click on the Lock Button and save the changed settings.
Bonus Tip: Restore Inaccessible Files on Mac
Another method you can try is to apply third-party data recovery software, which can scan and search deeply in your computer's disk, and find all the lost data, including deleted, hidden, or turned to RAW files.
Deep Data Recovery for Mac is a reliable tool that can help restore lost, invisible, or inaccessible files and folders. While it may not be able to fix all types of denied errors, it is an option worth trying after exhausting all other possible methods.
Download Deep Data Recovery for Mac now, and follow the steps below to find your lost or inaccessible files.
Step 1. Select file types. Click the "Next" button.

Step 2. Select the disk location where you lost data and click the "Scan" button to start the recovery process.

Step 3. Deep Data Recovery for Mac will immediately scan your selected disk volume and display the scanning results on the left pane.

Step 4. To recover the files, select them from the scan results and click the "Recover" button. This will restore the files.
Conclusion
To fix the "permission denied" error on Mac, follow the methods one by one, which should solve the problem. If not, you can try Deep Data Recovery for Mac to scan and restore inaccessible files. If that also fails, it's a good option for recovering lost data from the emptied Trash bin or unsaved Word documents.
Related Articles
- macOS Recovery - What Can Recovery Mode Do when macOS Breakdown?
- How to Recover Deleted Files After Emptying Trash Bin on Mac
- Operations You Should Know when Switching from Windows to Mac
- [macOS Guideline] How to Enter Mac Internet Recovery Mode
- 3 Ways to Fix Invalid B-tree Node Size Error and Recover Data
If you're experiencing an invalid b-tree node size error on your Mac's hard drive, there are a few potential fixes. - Kik Shows Notification but No Message iPhone [Solved]
Does Kik show notifications but no message on your iPhone? This issue can be resolved. This article will solve kik shows notification but no message iOS 15 issue. Follow the solutions or download Qiling MobiSaver now!