macOS Recovery - What Can Recovery Mode Do when macOS Breakdown?
Quick Navigation:
| Workable Solutions | Step-by-step Troubleshooting |
|---|---|
| 1. Reinstall OS under Recovery Mode |
After booting into the recovery mode, choose...Full steps |
|
2. Prevent Data Loss |
Method 1. Create a backup with Time Machine...Full steps Method 2. Create an emergency disk of your...Full steps |
What Is macOS Recovery?
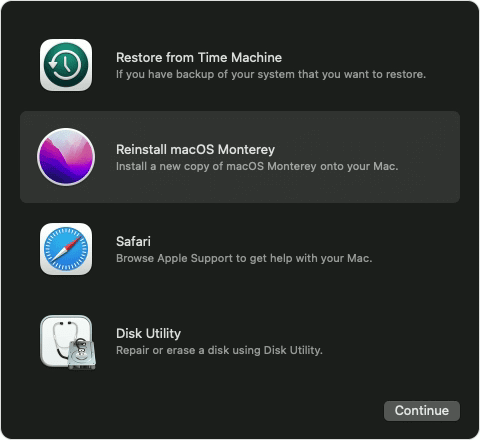
macOS Recovery is the Recovery Mode in macOS, allowing users to perform various operations on their Mac system, including restoring from Time Machine backups, reinstalling macOS, accessing online help, and repairing or erasing a disk using Disk Utility.
Reinstalling macOS and erasing the disk should be applied with caution, as it will result in the permanent loss of all data on the disk. This option should only be used as a last resort, and is the ultimate method for troubleshooting issues when using Recovery Mode.
If you're experiencing issues booting into Mac Recovery Mode, you can try entering Mac Internet Recovery Mode instead. The following sections will guide you through the process of booting into Mac Recovery Mode and reinstalling macOS. However, if you encounter problems with Recovery Mode, you can use Mac Internet Recovery Mode as an alternative.
How to Boot Into Mac Recovery Mode?
The process for entering recovery mode on Mac computers differs depending on whether it uses an Intel chip or the M1 chip. For Intel-based Macs, you can enter recovery mode by restarting the computer and immediately holding down the 'Command + R' keys. For Macs with the M1 chip, you can enter recovery mode by restarting the computer and immediately holding down the 'Power' button until the startup options appear, then select 'Options' and click on 'Continue'.
For Intel Macs:
Step 1. Restart your Mac.
Step 2. To reset your Mac, press the Command (⌘) and R keys at the same time until you see an Apple logo or a spinning globe appear on the screen. This will initiate the recovery mode, allowing you to access the Utilities menu and perform a system restore or other maintenance tasks.
Step 3. Choose from the Recovery Mode utility options.
For M1 Macs:
Step 1. Turn off your Mac.
Step 2. Press and hold the Power button.
Step 3. A message stating you'll be able to access startup options soon will appear. Keep holding the button down.
Step 4. Click Options > Continue to open up Recovery.
If your Mac won't boot into Recovery Mode, try the following fixes. Restart your Mac and immediately hold down the Command (⌘) + R keys to boot into Recovery Mode.
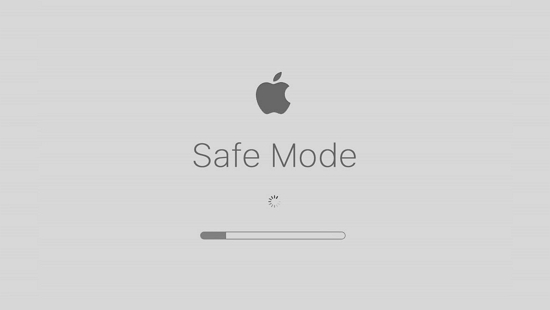
If you're unable to boot into Mac recovery mode due to the Command R not working, you can try booting your Mac in safe mode, then restart and hold the Shift key to enter safe mode again. If that doesn't work, you can try booting from an external drive or a USB drive with the macOS installer. If none of these methods work, you may need to reset the System Management Controller (SMC) and the Power Management Unit (PMU) on your Mac, or seek professional help from an Apple Support Specialist.
How to Reinstall OS under Recovery Mode?
To reinstall macOS, follow these steps. You can usually do this without losing data, but if your Mac is severely damaged and needs to be erased, you'll lose all existing data. Make sure to back up your Mac before proceeding, as this method will erase all content. The process involves booting from the Recovery Mode, selecting the language and keyboard layout, and choosing the option to reinstall macOS. This will erase the startup disk and install a fresh copy of the operating system.
Step 1. After booting into the Recovery Mode, choose Reinstall macOS (your OS version name), and click Continue.
Step 2. Follow the on-screen guide to finishing the reinstalling process.
Step 3. Please follow the below guides to handle the pop-up messages during the re-installation.
- The installer asks to unlock your disk, enter your Mac login password.
- If the installer can't see your disk or can't install it on your computer, erase your disk with Disk Utility first.
- If the installer offers you two choices: installing on Macintosh HD or Macintosh HD - Data, choose the former one.
During the installation process, your Mac may restart multiple times, displaying a progress bar or a black screen. It's essential to refrain from closing your Mac during this time to ensure the installation completes successfully.
Bonus Tip: How to Prevent Data Loss after Reinstalling macOS
When reinstalling macOS, users may need to erase their disk, risking data loss if there's no backup. To avoid this, there are two methods that can help recover data after reinstalling macOS and prevent data loss.
Method 1. Create a Backup with Time Machine
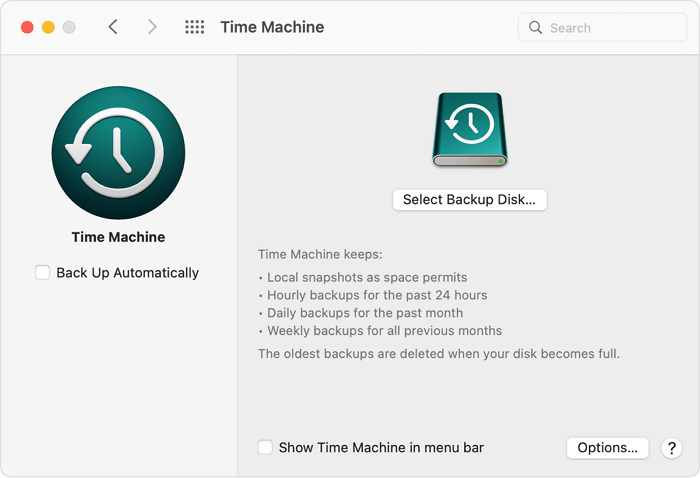
Time Machine is a built-in macOS backup utility that allows users to back up their personal data, including apps, music, photos, email, and documents. Once set up, Time Machine will automatically back up the chosen content to an external storage device, which users must prepare beforehand.
Step 1. Connect your external hard drive to your Mac, then go to System Preferences, click on Time Machine.
Step 2. To start the backup process, click the "Select Backup Disk" option and choose your prepared drive.
Step 3. To confirm, click "Use Disk" and the Time Machine will start making periodic backups automatically.
*This section briefly explains the macOS Recovery feature.
Method 2. Create an Emergency Disk of Your Mac
You can also try creating an emergency disk using a USB drive, which can be used to recover data if your Mac is not functioning properly. To create this disk, you can use a third-party tool like Deep Data Recovery for Mac.
Deep Data Recovery for Mac is a data recovery software designed specifically for Mac users. Its primary purpose is to help users recover lost data that cannot be retrieved using built-in methods, making it a useful tool for recovering permanently deleted files on a Mac.
Besides data recovery, Deep Data Recovery for Mac also allows you to create a bootable USB drive. To do this, you'll need an empty USB drive, which you can use to create a backup of your system. After launching the software, follow the guide to create a bootable USB drive, which can be a useful tool in case of system crashes or other issues.
How to Create a USB Bootable Media
Step 1.To create a bootable USB drive for Deep Data Recovery on a Mac, install and run the software on another Mac computer, then select "File" > "Create Bootable USB" and choose a USB drive to use as the bootable disc.
- Warning
- The creator will prompt to erase the drive to reallocate the space, then write bootable files to it, so back up all USB files before processing "Eraser".
Step 2. The program creates a 2GB space on the USB, saving the boot files, while leaving the remaining space available for storage.
Step 3. Once the repair process is complete, follow the guide to boot the corrupted Mac from a bootable disc and initiate the recovery process. It's recommended to restore data to an external hard drive.
How to Recover Data from Mac Hard Disk
Step 1. Launch Deep Data Recovery, select the file types you want to recover, and click "Next" to begin the recovery process.

Step 2. Select the disk location where you lost data and files, then click the "Scan" button.

Step 3. Deep Data Recovery for Mac will immediately scan your selected disk volume and display the scanning results on the left pane.

Step 4. In the scan results, select the file(s) you want to recover and click the "Recover Now" button to restore them.
Conclusion
When your Mac is experiencing issues, such as being slow or unresponsive, booting into Recovery Mode can be a helpful troubleshooting step. However, data security is always a concern, even when attempting to fix a broken computer. To avoid potential data loss, it's recommended to have a backup plan in place, such as the two methods introduced in this article, to ensure your important files and data are safe.
Related Articles
- How to Fix Excel File Open But Not Visible on Mac
- Deleted Files Mac But Still No Space: Reasons and Solutions
- 10 Steps to Fix "There is No Connected Camera" on Macbook Air/Pro/iMac 2022
- Mac Won't Boot into Recovery Mode Fixes | Mac Command R Not Working Solutions
- How to Fix Folders Turned into Shortcuts
If your folders suddenly turned into shortcuts on your PC, USB pen drive, or portable storage devices, there are easy ways to fix them. Alternatively, if your saved files are lost, you can use Qiling file recovery software to restore them in just 3 steps. - [Solved] Double Click Won't Open Files Windows 11/10/8/7
If you're experiencing issues with opening folders by double-clicking in Windows 10, 8, 7. You can use a reliable data recovery tool to recover files or folders if the desktop folders won't open or folder not opening issue persists. Alternatively, try the effective tips provided to fix the folder not opening on double click issue.