Mac Won't Boot into Recovery Mode Fixes | Mac Command R Not Working Solutions
Mac users may encounter issues booting into Recovery Mode, prompting the need for troubleshooting steps to resolve the problem and regain access to the Recovery Mode.
| Workable Solutions | Step-by-step Troubleshooting |
|---|---|
| Fix 1. Boot into Recovery Mode | Turn off your Mac first, and press...Full steps |
| Fix 2. Check Keyboard Connections | Disconnect your current keyboard...Full steps |
| Fix 3. Create Bootable Installer | Open Terminal, paste one of the commands...Full steps |
| Fix 4. Boot Mac in Safe Mode | choose the Apple menu > Shut Down...Full steps |
| Fix 5. Restore Time Machine Backup | Press the power button and immediately press...Full steps |
| Fix 6. Reinstall OS | Press and hold the Option + Command + R key...Full steps |
The Mac Command R is not working due to various reasons. It could be because of a software glitch, or the function keys are not enabled in the System Preferences, or the keyboard settings are not configured correctly, or the Command R key is being used by another application, or the Mac is running with an outdated operating system.
Possible Reasons of Mac Won't Boot into Recovery Mode
Your Mac failing to boot into Recovery Mode can occur without warning, and several factors may contribute to this issue. These include corrupted system files, a failing hard drive, or a malfunctioning SSD, which can prevent the Recovery Mode from loading properly. Additionally, a problem with the boot process, such as a faulty boot sector or a corrupted boot loader, can also cause the issue.
- 1. The M1 Mac was introduced in November 2020, and for users of this model, there is a new way to enter Recovery Mode.
- 2. Macs running Snow Leopard or older can't boot into Recovery Mode because they lack a recovery partition.
- 3. To resolve the issue, try restarting your Mac or Bluetooth devices. If that doesn't work, check the keyboard's battery level or replace the batteries if necessary. Also, ensure that the keyboard is in range of your Mac and that there are no physical obstructions between the keyboard and your Mac.
- 4. Your Recovery partition is damaged or deleted.
If you're unable to boot into recovery mode on your Mac, there could be several reasons behind this issue. To resolve the problem, you can try the methods outlined, which may help you troubleshoot and fix the issue.
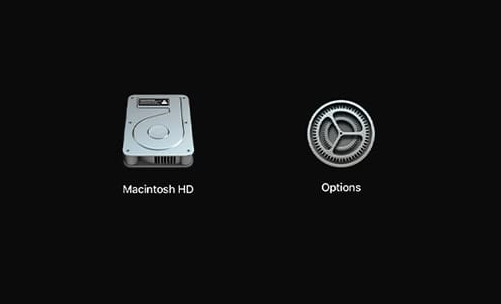
Method 1. Boot into Recovery Mode for M1 Mac
The steps to enter Recovery on an M1 Mac involve first shutting down the computer, then pressing and holding the power button until the startup chime sounds for the second time, and finally releasing the power button. This will boot the Mac into Recovery mode, where you can access the Recovery Environment and perform various tasks such as reinstalling macOS, running a disk utility, or restoring from a Time Machine backup.
Step 1. Turn off your Mac first, and long-press the on button.
Step 2. When the Apple logo appears, you'll see a message saying that holding the power button will take you to startup options.
Step 3. Select Options > Continue, and this will open Mac Recovery.
Method 2. Check Mac Keyboard Connections
To confirm if a keyboard issue is causing a Mac to not boot into Recovery Mode, try disconnecting the current keyboard and connecting a known working keyboard from another Mac to see if the Mac can still boot into Recovery Mode.
If you can't type, check if your keyboard is working properly. If it is, you can try using a different keyboard. If not, try using a virtual keyboard or dictation software to communicate. You can also try using a keyboard with a different layout or configuration.
Method 3. Create Bootable Installer
To create a bootable installer for macOS, you'll need a USB flash drive with at least 14GB of free space and a downloaded installer for the desired macOS version. You can download the installer from Apple's official website. The process can be initiated through the Mac Terminal, and the steps involve using the `createinstallmedia` command to create the bootable installer. This method is straightforward and efficient, allowing you to create a bootable installer for macOS Big Sur, Catalina, Mojave, High Sierra, or El Capitan.
Step 1. Connect the prepared USB flash drive to your Mac.
Step 2. Open Terminal, paste one of the following commands in it.
Big Sur:
sudo /Applications/Install\ macOS\ Big\ Sur.app/Contents/Resources/createinstallmedia --volume /Volumes/MyVolume
Catalina:
sudo /Applications/Install\ macOS\ Catalina.app/Contents/Resources/createinstallmedia --volume /Volumes/MyVolume
Mojave:
sudo /Applications/Install\ macOS\ Mojave.app/Contents/Resources/createinstallmedia --volume /Volumes/MyVolume
High Sierra:
sudo /Applications/Install\ macOS\ High\ Sierra.app/Contents/Resources/createinstallmedia --volume /Volumes/MyVolume
El Capitan:
To create the installation media for OS X El Capitan, run the command `sudo /Applications/Install\ OS\ X\ El\ Capitan.app/Contents/Resources/createinstallmedia --volume /Volumes/MyVolume --applicationpath /Applications/Install\ OS\ X\ El\ Capitan.app` in the Terminal, replacing `/Volumes/MyVolume` with the actual path to the volume where you want to create the installation media. This command will create a bootable USB drive or DVD with the El Capitan installation files.
Step 3. Press Return to enter the command.
Step 4. Enter your administrator password and press Return again.
Step 5. When prompted, type "Y" to confirm that you want to erase the volume.
Step 6. After erasing the volume, you'll get a notice from Terminal asking to access files on a removable volume. Click OK to proceed with the copy.
Step 7. Once the Terminal informs you that it's done, the volume will have the same name as the installer you downloaded, such as Install macOS Big Sur, and you can quit Terminal.
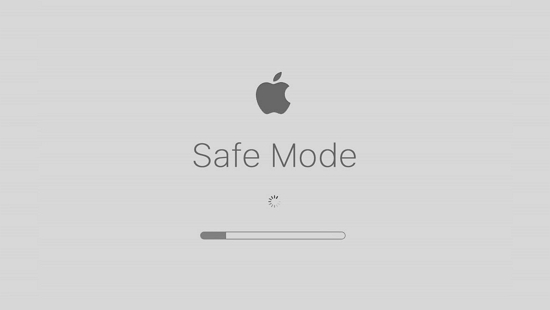
Method 4. Boot Mac in Safe Mode
To determine if a problem is caused by software loaded when your Mac starts up, start up your Mac in safe mode. To do this, turn on your Mac and immediately hold down the Shift key. Keep holding the Shift key until the login window appears.
Step 1. On your Mac, choose the Apple menu > Shut Down. After your Mac shuts down, wait 10 seconds.
Step 2. To restart your Mac, first, click the Apple logo in the top left corner of the screen, then select Restart from the dropdown menu. Immediately after hearing the startup chime, press and hold the Shift key.
Step 3. Release the Shift key when you see the login window.
Step 4. To get into safe mode on your Mac, you can restart your computer and hold down the shift key on your keyboard until the login screen appears. This will prevent any login items from loading, including login agents and login items, which can cause issues with your system.
Method 5. Restore Mac with Time Machine Backup
To restore your Mac using Time Machine backup files, connect the external drive containing your backup to your Mac, restart it, and hold down the power button until you hear the boot chime for the second time. This will boot your Mac in
Step 1. To set up Time Machine on your Mac, first shut down your Mac, then connect the Time Machine backup drive to your Mac.
Step 2. Press the power button on your Mac and immediately press and hold the Option key, also known as the Alt key, while the computer boots up. This will allow you to access the Startup Manager, where you can select which operating system to boot into.
Step 3. When you see the startup manager screen, you can release the Option key.
Step 4. Select the backup drive and click Return.
Step 5. Your Mac will boot into an OS X installer type screen where you can choose to restore from one of the backups.
Solved: USB Flash Drive Not Showing Up on Mac
If a USB flash drive is not showing up on a Mac after being inserted into the USB port, there are solutions available. One option is to download Deep Data Recovery for Mac, which can help recover data from a USB drive that is not being recognized. This software can help retrieve lost files and data from the USB drive, even if it is not being detected by the Mac.
Method 6. Reinstall OS with Mac Internet Recovery
If you're experiencing issues with your Mac, you can try booting into Internet Recovery to reinstall macOS from Apple's server. This method allows you to start from a clean slate and install the operating system again, potentially resolving any problems that were causing issues. To do this, restart your Mac and immediately hold down the power button.
Step 1. Shut down your Mac first.
Step 2. Press the power button on your Mac, and immediately press and hold the Option, Command, and R keys at the same time. Keep holding them until you see the Apple logo and a progress bar.
Step 3. The system will take a few seconds to process the request. This is a normal part of the process.
Note: Your Mac should be connected to a strong internet connection.

Bonus Tip: How to Recover Data from Mac
Mac computers can be prone to accidents, resulting in permanent data loss if not backed up. This can happen due to OS crashes or other unforeseen events, and having a Time Machine backup can be crucial in retrieving lost data.
Qiling, a pioneer in data recovery, has developed exclusive and safe data recovery software, Deep Data Recovery for Mac, to help users recover deleted or lost data on their Mac in seconds, requiring no technical expertise.
To recover data using Deep Data Recovery for Mac, download the tool and follow the guide. You can start by using this software to scan your Mac for lost data, and then follow the prompts to complete the recovery process. With this tool, you can try to recover deleted or lost files and data from your Mac.
Step 1. Launch Deep Data Recovery for Mac, select the file types you want to recover, and click "Next" to begin the recovery process.

Step 2. Select the disk location where the data was lost and click the "Scan" button to start the recovery process.

Step 3. Deep Data Recovery for Mac will immediately scan your selected disk volume and display the scanning results on the left pane, allowing you to easily locate and recover lost files.

Step 4. To recover your files, select them in the scan results and click the "Recover" button to have them back.
The Bottom Line
Your Mac won't boot into Recovery Mode due to either hardware issues, such as a faulty keyboard, or problems with the recovery partition on your Mac.
If your Mac won't boot into Recovery Mode,how to fix it? Our article provides a range of solutions to help you troubleshoot the issue, regardless of the reason behind it. You can try these solutions to get your Mac up and running again. Additionally, if you're interested in recovering lost data, we've also included a data recovery tool that you can try with a free trial.
Related Articles
- Disk Drill Mac: Is It Safe? Or Is It Worth Downloading?
- How to Recover Data from Unmountable Hard Drive on Mac
- How to Undelete Data on Mac OS X
- 9 Tips for How to Fix Mac Stuck on Apple Logo and Recover Data
- Free Download Bad Sector Repair Tool - Flobo Hard Disk Repair
Flobo Hard Disk Repair is developed for hard drive bad sector repair. No matter your hard drive is corrupted, damaged, or dead due to bad sectors, you can rely on this tool. While Flobo Hard Disk Repair would not recover hard drive data, you may download Qiling hard drive recovery software to recover data before doing the repair. - Folder Is Not Accessible Access Is Denied
If you're experiencing issues with accessing files and folders in Windows 10/8/7, such as “Folder is not accessible. Access is Denied” errors, don't worry!