10 Steps to Fix "There is No Connected Camera" on MacBook Air/Pro/iMac 2022
If you're experiencing a dark screen issue with your MacBook's front-facing camera, it's likely due to a software or hardware problem. To troubleshoot, try restarting your MacBook, checking for software updates, and ensuring the camera is selected in System Preferences. If the issue persists, it may be a hardware problem and you should contact Apple support for further assistance.
The dark screen will have a "No connected camera" error message. However, a malfunctioning camera during a zoom meeting can be frustrating, and we're here to help. We'll explore the 10 possible solutions to resolve this issue.
*Got no idea to make Mac Digital Camera Photo Video Recovery? Follow the guide to get 2GB free recovery method.
Why Is Camera Not Working on Mac?
The "no connected camera" message is typically a software issue, making it relatively simple to resolve. It could be due to an application previously running on macOS using the camera, or the camera not having the necessary permissions.
If the camera is not working due to a hardware issue, the green light may flash. In this case, it's best to contact Apple for assistance.

How to Fix 'No Connected Camera' Error in 10 Steps
Here are the first five ways of fixing your camera not connected issue on Mac which will not cost too much time and effort. To fix the camera not connected issue on Mac, you can try restarting your Mac, checking the camera's power source and cable connection, updating your Mac's operating system, checking for any software conflicts, and using the built-in Camera app to troubleshoot the issue.
- Step 1. Restart Mac
- Step 2. Check The Camera Appearance
- Step 3. Check The Internet Connection
- Step 4. Check The App's Permission to Use a Camera or Not
- Step 5. Update The App to The Latest Version
- Step 6~Step 10
Step 1. Restart Mac
To resolve the issue with your MacBook's Wi-Fi not connecting, try restarting your MacBook. This simple step can often resolve connectivity issues. To restart your MacBook, click the Apple logo in the top left corner, select "Restart," and follow the on-screen instructions.
1: Look in the upper left corner of the screen, where you'll see an Apple icon.
2: Choose "Restart" from the drop-down list when the option displays.
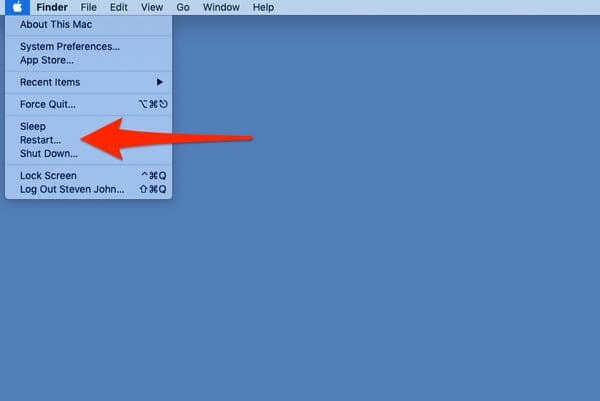
Step 3: The MacBook will automatically shut down and then restart itself after a few minutes, as part of its normal shutdown and restart process. This is a normal behavior and does not indicate any issue with the device.
Step 2. Check The Camera Appearance
If the camera appears to be working correctly, it should have a clear and sharp image. The image should be free of any distortions or aberrations, and the colors should be vibrant and accurate. If the image appears blurry or distorted, it may indicate a problem with the camera's lens or sensor.
1: Open the Finder.
2: Click on the Applications option on the left, which is located on the left-hand side of the menu bar.
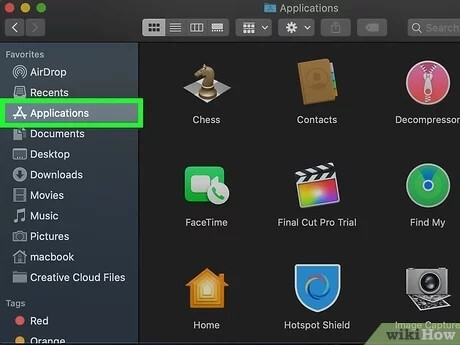
3: To open the Photobooth, simply double-click on it, which will automatically open your webcam and display a picture, indicating that it is functioning correctly.
Step 3. Check The Internet Connection
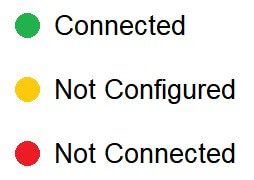
To check your internet connection on a MacBook, click the Wi-Fi icon in the top right corner of your screen and select your network from the list of available networks. If you're connected, you'll see the name of your network and the signal strength. If you're not connected, choose from the available networks. You can also check your internet connection by trying to load a website or checking your email, and if it's taking a long time to load or you're getting error messages, it may be a sign that your internet connection is unstable.
1: Select System Preferences from the Apple Menu.
2: Select Network from the drop-down menu.
3: Select the Network Adapter that you want to inspect.
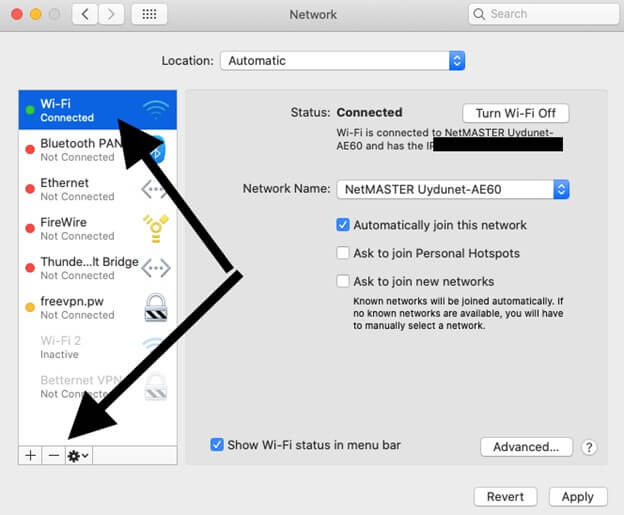
4: Your internet connection's current state may be seen right here.
Step 4. Check The App's Permission to Use a Camera or Not
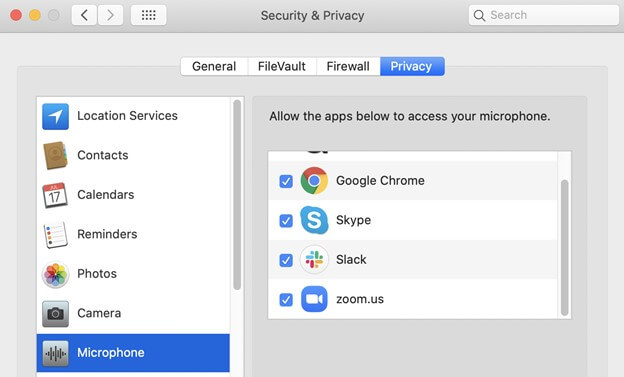
If your device hasn't granted permission to certain functions, you can check by looking at apps like FaceTime, Zoom, and Photo Booth, which often require camera and microphone access. To check, go to Settings > Privacy > Camera and Microphone, where you can see which apps have been granted permission and which haven't. You can also check the app's settings within the app itself to see if it's requesting permission. If you see an app listed under "Denied" or "Not Allowed," you can tap on it and select "Allow" to grant permission.
1: Go to the Apple menu and choose System Preferences.
2: To learn more about security and privacy settings, go to the Security & Privacy menu option.
3: The Privacy tab can be found in the top-right corner of the screen.
4: Go to System Preferences > Security & Privacy, click the Privacy tab, and select it from the top-right.
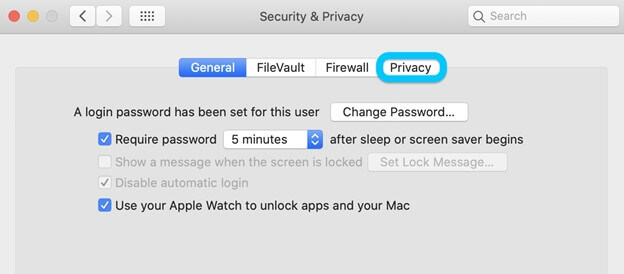
(Note: Locked-In Mac users may modify their system by clicking on the lock icon in the bottom left corner) In Mac users may modify their system by clicking on the lock icon in the bottom left corner. In Mac users may modify their system by clicking on the lock icon in the bottom left corner.
5: Now, you can view your applications' permissions by clicking on an item in the left sidebar, which displays the permissions for each application.
Step 5. Update The App to The Latest Version
If your camera apps aren't updating, it's possible that your system is running out of date, so try restarting your macOS and then head over to the App Store to update all of your apps.
1: To open the Mac App Store, you can click on its icon in the Dock, search for it in Spotlight, or navigate to it in the Applications folder.
2: To discover any outstanding updates, click "Updates" on the sidebar.
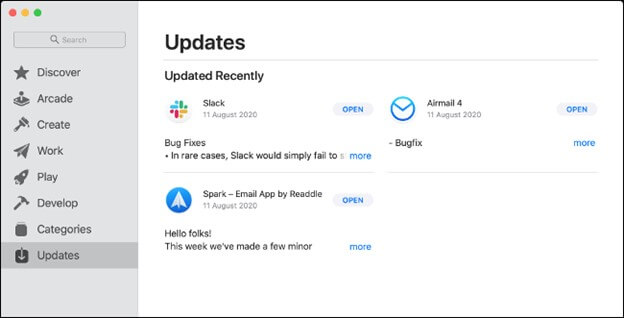
3: Applications with pending updates will have an “Update” icon next to them, allowing users to manually initiate the update process by selecting it.
The rest five ways are kind of harder to follow, but they're all proved to be useful to solve the camera malfunctioning error.
- Step 6. Uninstall and Reinstall a New Version of the App
- Step 7. Disable Suspected Apps in Activity Monitor
- Step 8. Force Quit Camera Related Apps Using Terminal
- Step 9. Reset SMC
- Step 10. Reinstall macOS On MacBook or iMac
Download Deep Data Recovery for Mac to recover any type of files and folders you care about that have been lost on your MacBook Pro, Air, or iMac.
Step 6. Uninstall and Reinstall a New Version of the App
To access your Applications folder in the Finder, select the "Applications" option in the sidebar of any Finder window.
1: Double-click the program in Spotlight while holding down the Command key to open it in a new window.
2: To delete an app on a Mac, drag the application icon to the Trash, or select the app and choose File > Move to Trash from the context menu.
3: To delete the software, select Finder > Empty Trash. This will remove the software from your computer.

To reinstall an app, go to the App Store, search for the app you want to reinstall, and download it again. This will restore the app to its original state, including any updates or purchases you made previously.
Step 7. Disable Suspected Apps in Activity Monitor
If you suspect an application on your MacBook is causing issues and damaging files, it's a good idea to disable it temporarily to prevent further problems. This can help you troubleshoot the issue and prevent any further damage to your device.
1: To access Utilities, click the "Go" button in the top menu bar of your screen, then select "Utilities" from the drop-down menu that appears.
2: Next, look for "Activity Monitor" and click on it.
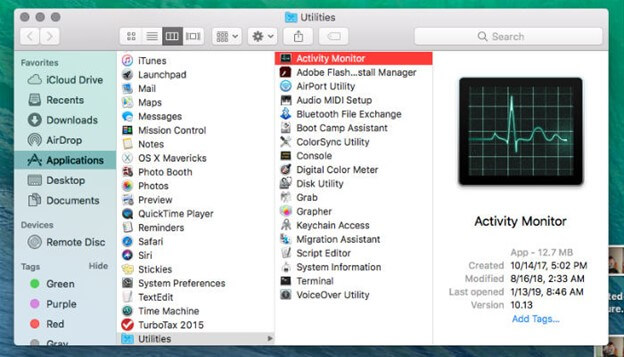
3: When the Activity Monitor window appears, look for and terminate the offending program.
4: In the Activity Monitor window, click on the "X" button in the upper-left corner.
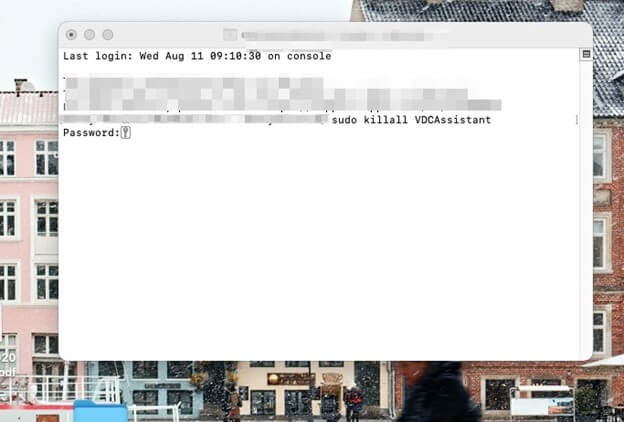
Step 8. Force Quit Camera Related Apps Using Terminal
If you think your camera is lagging or glitching, force quitting the camera-related apps using the Terminal feature can help resolve the issue quickly.
1: Close any applications that have accessibility to your camera.
2: To open Terminal, select the Spotlight Search button, type "Terminal", and then hit Enter.

3: Enter the command sudo killall VDCAssistant. If asked, enter your password and hit the Enter key. This command will terminate the VDCAssistant process, which is likely causing the issue.
4: Enter the command sudo killall AppleCameraAssistant into the open command line window.
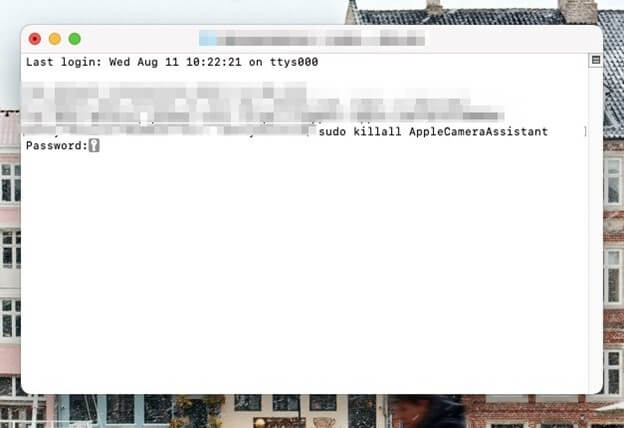
(Note: Afterwards, open an application that utilizes the built-in webcam and check whether the issue with the camera is fixed).
Step 9. Reset SMC
To address the issue of a non-functional or non-appearing camera on a MacBook, resetting the System Management Controller (SMC) is a viable solution. This can be done by following the system's step-by-step instructions, which can help resolve the issue and get the camera working again.
1: Shut down your Mac.
2: Press and hold the Power button and Control+Alt+Shift for 7 seconds each.
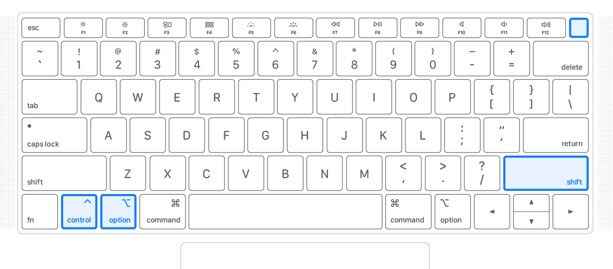
3: To turn on your device, simply press the Power button. This will activate the device and make it ready for use.
Step 10. Reinstall MacOS On MacBook or iMac
To troubleshoot issues with your iMac or MacBook, you can try reinstalling macOS. This process will erase all data on the device, so make sure to back up any important files before proceeding. To reinstall macOS, start by shutting down your device, then turn it back on and immediately hold down the power button until the startup options appear.
Step 1: Choose Reinstall macOS from the tools panel in macOS Recovery.
Step 2: Now select Continue and apply the on-screen directions to start the installation process.
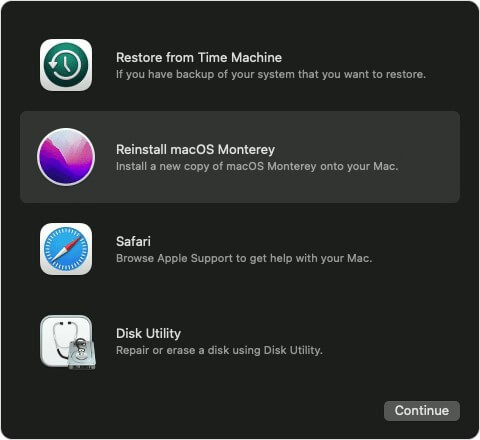
Reinstalling macOS is a high-risk process that can lead to data loss if not done properly. It's crucial to back up all important files and data before proceeding. If you're still willing to proceed, there are solutions available to recover your files in case something goes wrong.
Deep Data Recovery for Mac: Your Data Recovery Companion
If you've reinstalled macOS, don't worry - you can recover your lost files. There's software available that can help you regain access to your files after a reinstall.
Deep Data Recovery is the most excellent macOS data recovery software, but even it may fail to retrieve files that have been destroyed or lost permanently.
The world's most potent and dependable tool for retrieving lost or deleted Mac files is Data Recovery Wizard for Mac, which accomplishes this in just three simple steps.
This Mac data recovery program searches deeper into storage devices than any other, ensuring the most outstanding results, with no harm to the original data or personal information, and is the first and only program to work with the T2 chip encryption problem.
With Qiling's SD card photo recovery feature, you can easily retrieve lost videos and photos using the software.
Some prominent features include:
- Recovery of Deleted Files Recover digital camera deleted files, including photos and videos, even from the Trash Bin, using their original names.
- Mac Hard Disk Recovery To backup and restore data from a corrupted or formatted external hard drive, you can try using data recovery software. This software can scan the drive and recover any recoverable files.
- SD Card Photo Recovery You can recover deleted photos and data from memory cards.
- Different Data Loss Scenarios A system crash or upgrade, a virus, or an unplanned power outage are all examples of unexpected events that can cause a system to fail or shut down.
Here is the step-Here's a one-paragraph, step-by-step tutorial on how to recover lost macOS files using the Qiling Wizard Recovery:
Step 1. Launch Deep Data Recovery. Choose file types and click "Next" to start the recovery process.

Step 2. After operating system update, data was lost on the **C:** drive. I clicked Scan to locate the missing files.

Step 3. Deep Data Recovery for Mac will immediately scan your selected disk volume and display the scanning results on the left pane.

Step 4. After the scan, select the target files that were unknowingly lost during or after the update and click the Recover button to get them all back.
Related Articles
- Can't See Files on External Hard Drive Mac? Find Missing Files Here
- PDF File Recovery: How to Recover Deleted/Unsaved PDF Files Mac
- MacBook Pro/Air Won't Turn on? 10 Fixes + Bootable Recovery Tips
- How to Recover Data from A Fusion Disk
- Excel Found A Problem with One Or More Formula References in This Worksheet [Solved]
You receive an error message in Excel saying it found a problem with one or more formula references in the worksheet while saving the workbook. To fix this issue, you can refer to the post for troubleshooting steps. If you're experiencing file loss problems, you can try using Deep Data Recovery to recover your Excel files. - Should You Wait for a Response or Close When Excel Frozen but Not Crashed? 10 Tricks Here
If Excel freezes but doesn't crash in Windows 10, the correct reaction is to wait patiently for it to respond, rather than immediately restarting. This approach can help prevent data loss and allow you to recover unsaved work.