Deleted Files Mac But Still No Space: Reasons and Solutions
Quick Navigation:
- 1. When Should You Delete Files on Mac
- 2. Why No Space Is Freed After Files Are Deleted on Mac
- 3. Solutions to Files Deleted But No Space Are Freed (4 Effective Methods With Detailed Steps!)
- 4. Remedial Aid: Recover Accidentally/Mistakenly/Permanently Deleted Files
Your Mac may have ample storage space, but it's not limitless. As a result, deleting unnecessary files is a good way to free up space for new ones. However, the issue arises when you delete multiple files and empty the trash, only to find that your storage space hasn't increased. This can be frustrating, especially when you're unsure of what to do next.
Most Mac users face the problem of a stuck or frozen cursor at some point, but there are several methods to resolve it. If you're experiencing this issue, keep reading to find the best possible solutions.

When Should You Delete Files on Mac
You need to delete files when you want to replace or update them. This helps to clean useless contents and free up disk space, which can help prevent your Mac from running slow.
If you keep adding new files without deleting old ones, it can get cluttered and make it harder to find specific files. However, storing similar files together can actually make them easier to locate. On the other hand, regularly deleting unnecessary files helps keep the system organized and saves time and effort in the long run, making it easier to find the files you need.
Regularly check your Mac for unnecessary data and remove it to ensure optimal performance. This simple task can help keep your device running smoothly and efficiently.
Why No Space Is Freed After Files Are Deleted on Mac
When you delete files from your Mac and empty the Trash, they may not be deleted permanently, leaving no free storage space despite your efforts.
Mac users may experience a phenomenon where deleted files still consume disk space, even after macOS attempts to repair the disk. This issue arises when the operating system fails to truly delete a file, often due to an unclosed process that prevents the file from being released from the disk. As a result, the Mac does not reclaim the storage space used by the deleted file, leading to a perceived lack of available space.
To free up disk space from unseen files, you can try deleting temporary files, emptying the recycle bin, and uninstalling unused programs, as well as using disk cleanup tools to remove unnecessary files and system logs. You can also check for and remove any malware that may be consuming disk space.
The "Other" storage category on your Mac is a catch-all for various system and data files that don't fit into the more specific categories like "Documents", "Photos", or "Music". This includes system logs, caches, and other temporary files that your Mac uses to run smoothly.
The storage capacity of MacBook Pros ranges from 128GB to 2TB, making computer disk space precious, especially when using a Mac computer.
Solutions to Files Deleted But No Space Are Freed
If you're a Mac user experiencing the issue of deleted files taking up space, don't worry - there are solutions to help you completely delete the files and free up space. These methods are easy to follow and don't require technical expertise, making them accessible to anyone. By implementing these solutions, you cannot only resolve the problem but also prevent it from happening in the future, keeping your Mac running smoothly and efficiently.
- Method 1. Open Storage Tab to Free Space
- Method 2. Restart Mac in Safe Mode
- Method 3. Run First Aid in macOS Recovery Mode
- Method 4. Manually Free Up Space By Startup Disk
Method 1. Open Storage Tab to Free Space
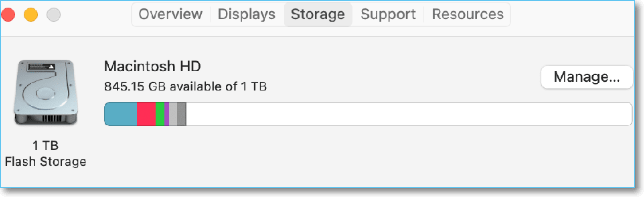
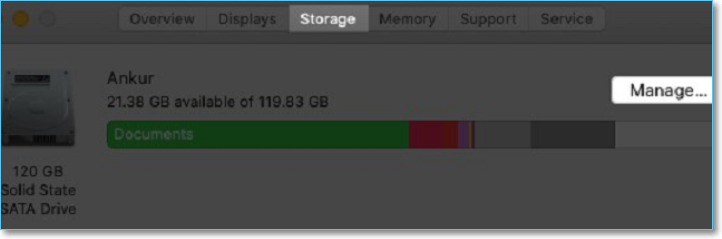
When you delete files from your Mac but don't see any free storage space, you can try optimizing the storage space using the built-in system. To do this, go to About This Mac, click on Storage, and then click on Manage. This will show you a list of files and storage space usage, allowing you to identify and delete any unnecessary files or data.
Step 1. In the left corner of your Mac, tap on the Apple logo, then choose the "About This Mac" option.
Step 2. Click on the "Storage" option, which will calculate and display the used and available disk space.
When the calculating process is complete, you'll see a categorization of files, which allows you to identify and delete a large number of scrapable files in one go.
Step 3. Click the Manage button to explore the storage management menu.
Step 4. To start the storage optimization process, the system will ask you to choose from given options. You can select the "Optimize Storage" option to free up space by deleting unrecognized files, or choose other options to automatically reduce clutter or empty the trash.
Note: You can choose the "Store in iCloud" option and use Apple cloud storage to save files, but you'll have to pay extra storage fees if your data exceeds 5 GB.
Method 2. Restart Mac in Safe Mode
Restarting your Mac in Safe Mode can be a good option if you delete files but it fails to recognize and free the storage space. This method may be time-consuming, but it thoroughly diagnoses and fixes any random errors, automatically removes cached data, and helps delete files or applications from your Mac. To restart in Safe Mode, follow the given steps.
Step 1. To shut down your computer, first open the Start menu and click on "Shut Down". Immediately press and hold the Shift key as you click on Shut Down. This will initiate a shutdown without prompting for a restart or other options.
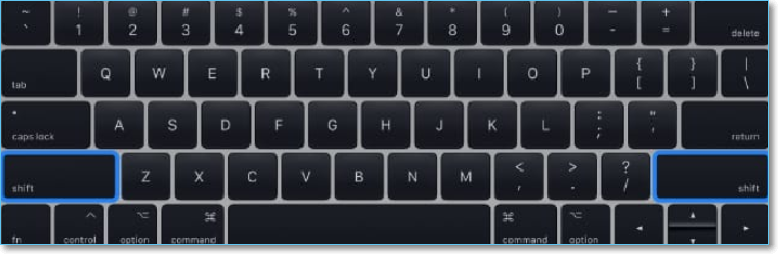
Step 2. Hold the Shift key until you see the Apple logo on the screen. Release the key and wait for a few seconds.
Note: The boot process may take some time.
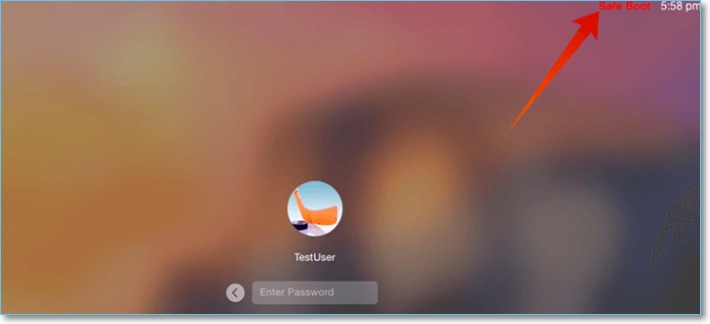
Step 3. When you see the login screen, check if Safe Boot is written in red on the top-right side of your Mac.
Turning on Safe Mode can resolve booting issues by disabling all non-essential programs and services, allowing the system to boot normally.
Step 4. Log in to your Mac, check the disc space, and you'll find that there's more storage space available than before.
Using Safe mode, you can also clear other unneeded stuff from your Mac.
Step 5. Now, Restart your system and boot normally.
Method 3. Run First Aid in macOS Recovery Mode
If the previous method doesn't solve the problem, you should run First Aid in macOS Recovery Mode from Disk Utility to smooth out your disk performance.
You can use the First Aid function to diagnose and fix problems with your Mac's disk, volumes, or external drives. This feature has various built-in tools that can help find and fix random errors, making it a useful troubleshooting tool.
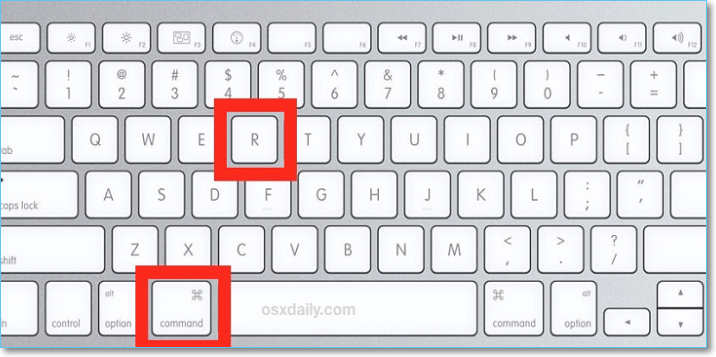
Step 1. To restart your Mac and enter macOS Recovery Mode, simply restart your Mac and quickly press and hold the Command + R keys as your Mac boots up. This will allow you to access the built-in macOS recovery tools and utilities.
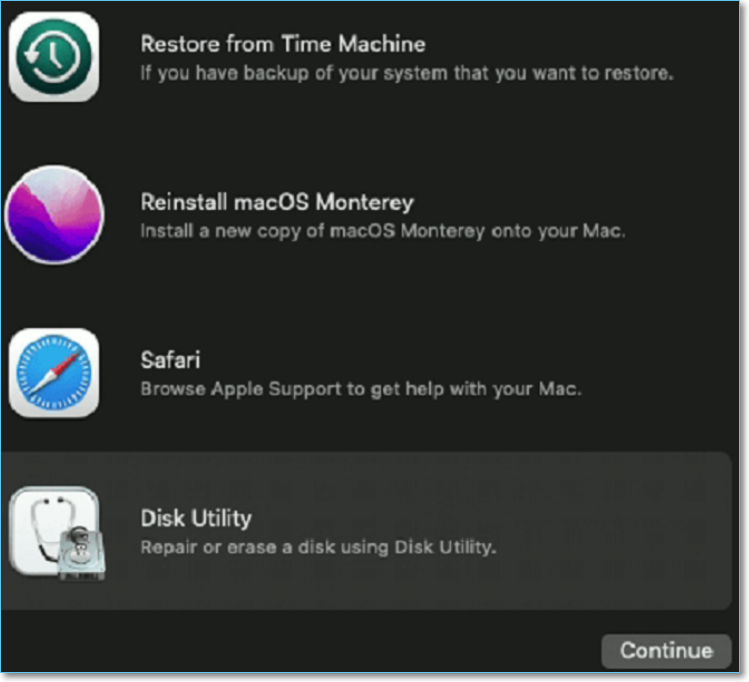
Step 2. Once the Apple logo appears, release the keys. Open the macOS Utilities, select Disk Utility, and click Continue.
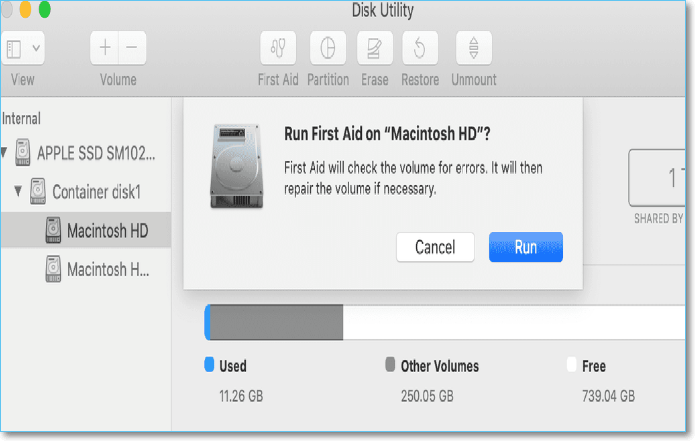
Step 3. In the sidebar, select Macintosh HD and select First Aid.
Step 4. Start the storage drive repair procedure by clicking Run.
This process will check and fix errors on the hard drive, clean up space, and improve the system's performance by running Disk Utility.
Method 4. Manually Free Up Space By Startup Disk
Manually freeing up disk space is indeed an effective way, allowing you to increase your free space and better manage your data. To do this, follow these steps:
Step 1. To check your Mac's storage, click on the Apple logo, then select About This Mac, followed by Storage, and finally click on Manage.
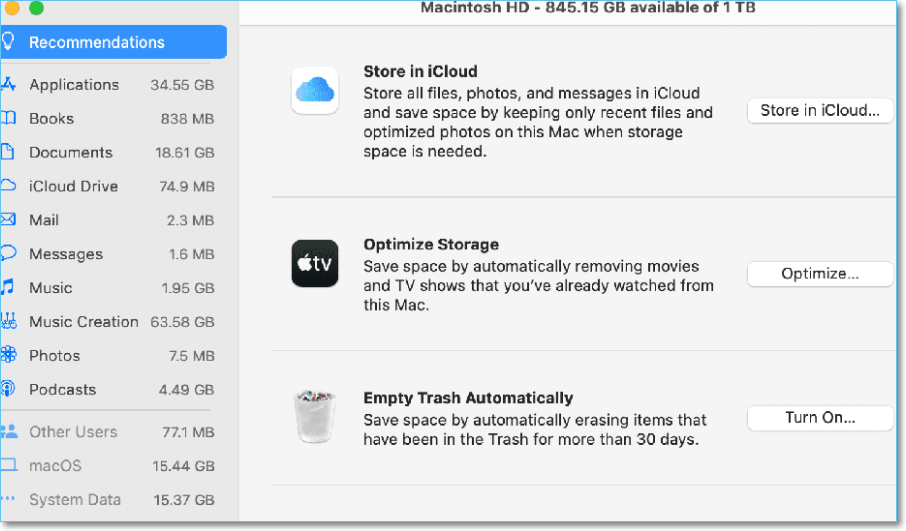
The user will see various options to manage disk space under the "Recommendations" section.
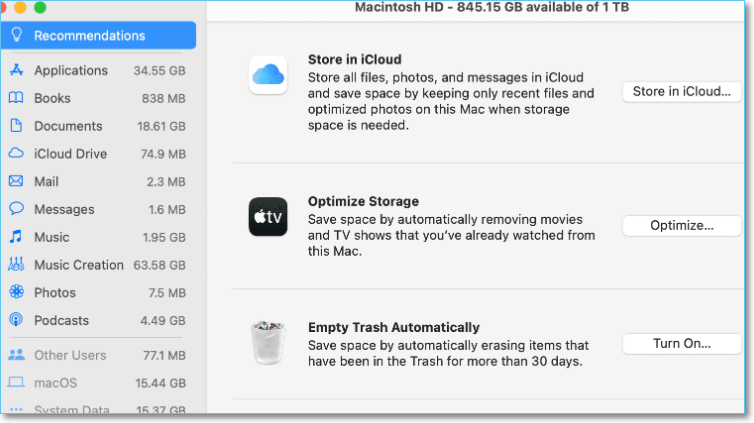
Step 2. You can select the "Store In iCloud" option to save some files online.
Note: iCloud offers you up to 5 GB of free storage space.
Step 3. To delete watched iTunes movies and TV programs, select the "Optimize" option.
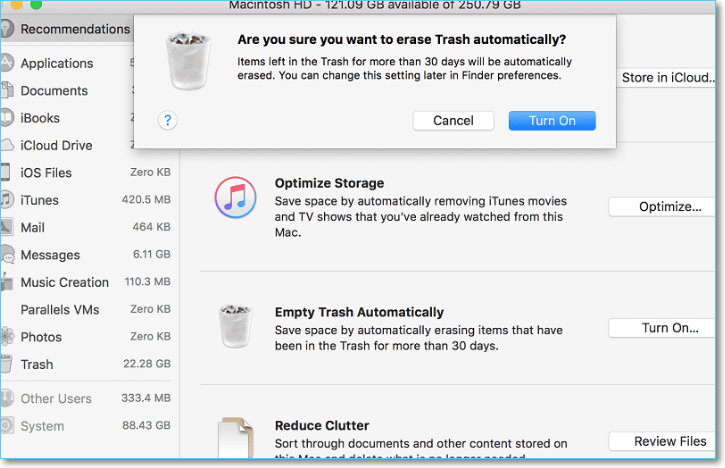
Step 4. To turn on automatic emptying of the trash, select the "Turn On" option next to "Empty Trash Automatically". This will delete all files from the Trash that have been there for 30+ days.
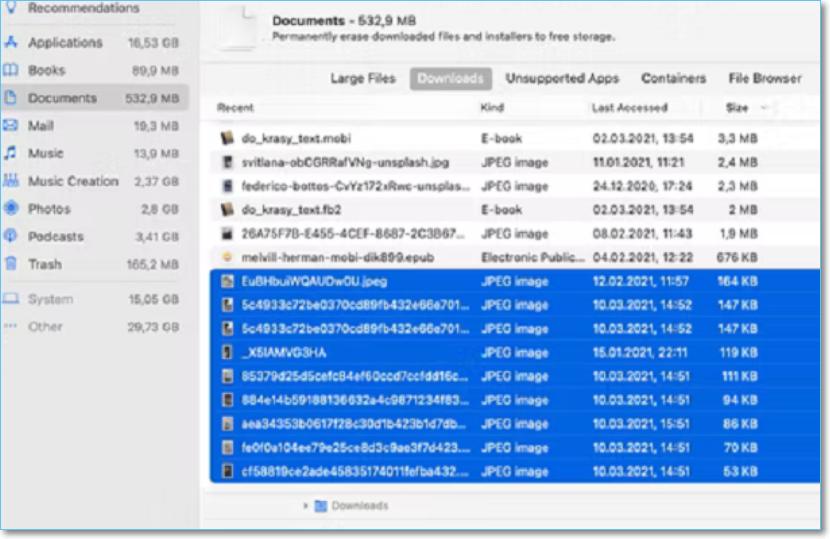
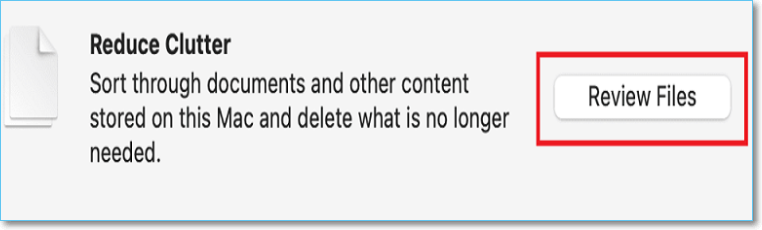
Step 5. To declutter your Mac, go to the "Reduce Clutter" section, select "Review Files" and sort through your files. Check all unnecessary files and delete them.
Step 6. To clean up your computer, select the Applications folder, then move any unused apps to the Trash. Next, manually review all documents and photos, and move them to the Trash if they are unnecessary.
Step 7. To free up storage space on your Mac, go through each of the options like iOS Files, iTunes, and Mail, and delete any unwanted files to clear up space on your Macintosh HD.
Step 8. After selecting the files to be deleted, click the "Empty Trash" button with caution, ensuring all desired files are removed from the trash.
The Mac user will see an extensive free section on the disk of their Mac.
Remedial Aid: Recover Accidentally/Mistakenly/Permanently Deleted Files
Dealing with deleted files on a Mac that still occupy space can be frustrating. While deleting unnecessary data can help free up space, it's easy to accidentally delete important files in the process. To avoid this, it's essential to use a reliable method that allows you to safely delete unwanted files without compromising your essential data.
If you've lost or deleted crucial files on your Mac, don't worry - you can recover them using a reliable data recovery tool. Among the various options available, Deep Data Recovery for Mac is highly recommended, having continually improved its algorithms to ensure swift and reliable recovery of deleted files.
Deep Data Recovery is a user-friendly data recovery software that allows Mac users to easily recover disappeared files by following a few simple steps. To operate it, a stable Internet connection is required, which enhances its functionality and delivers the best results. This advanced tool is capable of recovering commonly used file formats, including photos, audio, video, and document files, and presents well-categorized and organized results at the end of the process.
To use this powerful tool, simply follow the steps outlined below.
Step 1. Launch Deep Data Recovery, select the desired file types, and click "Next" to initiate the recovery process.

Step 2. Select the disk location where you lost data and click the "Scan" button.

Step 3. Deep Data Recovery for Mac will immediately scan your selected disk volume and display the scanning results on the left pane.

Step 4. The scan results will show the files that were recovered. To complete the recovery process, select the desired file(s) and click the "Recover" button.
Related Articles
- How to Undelete Data on Mac OS X
- Will Formatting My Mac Make It Faster | Here is Answer
- Mac Video Repair | How to Repair Corrupt MOV, MP4 Files
- No.1 Recuva for Mac Free Download
- How to Get, View, Remove Windows 10 Update? [2022 Latest Guide]
Windows 10 is the current major operating system on Windows computers, and managing updates is an essential part of using it. This page provides information on how to get, view, and remove Windows 10 updates, allowing users to take control of their system's updates on their own. - Error: Google Docs Didn't Save My Work _ How to Recover Unsaved Changes to Google Docs
If Google Docs didn't save your work, don't panic! If your changes didn't auto-save, you can try to recover them. Follow our advice to potentially reappear unsaved changes. This might be caused by Google Docs not auto saving or not working properly, but you can try to recover your work.