3 Ways to Fix Invalid B-tree Node Size Error and Recover Data
I was listening to music when suddenly the sound started going off and on, then everything froze. Despite multiple attempts to repair the disk using Disk Utility, all failed, and I encountered an error message.invalid b-tree node size The error "invalid b-tree node size" is likely due to a corrupted database file. B-tree nodes in a database store data in a structured way, and an invalid size indicates that the node's data is not properly formatted. This can occur due to a software glitch, power outage, or other system failure. To repair the issue, you can try running a database repair tool or using a database recovery software. These tools can scan the database file, identify the corrupted nodes, and attempt to repair or recover the data.
An invalid B-tree node size error occurs when the size of a B-tree node in the database is not valid, which can cause problems with data retrieval and storage. This error can be caused by a corrupted database, a faulty disk, or a software issue. To resolve this issue, you can try rebuilding the database, checking the disk for errors, or running a database maintenance script.
If you encounter an invalid b-tree node size error, you can fix it by following these steps. First, you need to identify the problematic node in the b-tree.
| Workable Solutions | Step-by-step Troubleshooting |
|---|---|
| Fix 1. Disk Utility | Choose Apple menu > click Restart > Press and hold the Command and R keys...Full steps |
| Fix 2. Fsck command | Start your Mac in single-user mode > Type the command /sbin/fsck -fy...Full steps |
| Fix 3. Reformat | Launch Disk Utility > click the Erase tab > from the Volume Format menu...Full steps |
What is the Invalid b-tree Node Size Error?
On a Mac, every file saved has a unique entry in the index table formatted as a B-tree. When you access a file, the Mac OS X has to parse this B-tree to locate the file, which can be a time-consuming process.
When you see "invalid b-The b-tree corruption on a Mac HDD causes the operating system to fail to parse the tree node size, resulting in a corrupted disk that makes data inaccessible.
What Causes the Invalid b-tree Node Size Error?
Hard drives can become corrupted due to various factors, including physical damage, power surges, software bugs, or human error. To prevent data loss and protect your external hard drive, it's essential to regularly back up your data, use a reliable backup software, and keep your drive's firmware and operating system up to date.
- Virus attack
- OS X failure
- Modification in BIOS setting
- Improper shutting down of the computer
- Boot Sector errors
- Corrupt file system
To resolve the b-tree error, you can try running the Disk Utility's First Aid tool or the built-in fsck command, which can repair any corrupted file system structures. If the issue persists, you can try reinstalling macOS or seeking professional help from a data recovery service.
How to Fix Invalid b-tree Node Size Error?
As such b-A tree error, specifically an invalid b-tree node size error, can lead to severe hard drive corruption and data loss. It's essential to address this issue promptly. Some users recommend using Diskwarrior, a third-party software, to repair the error, but it's recommended to research and consider alternatives before purchasing.
Besides, there are three additional free methods that can help fix the invalid b-tree node size error on a Mac hard drive, including using Disk Utility, running the fsck command, and reformatting the drive.
Fix 1 - Disk Utility
Here are the steps to use Disk Utility to repair a Mac hard drive in one paragraph:
Step 1. Choose the Apple menu, and click Restart.
Step 2. Press and hold the Command and R keys until the Apple logo appears and then release the keys.
Step 3. Click Disk Utility and click Continue.
Step 4. In the sidebar, select the disk with the invalid b-tree node size and you want to repair, and click the First Aid button.
Step 5. Click Run.
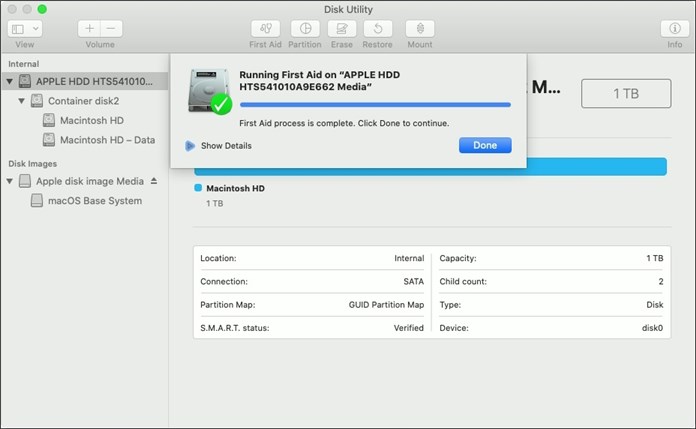
If Disk Utility can't repair your disk, try running it again. If that doesn't work, proceed with the next solutions.
Fix 2 - Fsck command
The fsck (File System Consistency Check) command is used to repair disk and file system problems on your Mac. To use this command, you can run it in the Terminal app, where you'll need to follow the prompts to scan and repair any issues that are found.
Step 1. Restart your Mac, then press and hold the Command+S keys while it boots to start it in single-user mode.
Step 2. To start a file system check, type the command `/sbin/fsck -fy` into the terminal and press Enter.
Step 3. When the fsck command has your disk checked and repaired, type "reboot" and press Enter. Your Mac will reboot and return to the usual login screen.
Fix 3 - Reformat
To reformat a Mac hard drive, start by backing up the drive with Time Machine or a third-party Mac backup software, as the formatting process will erase all data on the drive. Then, restart your Mac and immediately hold down the 'Command (⌘) + R' keys to boot into Recovery Mode. From there, select Disk Utility and follow the prompts to erase the drive.
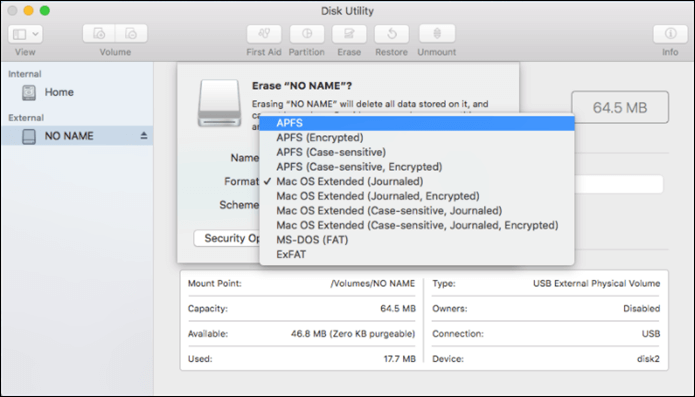
Step 1. Launch Disk Utility. Click the icon for your external hard drive in the sidebar on the left.
Step 2. Click the Erase tab along the top of the window.
Step 3. From the Volume Format menu, choose Mac OS Extended (Journaled).
Step 4. Enter a name for the external hard drive in the Name field.
Step 5. Click the Erase button.
Recover Data from Mac Volume with Invalid b-tree Node Size Error
Since the invalid b-A tree node size error on a Mac hard drive can lead to data loss or inaccessibility, making it crucial to use a powerful Mac hard drive recovery software to recover data from a corrupted or damaged drive.
Deep Data Recovery for Mac is a professional third-party software that can easily recover all types of files on a Mac volume, including documents, pictures, movies, music, emails, and more. To recover data from your Mac, simply download and launch the software, then follow the step-by-step guide to access and recover your lost files.
3 Steps to recover data from invalid b-tree node size error on mac
Step 1. Launch Deep Data Recovery on your computer, select the desired file types, and click "Next" to initiate the recovery process.

Step 2. Select the disk location where the lost data and files are stored, then click the "Scan" button to initiate the scanning process.

Step 3. Deep Data Recovery for Mac will immediately scan your selected disk volume and display the scanning results on the left pane.

Step 4. To recover your files, select them from the scan results and click the "Recover" button, which will restore them to their original state.
Related Articles
- Guide: Recover an Unsaved Keynote Presentation on Mac
- 2022 Fixed: Time Machine Won't Complete First Backup
- Recover Files from a Dead/Crashed iMac with Qiling Data Recovery
- How to Recover a Replaced File on Mac
- Where Is the Recycle Bin in Windows 10/11, How to Find and Open Recycle Bin
The Recycle Bin in Windows 10 can be found and opened in several ways, including from the desktop, File Explorer, command prompt, or settings. You can also use these methods to empty the Recycle Bin and restore deleted files from it. - Why Does My Computer Keep Freezing When Playing Games?
Your computer keeps freezing on Windows 10, and you're wondering why. The culprit could be a combination of factors, including too many programs open, overheating, hardware failure, outdated disk drivers, and more.