How to Recover a Replaced File on Mac
How to Recover Accidentally Replaced Word Files
If you've accidentally overwritten a file with the same name, chances are you've made a terrible mistake. Even though macOS warns you that the file already exists, you might have clicked the "Replace" button without thinking. In some cases, you can recover overwritten Word documents by searching for temporary files in Finder. However, for other types of files like pictures, texts, or videos, you may need to restore them to previous versions using Time Machine backup or a third-party Mac data recovery software.
| Workable Solutions | Step-by-step Troubleshooting |
|---|---|
| #1. Recover from Time Machine | Connect the Time Machine backup disk to your Mac > open and locate the backup file...Full steps |
| #2. Recover with Third-party Software | Download Deep Data Recovery for Mac > choose the location to scan > recover...Full steps |
If you're dealing with a desperate situation where files have been replaced or overwritten on your Mac, don't worry, as there are two possible ways and step-by-step guides available to help you recover them.
#1. How to Recover Replaced Files on Mac from Time Machine
You can try using Time Machine or a third-party data recovery software to recover the overwritten files on your Mac. If you have Time Machine backups, you can restore the original files from the backup. If not, you can use a data recovery software like Deep Data Recovery to scan your external hard drive and recover the deleted files. Be careful not to overwrite the original files again. You can also try using the "Restore Previous Versions" option in Finder to see if you have any previous versions of the files that you can restore. It's also a good idea to create a backup of your external hard drive in case something like this happens again.
Prior notice to recover a replaced file on Mac:
1) When replacing a file with the same file format and name, the chances of recovering the original file are zero.
When replacing a folder with the same name, files from both folders are combined, with new files overwriting old ones, potentially losing the replaced files. The chance of retrieving overwritten files is still zero.
To recover overwritten files from Time Machine:
If you're an early riser who regularly backs up important files on your Mac, and you later discover that you've accidentally replaced or overwritten a crucial file or folder, your best course of action is to recover the overwritten files from your Time Machine backup.
To restore files from a Time Machine backup, you must have created a backup of those files in advance.
It's easy! You can simply find the containing folder of overwritten files from the backup by using Time Machine:
Step 1.To access your Time Machine backup, connect the backup disk to your Mac computer and click the Time Machine icon in the Status menu. This will launch Time Machine, allowing you to browse and restore files from your backup.

You can also click "Finder", and then open the "Time Machine" application.
Step 2. On a Mac, to find the date and time of your last Time Machine backup, scroll to the bottom right corner of the screen and look for the Timeline. This will display the date and time of your most recent backup.
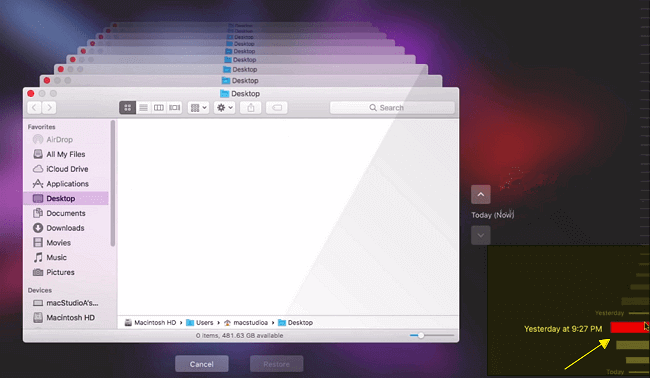
To restore a backup from Time Machine, click the up arrow next to the Time Machine window to find the right backup, then double-click a specific file or folder to check if the files are what you want to restore from the backup.
Step 3.If files are overwritten and were previously backed up by Time Machine, you can select them and click "Restore" to retrieve the old versions.
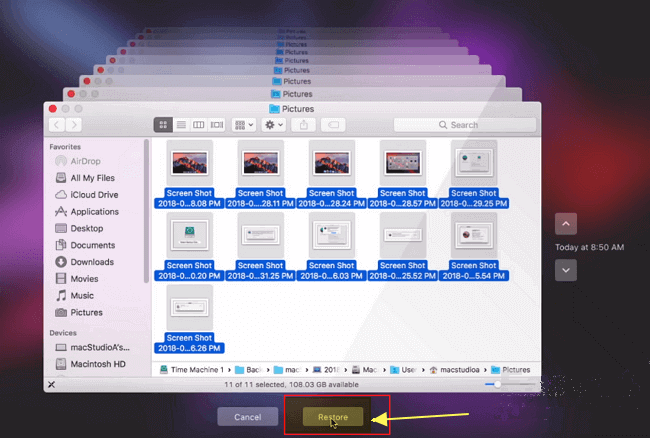
The replaced files on your Mac will be restored from a Time Machine backup to their original location, allowing you to use them again.
#2. How to Recover Replaced Files on Mac with Deep Data Recovery
Unfortunately, it's unlikely you can recover the deleted files without a backup, but you can try using a data recovery software on your Macbook to scan the USB stick and see if it can recover any files. You can also try using the "Disk Utility" app to see if the files are still on the USB stick and can be recovered. However, be aware that using data recovery software can potentially overwrite the remaining files on the USB stick, so use it with caution. If you're unable to recover the files, you may want to consider contacting your school to see if they have any backup copies of your training materials.
If you've emptied a storage device and saved new files on it, the old files will be replaced, but you can still restore them from a backup or recycle bin, if available.
50GB of lost files in the empty space on a 100GB USB can still be recovered, but the 50GB of new files saved on top of them cannot be restored.

Prior notice to recover replaced files on Mac hard drive or flash drive:
When you delete files on a storage device and save new ones, the replaced files in the occupied space are gone forever. However, if you've saved new files in the empty space, professional file recovery software can still help you recover the lost file.
If you're facing a situation where you've accidentally replaced files on your Mac, you can either restore the replaced files from a Time Machine backup if you had one, or seek the help of a professional Mac data recovery software.
Best way to get overwritten files back on Mac:
If you've accidentally emptied storage devices and replaced old data with new files, you can use third-party Mac data recovery software to recover the replaced files from the empty space. A powerful and safe alternative, Deep Data Recovery for Mac allows you to recover deleted files on Mac in just three steps, and supports restoring multiple file types such as pictures, videos, documents, and music files.
Step 1. Select the file types. Click the "Next" button.

Step 2. Select the disk location where you lost data and files, and click the "Scan" button.

Step 3. Deep Data Recovery for Mac will immediately scan your selected disk volume and display the scanning results on the left pane.

Step 4. The scan results shows you the files that were found. You can select the file(s) you want to recover and click the "Recover" button to retrieve them.
To Sum Up
We've gathered two scenarios where Mac users have lost files and provided solutions to help them recover the replaced files.
- Case 1 - You accidentally replaced a file on your Mac with a wrong version from a backup, and now you need to recover the original file. What's the next step?
- Case 2 - If you've replaced files on a hard drive or USB stick, you can try recovering them from a backup or using third-party data recovery software. This method is more reliable than trying to recover files from a corrupted drive, but it still requires a backup or a reliable recovery tool.
Related Articles
- 6 Best Free Deep Data Recovery Alternatives for Mac Data Recovery in 2022
- GetDataBack Mac & Windows
- What is Other on Mac Storage? Clear Other Storage Without Deleting Wrong Data
- How to Recover Deleted Photos from iCloud on Mac
- How to Recover Deleted Recordings on Sky Q and Sky Plus Box
If you've accidentally deleted recording files from your Sky Q or Sky+ box, don't worry, there are ways to recover them. You can try to undelete files from the Trash, or use Qiling hard drive recovery software to help you retrieve your deleted recordings. Both methods allow you to recover your shows, TV programs, or other recording files with ease. - How to Recover Deleted SQL Server Rows [2022]
Don't worry when you deleted a single or several rows in SQL Server. On this page, with the provided methods by Qiling software, you'll be able to recover deleted rows and repair corrupted MS SQL Server with ease.