What is Other on Mac Storage? Clear Other Storage Without Deleting Wrong Data
Quick Navigation:
| Workable Solutions | Step-by-step Troubleshooting |
|---|---|
| 1. Manually Clear Other Storage | Click the Apple icon and select About This Mac...Full steps |
|
2. Bulk Delete Other Data Safely |
Launch Qiling CleanGenius and click on...Full steps |
|
3. Recover Accidentally Deleted Files |
Select the location where your important...Full steps |
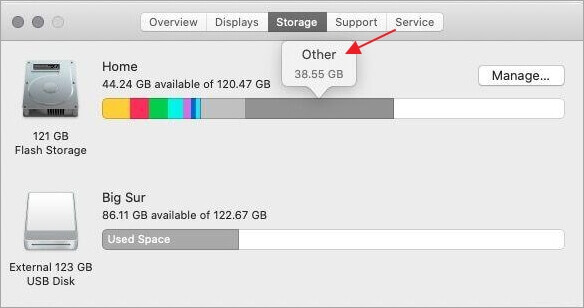
As a former Windows user, I found it challenging to manage storage on my Mac when I first switched. My MacBook Pro was getting cluttered, slow to start up, and applications were responding slowly, prompting me to clean it up. I tried deleting junk files and uninstalling unnecessary programs, but it didn't quite satisfy me. That's when I discovered the "Other" section on my Mac, which was taking up a whopping 38GB of space. I was curious to know what "Other" on Mac storage was and whether it was safe to delete it.
What's the Other Category on Mac Storage?
The Other folder on Mac contains various files not categorized under standard folders like Apps, Photos, Documents, Audio, or Video. This includes temporary files, cached data, and other unclassified file types, which can quickly fill up the Other folder.
How to Recover Deleted Cached Files on Mac
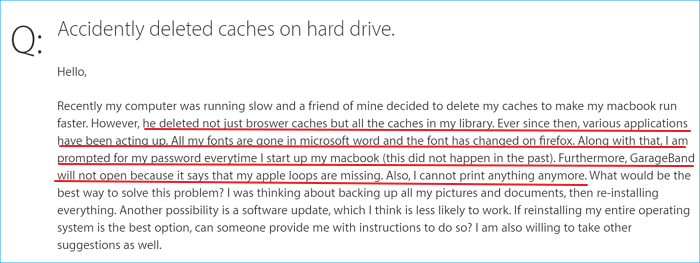
If you've accidentally deleted system files, libraries, scripts, or logs that are crucial for your system's functioning, there's a reliable solution. You can use the Windows System Restore feature to revert your system to a previous point when these files were still intact. This way, you can restore the deleted files and get your system up and running again. Just make sure to create a system restore point regularly to ensure you have a backup of your system's state. If you're unable to use System Restore or if the deleted files were not backed up, you can try using a system image backup or a third-party recovery tool to recover the lost data.
Q1: Can you tell me what the Other folder contains specifically?
The Other folder on a Mac contains a miscellaneous collection of files and data that don't fit into other categories, such as documents, images, videos, and music. This includes a wide range of file types, but not a comprehensive list, as the folder's contents can vary depending on individual user habits and the types of files they work with.
- 1. macOS system files and temporary files
- 2. Cache files, plugins, extensions and fonts
- 3. iCloud and iOS backup files
- 4. Project files created by AE and PS
Your Mac can easily identify common file types like music, pictures, and movies, but struggles with recognizing less common file types like ZIP, DMG, PSD, and some apps, which are often categorized as "Other" files.
Q2: Why is Other storage so big on Mac?
Mac's "Other" storage can be surprisingly huge. This category typically includes files that don't fit into the App, Photos, Audio, and Movie categories, such as massive DMG or ZIP disk images, large PSD and PDF files, or files accumulated by designers and students over time. As a result, users may be surprised to see a significant amount of storage taken up by "Other" on their Mac.
How to Manually Clear Other Storage on Mac
While clearing the Other storage space on a Mac, it's essential to note that not all files in this category are unnecessary or problematic. Some system files and program configuration data are crucial for the system and apps to function normally, and deleting them can cause serious issues. A complete guide is needed to safely clear the Other storage space, distinguishing between essential files and bloatware or garbage that can be safely removed.
- How to locate the Other storage section on Mac
- Click the Apple icon and select About This Mac to view storage information, where a grey chunk typically represents Other storage.
To access and view contents in Other storage, you'll need to know the path to access all Other storage data. This will allow you to view the contents stored in this location.
- Open Finder and select Go from the menu.
- Click Library from the dropdown menu.
The Library window displays a large number of files and folders, mostly categorized as "Other". Users can easily remove unwanted items by dragging them to the Trash.
- ~/Downloads
- ~/Library/Caches
- ~/Documents/Logs
How to Bulk Delete Other Data Safely
You may be hesitant to delete incorrect data using the manual method, which only targets minor file types, leaving many unnecessary files untouched, such as browse caches, plugins, temp files, extensions, duplicate files, app installation files, and even deprecated macOS update files.
To free up Other storage space on Mac, download and use Qiling CleanGenius for Mac, which can automatically select and remove insignificant storage data, performing a bulk spring cleaning. This approach avoids mistakes and effectively clears out useless files similar to those found in the Other data on Mac.
We highly recommend that every Mac user try our Mac cleaning utility at least once, as it can optimize system performance, enhance browsing fluency, and free up valuable storage space by removing accumulated garbage files and duplicated data. By running the software, you can clear browser caches and plugins, making it a worthwhile investment of your time.
Step 1. Launch Qiling CleanGenius and click on Browser Plug-ins;
Step 2. Select Browsers such as Safari, Google Chrome or Firefox that you need to clean up;
Click Clean Up to start cleaning the browser's plug-ins;
Click OK to confirm that you are ready to clean up selected browser's extensions, cookies and caches etc.
Your browsing histories, bookmarks and downloaded files won't be cleaned.
Step 3. Wait for the Mac browser plug-ins cleanup process complete.
To free up memory and space on your Macbook or iMac, try using Mac CleanGenius to free up memory, find and remove duplicated files, and uninstall unnecessary applications, which can help regain several to a dozen gigabytes of free space.
Bonus Tip: How to Recover Accidentally Deleted Files and Folders in Other Storage
Before we can conclude what the Other folder means on Mac storage and how to free up space from it, it's essential to provide users with additional information about Mac deleted files recovery. This will help users understand the importance of regularly cleaning up their Mac storage and how to recover deleted files if needed.
In case Mac owners accidentally clear critical files or folders from the Other storage in the Library window, they can still recover the lost files with the help of a reliable Mac data recovery software, such as Deep Data Recovery for Mac.
Deep Data Recovery
- Recover lost or deleted files, documents, photos, audio, music, and emails using specialized software or services that utilize algorithms and data recovery techniques to scan storage devices, networks, and cloud platforms for remnants of lost data, allowing users to restore and retrieve their important files and information.
- Recover files from various devices and storage media, including formatted hard drives, emptied trash bins, memory cards, flash drives, digital cameras, and camcorders.
- Data recovery can be crucial in various situations, including sudden deletion, formatting, hard drive corruption, virus attacks, and system crashes. In such cases, it's essential to have a reliable data recovery solution in place to restore lost files and prevent permanent data loss.
The software is capable of retrieving all types of files from your Mac storage drive as well as external storage devices, and is very user-friendly, requiring only three steps to complete the process.
Step 1. Select file types and click the "Next" button.

Step 2. Click on the location where your files were deleted and select the "Scan" button to start the recovery process.

Step 3. The software will perform both a quick scan and a deep scan on the selected volume, working diligently to locate as many deleted files as possible.

Step 4. The scan results will be displayed in the left pane, and you can recover your files by selecting them and clicking the "Recover" button.
Related Articles
- macOS Recovery - What Can Recovery Mode Do when macOS Breakdown?
- Recover Deleted iPhoto Library and Photos on Mac
- How to Restore from Time Machine: for Data Recovery and macOS Recovery
- 3 Methods: Recover Unsaved or Lost Excel File on Mac
- Email Recovery for Gmail, Yahoo, Outlook, Hotmail
If you've permanently deleted emails in Gmail, this article can help you recover them. You can also recover deleted emails in Outlook, Hotmail, or AOL. - How to Empty Recycle Bin on Windows 10 (On a Schedule)
To empty the Recycle Bin on Windows 10, you can right-click on the Recycle Bin icon on your desktop, select “Empty Recycle Bin” from the context menu, or press the Windows key + R to open the Run dialog box, type “recycle.bin” and press Enter.