[macOS Guide] | How to Reinstall macOS
| Workable Solutions | Step-by-step Troubleshooting |
|---|---|
| 1. Reinstall macOS from Recovery | Restart your Mac device > Press and hold the Command and R keys together until the Apple logo appears...Full steps |
| 2. Install an Earlier Version of macOS | Verify that your Mac can run earlier macOS versions > Download earlier versions > Click to install...Full steps |
|
3. Avoid Data Loss |
|
To reinstall macOS on your iMac, MacBook Pro, or Air without a USB flash drive or disc, follow these steps: Connect your Mac to the internet, go to Apple menu, select Restart, and hold down the Command (⌘) + R keys. This will boot your Mac in Recovery Mode. From there, you can select the option to reinstall macOS.
To reinstall macOS on your Mac, you can follow two methods. One way is to boot from the Recovery Mode and install the latest version of macOS. The other way is to use the App Store to download and install the latest version of macOS. Both methods can be completed in under an hour and are relatively straightforward. However, if you encounter any errors, it may become challenging to complete the task.

Reinstall macOS from Recovery
To enter the Recovery Mode on your Mac, start by shutting down your computer. Then, press the power button to turn it back on, but keep holding it down until you hear the second startup sound. Release the power button and immediately hold down the Command (⌘) and the 'R' keys. Keep holding them down until the Apple logo appears on the screen. This will take you to the Recovery Mode, where you can choose to restore from a Time Machine backup, reinstall macOS, or get the latest version of the operating system.
Step 1. To restart your Mac, press the power button or select "Restart" from the Apple logo in the top left corner of the screen. This will immediately shut down your device and then turn it back on.
Step 2. To force restart your Mac, press and hold the Command (⌘) and R keys together while it's rebooting. Hold them until you see the Apple logo, then release them. This will boot your Mac in Recovery Mode.

You've Entered into recovery Mode. Now to begin the installation, follow these steps:
Step 1. In macOS Recovery, select the Reinstall macOS option from the Tools window, then click Continue and follow the on-screen instructions.
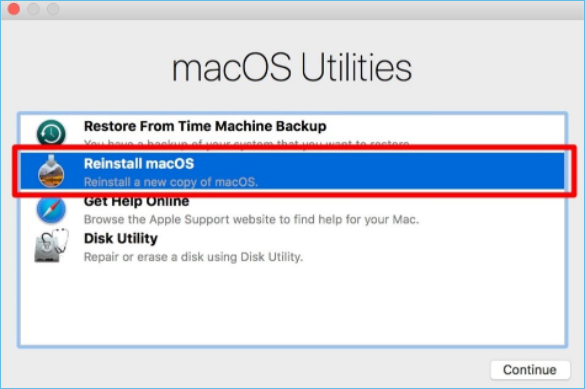
Step 2. To proceed, click "Agree" and then select your hard drive, followed by clicking "Install".
How to Install an Earlier Version of macOS
Downgrading macOS may be an option if your Mac is no longer running smoothly with a higher version, but be aware that not all Mac OS X versions are compatible with all devices. Apple's M1 chip, for example, prevents using an earlier version of Big Sur on your Mac, and typically, a Mac only runs the OS it came with or subsequent versions.
Step 1. To verify that your Mac can run the macOS or Mac OS X version you wish to install, you can check the model year and type of your Mac. Most Macs from 2006 or later can run macOS High Sierra (10.13).
Step 2. To install an earlier version of macOS, first, download the installer for the Mac OS X or macOS version you want to install.
Step 3. You can install the installer to update your Mac, but it will actually downgrade it. The installer will replace your current operating system with an older version, effectively reducing the functionality and security of your device.
Note: To install an older version of macOS on a Mac, you'll need to erase your data first, as newer macOS versions can't coexist with older ones. This means you'll lose access to your current operating system and data.
Avoid Data Loss when Updating or Reinstalling macOS
If your Mac is performing poorly or has a hardware failure, you may need to update or reinstall macOS. This can be a daunting task, especially if you're worried about losing your data. However, with the right preparation and tools, you can safely reinstall your operating system and restore all of your important files.
To ensure the safety of your data during a Mac reinstallation, you can use a data recovery program or a backup copy of your contents. You can back up your data in two ways:
1. Time Machine Backup
Using Time Machine, the built-in backup tool on your Mac ensures that all of your important data, including applications, music, photographs, email, and documents, are safely backed up. This means that if you accidentally delete or lose data, you can restore them from a backup, giving you peace of mind and protecting your digital life.
Step 1. Plugin an external storage device (USB).
Step 2. To access Time Machine options, navigate to the navigation bar and select Time Machine options, or go to Apple > System Settings > Time Machine.
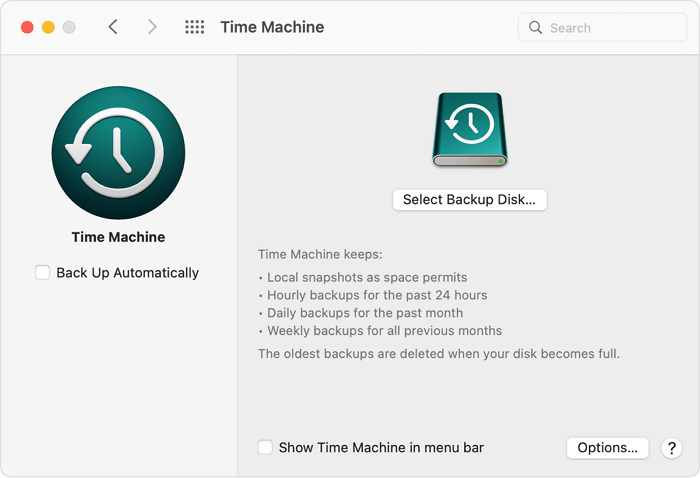
Step 3. Choose a backup disc!
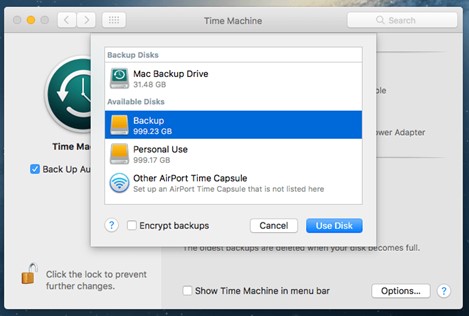
Step 4. Select the disc name and click Use Disk. Time Machine then automatically starts creating periodic backups without your intervention.
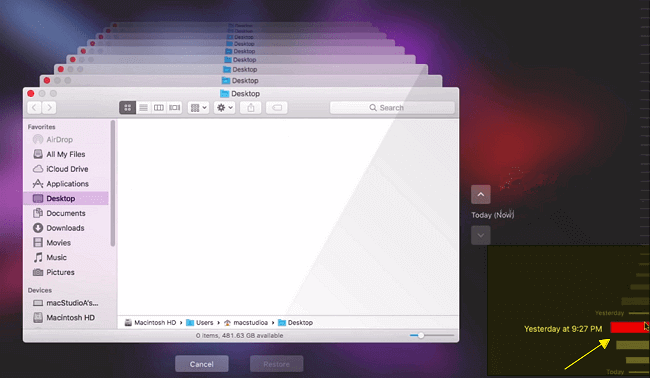
If you've factory reset your Mac or reinstalled macOS, you can recover your files by using Time Machine backups, iCloud backups, or an external drive. If you have a Time Machine backup, you can restore from it by going to System Preferences, then Time Machine, and selecting the backup you want to restore from.
Discover practical solutions to recover and restore Mac files after a factory reset, as well as a step-by-step guide on how to reset a MacBook Pro without losing any data.
2. The Deep Data Recovery
If you backed up your Mac data before reinstalling, you can retrieve it via Time Machine, an external hard drive, or other sources. If you didn't make backups, you'll need Deep Data Recovery to restore your data, which can easily recover data lost due to macOS reinstallation.
The best Mac data recovery tool is Deep Data Recovery, which can quickly and effectively recover all lost data, including office files, music, movies, and emails.
Deep Data Recovery for Mac
- Recover lost or deleted files, documents, photos, audio, music, effectively.
- You can recover files from a formatted hard drive and other commonly used data storage devices on your Mac using various software and techniques.
- Support Mac data recovery for sudden deletion, formatting, system crashes, and other unexpected situations.
If you've encountered a data loss problem after reinstalling macOS, you can recover lost data using Qiling Data Recovery for Mac. Follow these steps to get started.
Step 1. Select the file types. Click the "Next" button.

Step 2. Select the disk location where you lost data and files, then click the "Scan" button.

Step 3. Deep Data Recovery for Mac will immediately scan your selected disk volume and display the scanning results on the left pane.

Step 4. To recover your lost files, select the desired file(s) from the scan results and click the "Recover" button to have them restored.
People Also Ask
1. How do I erase and reinstall my iMac?
To erase and reinstall your iMac, follow the steps below to complete the process safely.
Step 1. Select Disk Utility.
Step 2. Depending on how you entered Recovery Mode, you may be prompted to launch Disk Utility immediately. If not, choose Utilities, then Disk Utility from the menu bar.
Step 3. View your hard disk list. Click "Erase" on your primary drive.
After wiping your data, you may reinstall macOS
Step 1. If you have a working recovery partition, choose "Reinstall macOS" and installation will start. Click "Continue" to proceed with the installation on a USB drive.
Step 2. Please select the Macintosh HD hard drive you specified earlier.
Step 3. MacOS will then start installing.
2. Does reinstall macOS delete everything?
You can reinstall MacOS on your Mac without losing any data by using Internet Recovery. To do this, restart your computer and keep pressing the Command+R key until the Apple logo appears. This will take you to a tools menu where you can select "Reinstall macOS Big Sur" to reinstall the operating system on top of the existing one.
3. How to reinstall macOS without Internet?
Using Ctrl+R to restart your Mac will reinstall the current version of macOS, which may include installing version 12.1 if it's the current version, without requiring an internet connection. This will install the most recent version of your operating system.
Conclusion
Reinstalling macOS in Recovery mode is usually a simple process on a Mac device. Before doing so, it's essential to back up your data, as it will be erased during the process. If you lose any data, the Qiling data recovery wizard can help you recover it. Once you've backed up your data, you can follow the instructions on how to reinstall macOS on your iMac, MacBook Pro, or Air. After the reinstallation is complete, you'll have a new-and-improved Mac ready to use.
Related Articles
- How-To | What to Do When My Mac Won't Boot Past Apple Logo
- [macOS Guideline] How to Enter Mac Internet Recovery Mode
- How to fix SSD not showing up on Mac?
- Snow Leopard Recovery Mode | How to Recover Data from Mac OS X
- Ultimate Guide to Partition Recovery on Windows 11/10/8/7 (2023)
Follow the latest guide to partition recovery on Windows 11/10/8/7 and you'll easily restore deleted or lost partitions and volumes that were accidentally deleted or lost. - Four Steps to Recover Deleted Ext3 Partitions in Windows 11, 10
If you're looking for a hassle-free way to recover deleted Ext3 partitions, consider using Ext3 recovery software, which can recover Ext3/Ext4 partitions in just four easy steps.