How to fix SSD not showing up on Mac?
Why is SSD not showing up on Mac?
If your Mac isn't detecting an SSD, whether it's new or used, it's a common issue that can occur with various brands like Samsung, SanDisk, and Crucial. Possible problems that might cause this issue include a faulty drive, incorrect SATA port, loose connections, or a malfunctioning Mac port. Additionally, the drive might not be properly formatted or recognized by the Mac's operating system, or there could be an issue with the drive's firmware or compatibility with the Mac's hardware. In some cases, the SSD might be physically damaged or have a manufacturing defect, which can also prevent it from being detected. If you're experiencing this issue, troubleshooting steps such as checking the drive's connections and formatting it can help resolve the problem.
- Connection Issue: The most common reason for an SSD not showing up on a Mac is often due to loose, worn, or damaged connecting cables, which can be easily resolved by checking and reseating the connections.
- USB Port issue: A faulty USB port can prevent the SSD from being recognized, causing it to not show up.
- MacOS problem: If the reasons above don't apply to your situation, then checking your macOS issue is necessary.
- SSD Problem: A broken or corrupted SSD can also be the reason why it's not working and not showing up, although it's not a common cause.
6 Fixes for SSD Not Showing or Detected by Mac
Most SSD connection or recognition problems can be fixed by yourself, and data is usually unaffected. However, some troubleshooting processes can endanger SSD data, so it's essential to backup your external storage first. If no backup is available, a reliable Mac data recovery program can be used to scan and export important data.
To fix the SSD not showing up issue, try checking the SSD's power connection and ensuring it's properly connected to your Mac. You can also try running a disk check and disk error checking tool, as well as checking the SSD's firmware and updating it if necessary.
Fix 1. Check If the USB Connection is Loose
Step 1. If the issue persists after swapping the USB cable, it's possible that the problem lies with the SSD itself. In this case, you may want to try using a different computer or a USB enclosure to see if the issue is specific to the current setup.
Step 2. Check the compatibility of your adapter by checking whether your SSD is using SATA I, II, or III.
Step 3. If you're experiencing issues with your SATA USB adapter, try using a different one to rule out any problems with the original adapter. Additionally, test the new adapter with a different drive to ensure it's not a problem with the drive itself.
Step 4. If your Mac has a C-type drive, you can try connecting the SSD directly to your Mac, bypassing the external enclosure. This might resolve the issue and allow you to access the SSD.
If you have a Samsung T5/T3 SSD and are seeing the "System Extension Blocked" and "No Samsung Portable SSD is connected" messages, go to System Preferences, click on Security & Privacy, and click the Allow button next to the message that says "System software from developer 'Samsung Electronics' was blocked from loading."
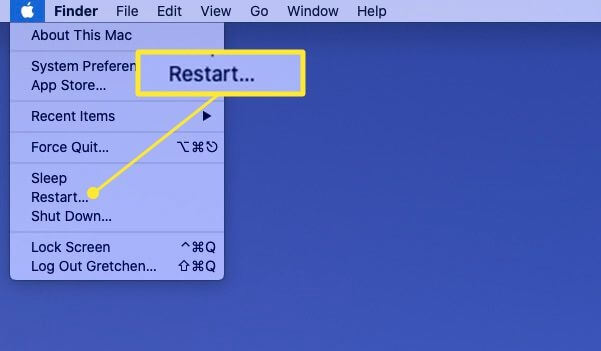
Fix 2. Restart Your Mac and Reconnect Again
Mac external SSD not showing issues are caused by system issues, which can be fixed by restarting your Mac. To do this, go to the "Apple menu" and select "Restart" to refresh the system's memory and give it a fresh start, which can resolve issues with the USB port being busy.
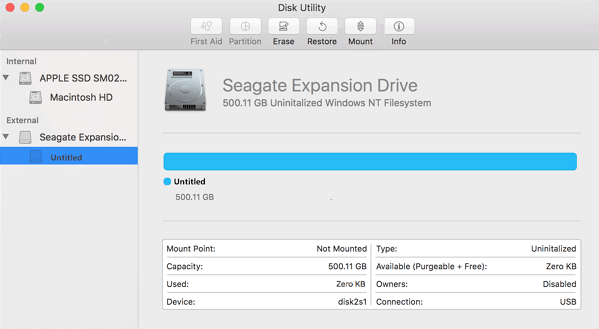
Fix 3. Mount SSD in Disk Utility
If your SSD is not showing up on your Mac, first check if it's listed in Disk Utility. If it is, ensure it's not physically damaged and you can mount and repair it. If not, it might be physically damaged.
Step 1. Go to System Preferences > Disk Utility.
Step 2. Make sure that the external disk is listed in the left sidebar.
Step 3. To make your external hard drive appear on your Mac, highlight your hard drive and select Mount. It should now appear under Devices in the Finder.
If an SSD used on other computers for a while no longer shows up on a macOS system, the issue is likely due to a corrupted or unsupported file system. In this scenario, the priority should be to recover any lost data from the SSD, followed by a reformat of the drive to ensure it's compatible and functional with the macOS system.
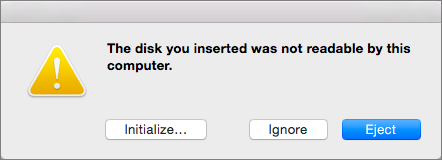
If your new SSD isn't showing up and you're getting an error message saying "the disk you inserted was not readable by this computer" in Disk Utility, try initializing the drive by erasing it in Disk Utility, making sure you don't have any data on the drive first.
Note: The Mac Operating System won't recognize an NTFS formatted SSD as writable, but a tool like NTFS for Mac can be used to write to an NTFS drive.
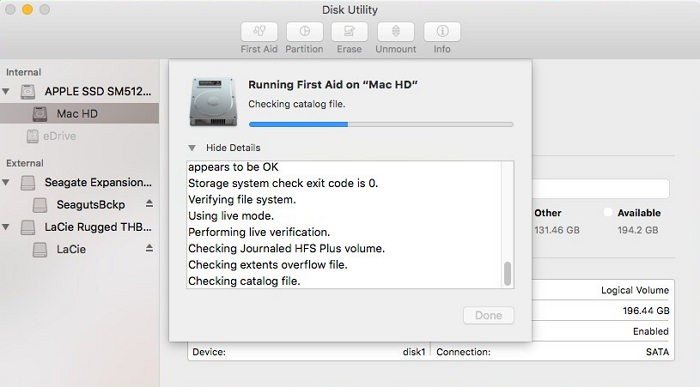
Fix 4. Repair SSD Errors with First Aid
If the SSD is mounted but not showing up on your Mac, there might be hardware errors. You can use the built-in First Aid feature to troubleshoot the issue. To do this, go to Disk Utility, select the SSD in the sidebar, click the "First Aid" button, and follow the on-screen instructions. This process will scan and repair any errors on the SSD, potentially resolving the issue.
Step 1. Launch Disk Utility.
Step 2. Select the grayed-out SSD located at the left sidebar.
Step 3. Hit the "First Aid" on the top.
Fix 5. Advanced Repair SSD by Using Terminal
If Disk Utility fails to repair your SSD, you can try using Terminal commands to fix the problem. To do this, you can follow a series of steps that involve using Terminal commands to diagnose and repair the issue with your SSD.
Step 1. Go to Finder > Applications > Utilities.
Step 2. Double-click on Terminal to launch the application.
Step 3. At the command prompt, type `diskutil list` and press Return. Note the identifier of the SSD.
Step 4. Type diskutil verifyVolume SSD_ID> hit Return.
If your SSD is the startup disk, use its identifier. Otherwise, type the identifier as noted previously. If no error appears, SSD repair won't help. But if your Mac's drive is corrupted and needs fixing, type 'diskutil repairVolume SSD_ID' and hit Return.
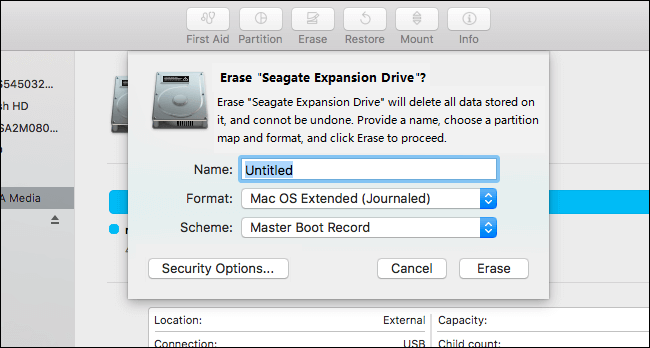
Fix 6. Format Unrecognized SSD on Mac
If all else fails, you can try formatting your SSD, but be aware that this will erase all data on it, so make sure to back up or recover any important files before doing so.
Step 1. Launch Disk Utility.
Step 2. Select the SSD on the top left side.
Step 3. Click on "Erase".
Step 4. Complete related information and click Erase.
How to Recover Data from Formatted SSD on Mac?
Formatting a disk on a Mac can result in complete data loss, especially if the data wasn't backed up. However, there's still a chance to recover the data using a data recovery software like Deep Data Recovery for Mac.
What does the Deep Data Recovery for Mac do for you?
Deep Data Recovery for Mac is a reliable software that scans and recovers lost or deleted files from various storage devices, including hard drives, external drives, fusion drives, USB, cameras, memory cards, and more. With just three simple steps, users can scan and recover their lost data. Additionally, the software can automatically repair damaged images and videos during the scanning process.
Deep Data Recovery for Mac is worth trying, so download the software from the button below and follow the guide to see how to recover your lost data.
Step 1. Launch Deep Data Recovery, select file types, and click "Next" to start the recovery process.

Step 2. Connect your external hard drive to your Mac and launch Deep Data Recovery for Mac. Select the external disk and click "Scan" to let the software search for lost files on it.

Step 3. After scanning, all files will be listed in the left panel of the scan results.

Step 4. Select the files you want to recover and click the "Recover" button, but avoid saving the recoverable files to the external hard drive to prevent data overwriting.
Note: The chances of data recovery on a Trim-enabled SSD are significantly reduced due to the Trim technology, which optimizes SSD usage and performance.
To fix the 'The disk you inserted was not readable by this computer' error on a Mac, try the following: restart your Mac, then try to eject the disk using the 'Eject' option in the Finder window. If that doesn't work, try using the 'Disk Utility' app to repair the disk permissions.
Easy and efficient methods to fix 'the disk you inserted was not readable by this computer' error on Mac are offered here.
Related Articles
- How to Recover Permanently Deleted Files on Mac with Free and Paid Solutions
- NTFS Recovery: Recover Lost Data from NTFS Partition
- Mac Not Recognizing External Hard Drive #6 Solutions#Data Recovery#
- Fix 'The disk you inserted was not readable by this computer' on Mac
- Email Recovery for Gmail, Yahoo, Outlook, Hotmail
If you're struggling to find out how to recover permanently deleted emails, this article can help. It provides step-by-step guides on how to recover deleted emails in various email services, including Gmail, Outlook, Hotmail, and AOL. - [5 Solutions for macOS] Recover Deleted Files After Updating to Catalina
How to recover deleted files after updating to Catalina? This article teaches you five ways to recover lost files on macOS Catalina. You can recover deleted files with Time Machine, recovery software, iCloud, Apple Support, and by checking the Mac folder.