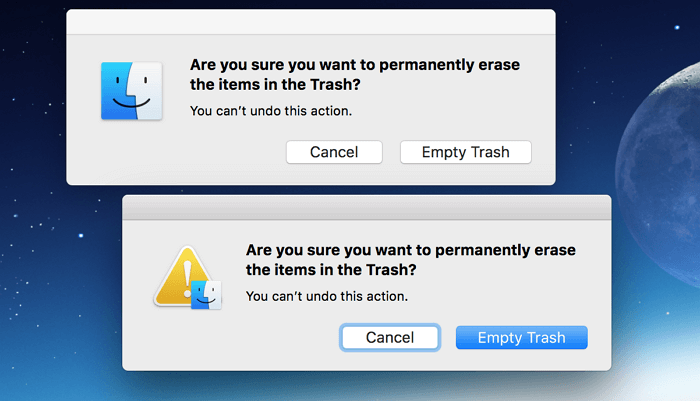
How to Force Empty Trash on Mac| 4 Fixes
Here are a few fixes for "how to force empty Trash on mac" that you may find helpful. If you're experiencing issues with emptying the Trash bin on your Mac, try restarting your computer, checking for any stuck processes, or using the Terminal command "rm -rf ~/.Trash" to force empty the Trash. You can also try resetting the System Management Controller (SMC) or the Power Management Unit (PMU), or using the "touch ~/.Trash/.

Why You Need Force Empty Trash on Mac
Understanding where the Trash is located on a Mac and the reasons behind it is essential before learning how to make macOS force empty the Trash. The primary catalysts for doing this include issues with disk space, corrupted files, or system updates that require a clean slate, among other reasons.
Users' privacy
Occasionally, users need to remove personal or sensitive data from their Macs, prompting the need to force empty the Trash and wipe private data to prevent future unauthorized access.
User's security
To ensure your security when selling your Mac, it's essential to securely erase all data, including emptying the Trash. This step is crucial to prevent a potential data breach. By doing so, you'll be able to sell your Mac with confidence, knowing that your personal information is protected.
More space
Removing unnecessary items from the Trash on a Mac can free up storage space if the device runs low, and forcing the Trash to clear can quickly release the system's hold.
Speed up
Removing extra files and data can significantly speed up your macOS. By getting rid of unnecessary items, you can free up space and improve your system's performance. Simply drag them to the Trash Bin, empty it, and you'll notice a noticeable boost in speed. Alternatively, formatting your Mac can also give you a fresh start, but be sure to back up any important files first.
5 Correct Methods to Force Empty Mac's Trash
Forcing empty Trash on a Mac is a simple process, and there are five methods to achieve this. Regardless of the cause, whether it's a stuck file or a problem with the Trash, you can use these methods to clear out the Trash on your Mac. By following these steps, you'll be able to force-empty the Trash and free up space on your computer.
Fix 1. Use the Terminal to empty Trash on Mac
It's common for Mac users to delete or recover files from the Terminal. If you want to force empty Trash on your Mac, running Big Sur, Monterey, or higher editions like Ventura, follow these procedures with caution, as incorrect Terminal commands can delete more than just the Trash.
Step 1. Launch Terminal on your Mac by accessing Spotlight and searching for Terminal. This is the quickest way to access the Terminal application.
Step 2. Type "sudo rm -R", then add a space (do not hit the Enter key at this point).
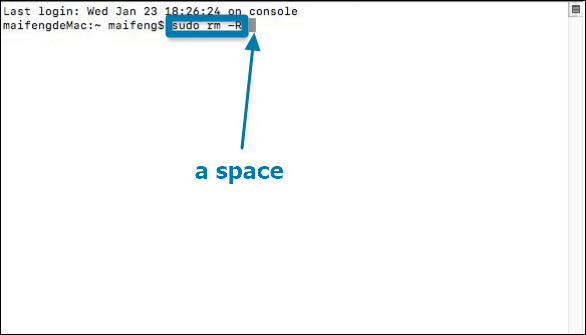
Step 3. To empty the Trash, select the items you want to delete, click the trash symbol in the dock, and drag the selected items to the Terminal window. Press the Enter key.
Step 4. Type your administrator password. And the password is invisible when you insert it.
Step 5. Press the Enter key once more. Wait for a while patiently. All done! This is a straightforward and simple instruction that can be applied to various situations.
Fix 2. Force empty trash on Mac in "safe mode."
If your Mac shows that the Trash file is in use, it may be due to a launch or login item. Try booting your Mac in Safe mode to see if any apps are interfering with the Trash.
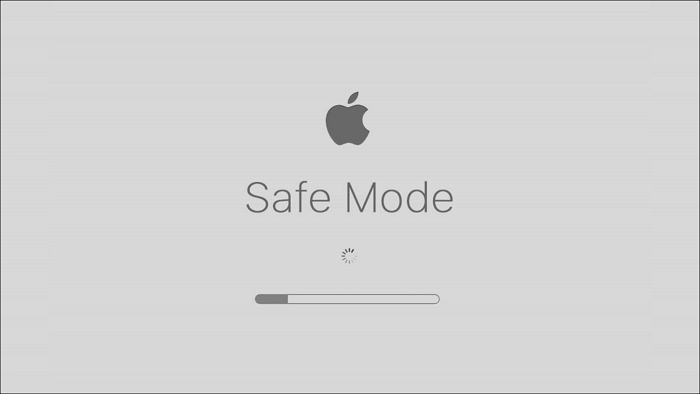
Step 1. Immediately hold the Shift key as soon as your Mac starts booting up. This will boot your Mac in Safe Mode.
Step 2. Release the key when you see the Apple logo. Your screen's upper-right corner should display "Safe Boot" to confirm the process is complete.
Step 3. The steps to completely remove a program from your Mac are as follows: Go to the Applications folder and find the program you want to delete. Drag the program to the Trash.
Fix 3. Force empty Mac Trash with the option key
On a Mac, if you're unable to open the Trash folder to delete its contents, you can use the Option key to force empty the Trash without opening it. This key combination allows access to specific program functions, enabling you to bypass the usual procedure and delete the contents of the Trash.
- Notice:
- This is an old method for earlier Mac versions, possibly from before 2015, which you might like to try. It will likely only work if your Mac is an early version from that time period.
Step 1. To find the Trash folder on your Mac's dock, click it, and hold the icon.
Step 2. To empty the Trash, double-click the Trash icon on your computer while holding down the Option key or the combination of Option and Shift keys. This action will permanently delete the contents of the Trash, bypassing the usual confirmation prompt.
Step 3. Select "Empty Trash" from the list of choices.
Step 4. Confirm whether you have forced empty the Trash when you see the pop-up windows.

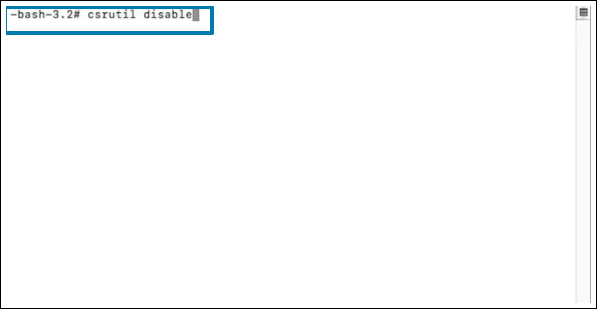
Fix 4. Utilizing a third-party tool
Try a third-To force empty Trash on a Mac using a third-party tool, you need to disable System Integrity Protection (SIP) first, which prevents third-party apps from accessing certain Mac capabilities. Once SIP is disabled, you can use a third-party tool to forcibly empty the Trash.
Step 1. Holding Command+R to boot your Mac in Recovery Mode.
Step 2. To turn on your iPhone, press and hold the Sleep/Wake button until the Apple logo appears. Then, release the button and wait for the login screen to appear.
Step 3. To disable System Integrity Protection (SIP) on your Mac, enter the command "csrutil disable" followed by a semicolon and then "reboot" in Terminal, and then restart your Mac in normal mode.
Step 4. The System Integrity Protection is temporarily disabled, allowing you to empty the Trash on your Mac.
Recover Permanently Deleted Files from Emptied Trash on Mac
Users may unintentionally delete files from the Trash. Implementing Deep Data Recovery for Mac, which is compatible with all current macOS versions, can help recover damaged, erased, or missing files, including those wiped from a drive or emptied from the Trash, with various scanning options to preview data before restoring.
Follow these steps to recover permanently deleted files and data.
Step 1. Scan for deleted files
Select the hard drive, external drive, or SSD where your important data & files were deleted, and click "Search for lost files".
Step 2. Filter the lost files
The software will perform quick and deep scans on the selected volume to find deleted files, and allow filtering of desired files by type and path.
Step 3. Recover deleted files
Double-To recover deleted files, click on the deleted files to preview them. After reviewing, click the "Recover" button to restore them.
To Wrap It Up
Using these tried-If you're struggling to empty the Trash on your Mac, the article may provide helpful methods to resolve the issue. Alternatively, if you've accidentally deleted data from the Trash, consider using Deep Data Recovery for Mac, a powerful software that can recover deleted files and data from various sources and conditions.
Force Empty Trash on Mac FAQs
Here are some other questions about forcing empty Trash on Mac.
1. Why won't my Mac let me empty the Trash?
- Files are occupied by an active program or a closed app for a background task.
- Files require repair because they are corrupted.
- Files are locked or under system protection integrity.
- Some files have been locked.
2. How do I empty Mac trash when it says "without permissions"?
To resolve the issue, select Get Info from the context menu of the item in your Trash bin, click your user name to confirm the file permissions, and change the permissions option to "Read & Write." This will ensure every file is readable and writable, and if not, you must adjust the file's rights to remove it.
3. How do I empty Mac trash when the "disk is full"?
If you get the error message "The process can't be finished because the disk is full," try restarting your Mac in Safe Mode and emptying the Trash again instead of backing up, erasing, and reinstalling.
4. Failed to force empty Trash on Mac?
If you're experiencing issues with Force Emptying your Trash on Mac, don't worry, there are ways to resolve the problem. Despite the various reasons that may be causing the issue, you can try repairing your macOS to get your Trash working again.
- Restart Mac in safe mode.
- Check virus invasion and repair your system files.
- Repair the drive before emptying the Trash.
Related Articles
- How to Find External Hard Drive on Mac In Case It's Working but Not Showing Up
- MacOS Comparison: Monterey vs Big Sur
- Move to Trash Shortcut on Mac with Three Sets
- How to Recover Unsaved/Deleted Sketch Files on Mac [4 Tips for Sketch Users]
- Recover Deleted or Unsaved PowerPoint Files
This page includes two ways - using powerful PowerPoint recovery software or the manual method to help you recover deleted or unsaved PowerPoint files without quality loss. With Qiling Data Recovery, it is a piece of cake to recover deleted PowerPoint files in Windows 11/10/8.1/8/7. - Email Recovery for Gmail, Yahoo, Outlook, Hotmail
How do I recover permanently deleted emails in Gmail? If you're struggling to find out how to recover deleted emails, read this article to learn how to recover deleted emails in Gmail, Outlook, Hotmail, or AOL.