Move to Trash Shortcut on Mac with Three Sets
Why Should I Move Files to Trash on Mac with Shortcut
As a Mac user, you may want to declutter your desktop by storing unwanted files and folders. The Trash on Mac is the perfect place to keep these items. You can move files to Trash using common methods or quickly with a shortcut, making it easy to tidy up your desktop in just a second.
If you have a cluttered desktop with unwanted files, this is for you. We'll show you how to quickly move them to the Trash on your Mac by introducing a useful shortcut, and you can also watch a video on the topic for a visual guide.
Move to Trash Shortcut(Three Ways)
The trash icon on a Mac is typically located on the dock, which is usually at the bottom of the screen. It's a simple, wastebasket-shaped icon that you can click on to access the trash. Alternatively, you can also right-click (or control-click) on the desktop and select "Empty Trash" from the context menu to delete any items you've thrown away.
![]()
You can use the keyboard shortcuts Command + Delete, the context menu, or the right-click menu to delete files to Trash.
Move Files to Trash Bin Shortcut - Command + Delete
You can press keys on your keyboard to delete files and folders, making it a simple way to move them to Trash.
Step 1. Select all the unwanted files and folders.
Step 2. Press both the Command and Delete buttons.

Step 3. If the files are locked, click "Continue" to confirm.
Step 4. All the files you delete will be kept in Trash.
Empty Trash on Mac Shortcut - Command + Shift + Delete
Keeping deleted files and folders in the Trash on your Mac for a long time can slow down your device and take up space. Fortunately, the Trash on Mac will automatically empty itself every 30 days, or you can set it to delete files immediately. If you prefer the latter, you can stop the automatic deletion and empty the Trash on your own schedule, or quickly do so using a shortcut. This way, you can maintain control over your deleted files and keep your Mac running smoothly.
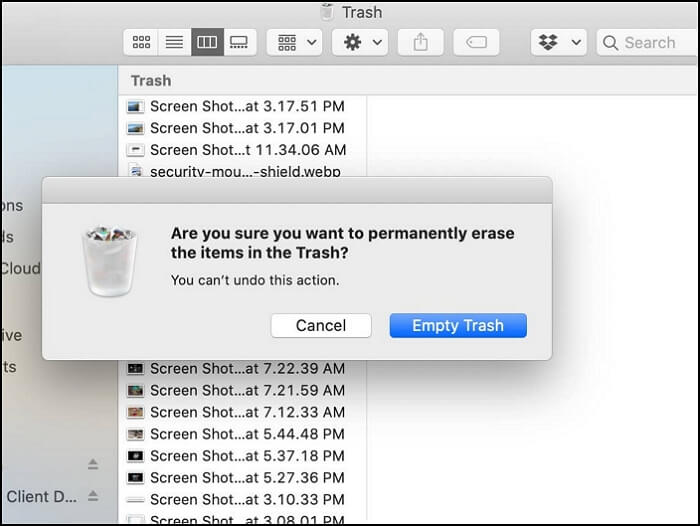
Step 1. Hold the Command key, the Shift key, and the Delete key at the same time to clear the cache.
Step 2. With this method, you may be asked to confirm.
Step 3. If you're certain you want to delete all files, simply click on "Empty Trash".
Empty Trash on Mac Shortcut Without Confirm
To empty the Trash on a Mac without a confirmation dialog box, press four keys simultaneously: Command + Shift + Option + Delete. This will bypass the usual confirmation prompt, allowing you to delete the contents of the Trash immediately.
Be careful using this method as your files and folders in the Trash will be deleted permanently once you press the four keys.
Note: If you're having trouble emptying the Trash on your Mac, don't worry, it's an easy fix. The issue is usually caused by a file or folder being locked, which prevents the Trash from being emptied. To resolve this, try clicking on the "Empty" button, then select the "Secure Empty Trash" option.
Common Ways to Move to Trash on Mac
After learning to move files to Trash with shortcuts, you may want to know the common ways to do so. We will teach you moving files to Trash in two common ways.
Method 1. Move Files to Trash Bin with Right-click
To delete files and folders on a Mac, follow these steps: simply select the item you want to delete, click the "Edit" menu and choose "Delete" (or press the Delete key), or right-click (or control-click) on the item and choose "Delete" from the context menu. You can also drag the item to the Trash icon on the Dock, or select it and choose "Move to Trash" from the File menu. Once you've deleted an item, you can empty the Trash by right-clicking (or control-clicking) on the Trash icon and choosing "Empty Trash" from the context menu.
Step 1. To delete an item, click on it to select it, then press the delete key on your keyboard. Alternatively, you can right-click the item and choose the "delete" option from the context menu.
Step 2. You will see the active list of this item. Select "Move to Trash" from the options.
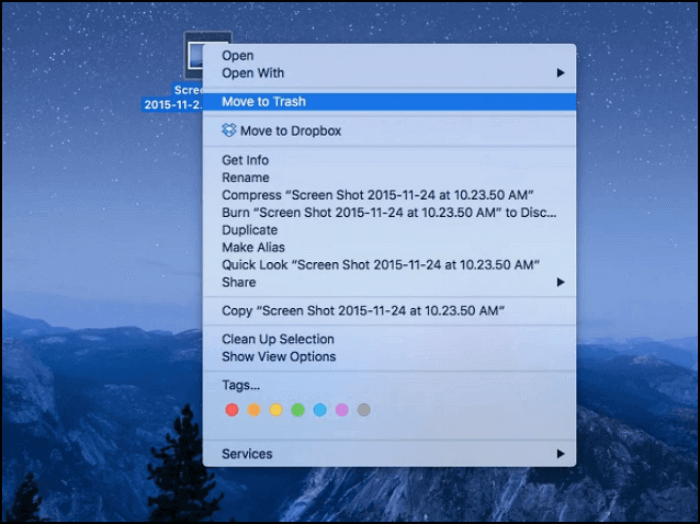
Step 3. Once you've deleted a file, it will be moved to the Trash folder. From there, you can choose to either delete it permanently by emptying the Trash, or restore it to its original location.
Method 2. Move Files to Trash Bin by Dragging
You can move files to the Trash on Mac by dragging them to the Trash icon in the Dock, right-clicking on the file and selecting "Move to Trash" from the context menu, or using the "Move to Trash" option in the Finder's File menu. However, if you want to do it quickly, you can also use the keyboard shortcut Command + Delete to move a selected file to the Trash. This shortcut can save you time and effort when deleting files.
Step 1. Select the files and folders you want to delete.
Step 2. Drag them to the Trash on Mac.
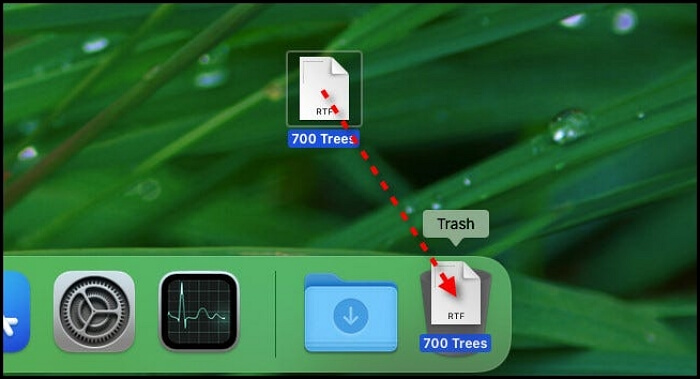
Step 3. Once you've deleted a file or folder, you can find it in the Trash, where you can recover it if needed.
How to Recover Deleted Files from Trash on Mac (2 Ways)
Before emptying the Trash on a Mac, files and folders can be recovered directly. If the Trash has been emptied, recovery software can still be used to retrieve lost files.
How to Recover Temporarily Deleted Files in Trash on Mac
If you decide you no longer need a file or folder, you can move it to the Trash, and if you change your mind, you can recover it with just one click.
Step 1. Find the file or folder you want in the Trash.
Step 2. Right-click the file and choose "Put Back".
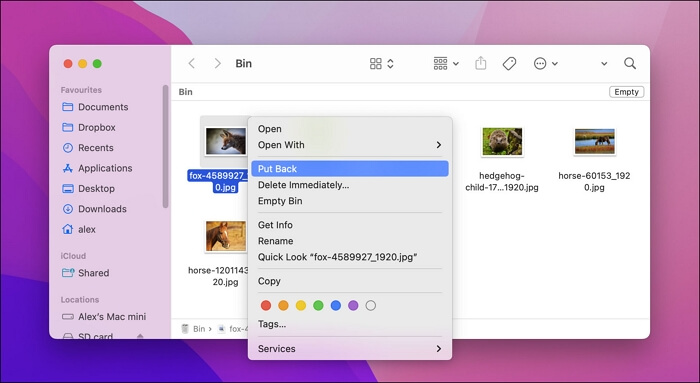
Step 3. Then you can find this file in the original position.
How to Recover Permanently Deleted Files from Emptied Trash on Mac
If you've emptied the Trash on your Mac, you can use a data recovery tool like Deep Data Recovery for Mac to recover deleted files.
With Deep Data Recovery for Mac, you can easily recover deleted files, including accidentally deleted files, permanently deleted files, unsaved Word documents, and deleted videos or photos, without worrying about how to recover Trash Mac or recover SD card Mac.
To recover deleted files and folders from an emptied Trash on Mac, follow these three steps: first, stop using your Mac immediately to prevent any new data from being written to the disk; second, download and install a reliable Mac data recovery software, such as Disk Drill or Deep Data Recovery Wizard, which can scan your Mac's hard drive for deleted files; third, select the files and folders you want to recover and follow the software's instructions to restore them to their original location or a new location on your Mac.
Step 1. Select the drive to be scanned
In the main Deep Data Recovery window, select the drive you need to recover lost/deleted files from and click the "Search for lost files" button.
Step 2. Select your lost data/files
Deep Data Recovery for Mac will immediately scan your selected disk volume, displaying the scanning results on the left pane, where you can sort the results to find specific files if needed.
Step 3. Recover lost/deleted data
After finding the desired files, preview them and click "Recover" to start the recovery process for your deleted or lost Mac files.
Bonus Tips: How to Fix Move to Trash Shortcut Mac Not Working
If you're having trouble moving files to the Trash due to unresponsive shortcuts, try the following solutions: Check if the shortcut is properly linked to the Trash folder, ensure the shortcut is not corrupted or deleted, and try creating a new shortcut or using the "Move to Trash" option from the context menu. Additionally, check for any software conflicts or updates that might be interfering with the shortcut's functionality. If none of these solutions work, you may want to consider reinstalling the operating system or seeking further assistance from a technical expert.
Tip 1. To resolve the issue, go to System Preferences and ensure that Command is enabled and mapped to the Cmd key. This should be done to allow the Command key to function correctly.
Tip 2. Check the custom shortcuts in the Keyboard Shortcut panel.
Tip 3. To check the shortcut associated with "Move to Trash", right-click a file in the Finder, and look at the context menu. The shortcut should be listed there.
Conclusion
With the detailed guide, you can now easily move files to Trash on Mac using shortcuts. To do this, simply hold Command and Delete to move files to Trash. If you want to empty the Trash, you can use Command + Shift + Delete or Command + Shift + Option + Delete. Remember to download Deep Data Recovery for Mac if you ever need to recover data, as it can greatly help you recover any lost files.
Move to Trash Shortcut on Mac FAQs
Do you have further questions? Find answers here:
How do I move multiple items to Trash on Mac?
To delete files on a Mac, open the folder containing the files you want to delete, hold the Command key while left-clicking each file, and then drag them to the Trash.
What is the shortcut to delete a file on Mac?
The delete keys on a Mac are Command and Delete. Pressing both keys will move files and folders to the Trash. To empty the Trash, use Command + Shift + Delete or Command + Shift + Option + Delete.
How do you get to the Trash Bin on a Mac?
The Trash Bin on a Mac can usually be found on the desktop, but if you can't locate it, you can use the Terminal or search function to find it.
How do you Delete files without the Delete button on a Mac?
On Mac, you can delete files with shortcuts. Holding Command and Delete moves files to Trash, while Command + Shift + Delete and Command + Shift + Option + Delete can help you empty the Trash.
Related Articles
- What Is the Other in My Mac Storage and How to Clear It
- How to Fix Mac Won't Shut Down Problem in 3 Minutes
- How to Recover Deleted Applications on Mac with Free and Proved Ways
- How to Fix Mac White Screen of Death? [macOS Ventura, Monterey, Big Sur]
- How to Recover Files from Hard Drive Using CMD? Easy & Free!
How to recover files from hard drive using CMD? You can easily recover files using different commands and the first one is to use the attrib command to exclude the hidden files. - How to Recover Files from Ransomware Attack [Full Guide 2022]
Are you looking for how to recover files from ransomware? Check it out here to learn 4 easy solutions to ransomware recovery.