Format Your Mac For Sale without Difficulty
Quick Navigation:
- 1. Why Need to Format Your Mac Before Selling It
- 2. Erase Everything on Your Mac(2 Effective Methods!)
- 3. Restore Your Data from Backup(Quick Steps!)
- 4. Bonus Tip: Recover Mac Data After Mis-Format
Before disposing of your Mac, you must go through a series of fundamental procedures to protect the privacy of your personal information stored on it. This includes deleting sensitive data, wiping the hard drive, and resetting the device to its factory settings.
Despite emptying the Trash can and removing sensitive files from your macOS hard drive, your Mac still stores important and sensitive information about you and your data in various locations.
To format a Mac for sale, start by backing up your data and erasing all personal information. This includes deleting any files, photos, and other data from your computer. Next, use the built-in Disk Utility to erase the startup disk, which will wipe all data from your Mac. You can also use a third-party software to securely erase your Mac, if you're selling it to someone who might be able to recover your data.
Why Need to Format Your Mac Before Selling It
Here are the reasons to format your Mac before selling it:
- To safeguard your personal data and ensure unauthorized access, use a VPN, enable two-factor authentication, and regularly update your passwords.
- Before you hand your Mac to someone else, ensure it's running smoothly and efficiently. This includes checking for any software updates, running a virus scan, and ensuring all necessary drivers are installed and up-to-date.
- To ensure the computer doesn't have viruses and malware installed in it, use a reputable antivirus software and regularly scan the system. Additionally, only download software and apps from trusted sources, and be cautious when clicking on links or opening email attachments from unknown senders.
- To securely erase private information from a Mac, use the built-in "Secure Empty Trash" feature, which overwrites the data with zeros. Alternatively, use the "Quick Erase" or "Full Erase" options in the Disk Utility app to securely erase data from the hard drive or individual partitions.
To recover data from a formatted Mac hard drive, you can use a data recovery software such as Disk Drill or Data Rescue. These programs can scan the formatted drive and recover deleted or lost files.
You always feel refreshed after reformatting your Mac's drive.
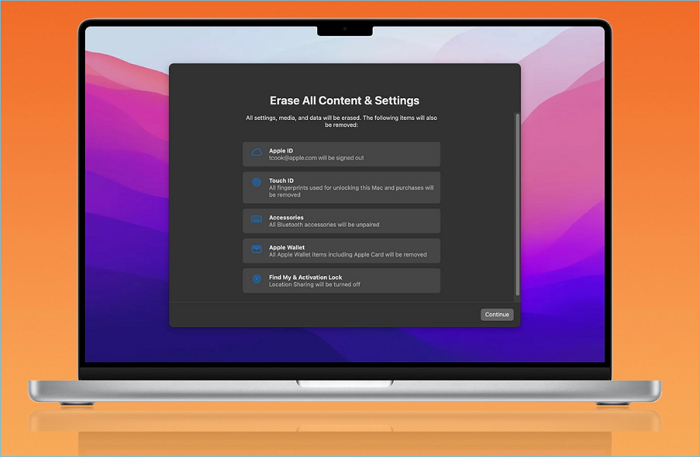
Erase Everything on Your Mac
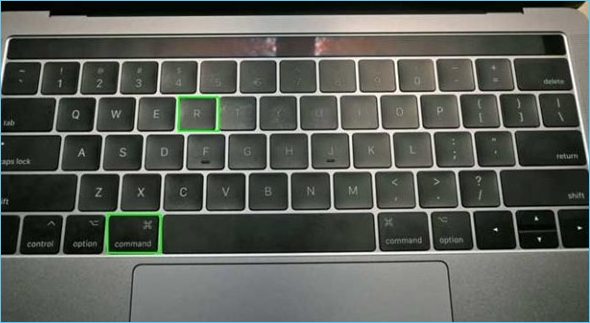
To erase or format everything on your macOS, you'll need to restart your computer and immediately hold down the Command (⌘) + R keys. This will boot your computer in Recovery Mode, allowing you to access the Disk Utility app.
1. Backup Your Important Data Using Time Machine
Time Machine backs up various types of data, including applications, music, papers, images, emails, and system files, and can be set to back up hourly, daily, or weekly, depending on the user's preference.
Time Machine creates a fresh backup of your Mac every hour, and keeps a daily backup for the most recent 30 days.
The system will automatically maintain weekly backups as long as there is space left on the storage device. When space runs out, the oldest backups will be removed and erased.
Step 1. To add an external hard disk to your Mac, simply connect it.
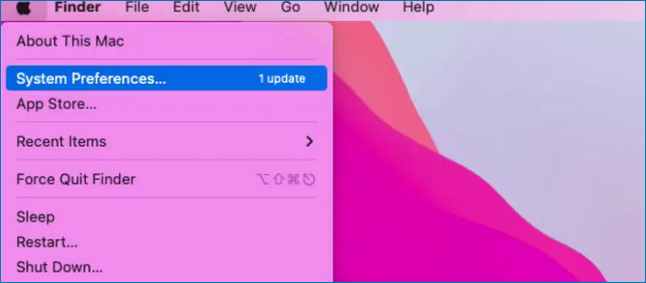
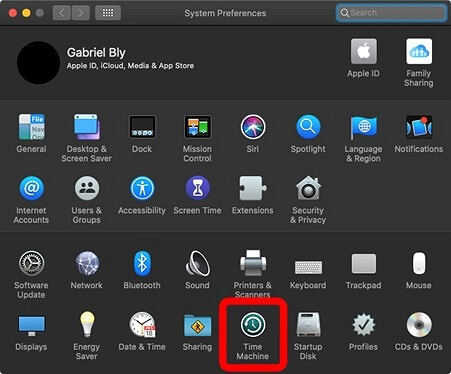
Step 2. After that, choose the Apple symbol located in the menu bar.
Step 3. Next, choose the System Preferences menu option.
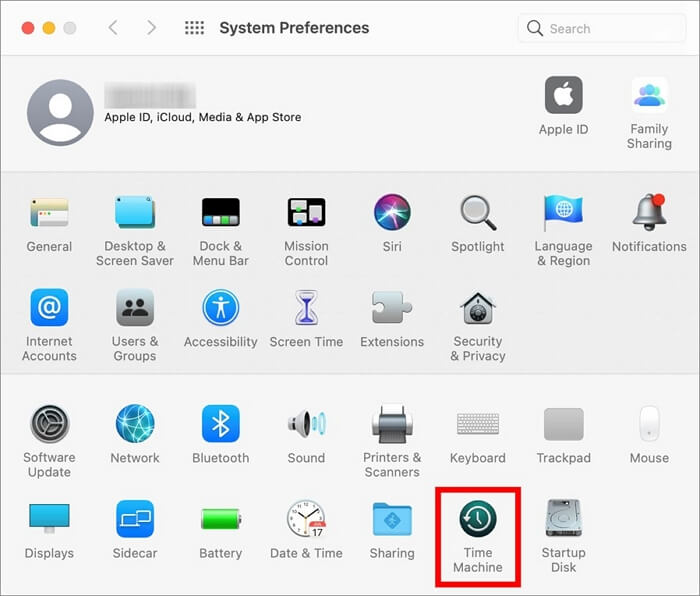
Step 4. After that, choose the Time Machine option.
Step 5. After that, choose the backup disk you want to use.
Step 6. Choose a disk drive and click the Use Disk button.
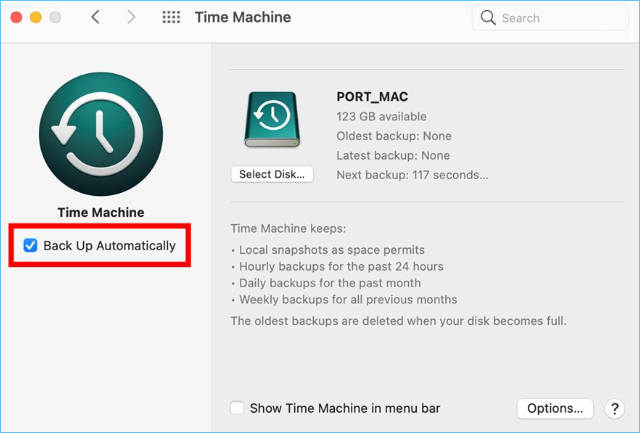
Step 7. To complete the process, check the box next to "Back Up Automatically".
Note: If your Mac doesn't initiate the backup process automatically, you can start it manually.
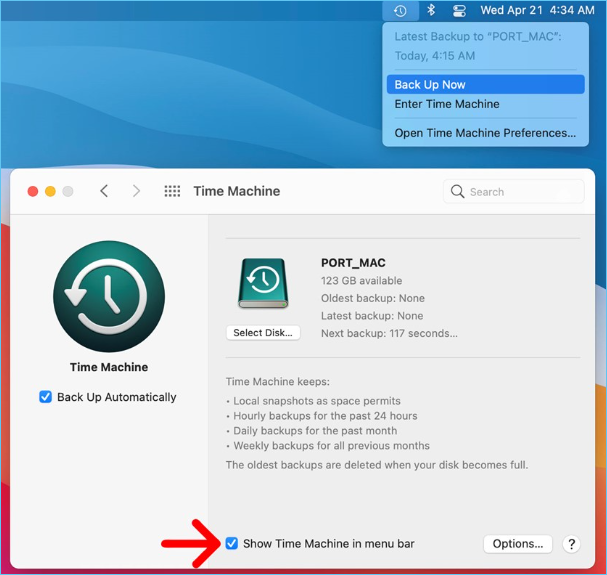
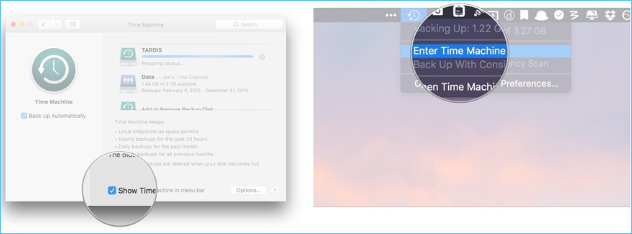
Step 8. To show Time Machine, check the box next to Show Time Machine in the menu bar and click the button.
Step 9. Click the Time Machine symbol in your menu bar and select "Back Up Now" to initiate a backup.
2. Reset macOS
Now, to reset your macOS, follow the procedure below:
Step 1. Turn on your Mac and immediately hold down the Command (⌘) and R keys on your keyboard. Keep holding them until you see the Apple logo, then you can release the keys.
Step 2. Choose the language you want to continue in.
Step 3. Select Disk Utility, then click the Continue button.

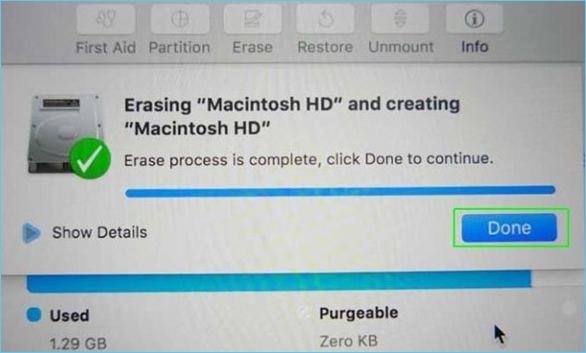
Step 4. Select your starting disk from the sidebar, which should be titled Macintosh HD by default, and then click the option labeled Erase.
Step 5. Select Mac OS Extended (Journaled) from the drop-down menu and click the Erase button after deciding on a name for the disk.
Note: To add a layer of protection to your disc, choose the "Journaled, Encrypted" option and create a password for it. Select the GUID Partition Map option.
Step 6. After clicking Erase, you may close the window and then click Done.
Step 7. To connect to your wireless network, click the Wi-Fi icon in the upper right-hand corner, as you would on a Mac, if you haven't already.
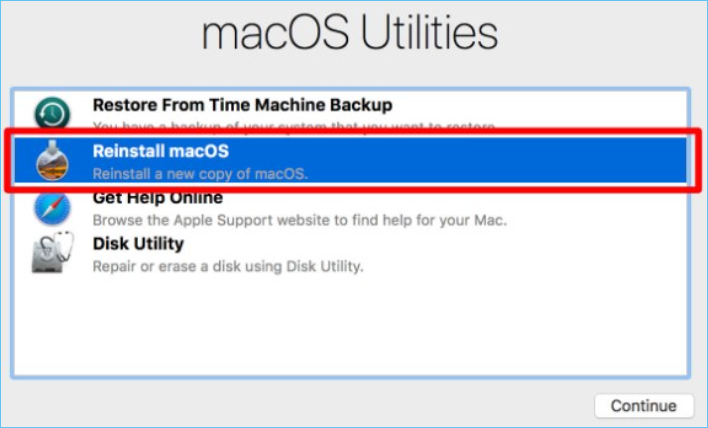
Step 8. Click on the Reinstall macOS option in the Utilities window and follow the on-screen instructions to complete the installation process.
Step 9. Press Continue on the pop-up box that appears after clicking Continue here. This will allow you to proceed with the action you were attempting.
Step 10. To proceed with the software installation, click the Agree button after reviewing the software licensing agreement.
Step 11. Select your boot disk, then click the Install button.

Step 12. Please pause the installation process and take a break. You can stretch your legs and consider getting a snack, like a sandwich. Then, proceed with the installation once you're ready.
Step 13. The computer will restart, and the installation process will resume.

Restore Your Data from Backup
To restore your backed-up data from Time Machine on a Mac, simply connect the external drive containing your backups to your Mac, then go to System Preferences > Time Machine > Select Disk, and choose the drive you want to restore from. From there, you can select the specific files and folders you want to restore, or choose to restore everything from a specific point in time.
Step 1. From the Apple menu, choose System Preferences.
Step 2. Time Machine symbol may be selected.
Step 3. To show Time Machine in the menu bar, check the box next to it in the System Preferences.
Step 4. To access Time Machine, click the Time Machine symbol in the Menu bar and press Enter.
Step 5. To restore a file or folder from the Recycle Bin, first, navigate to the Recycle Bin on your computer. Then, click on the "Restore" button next to the file or folder you want to restore.
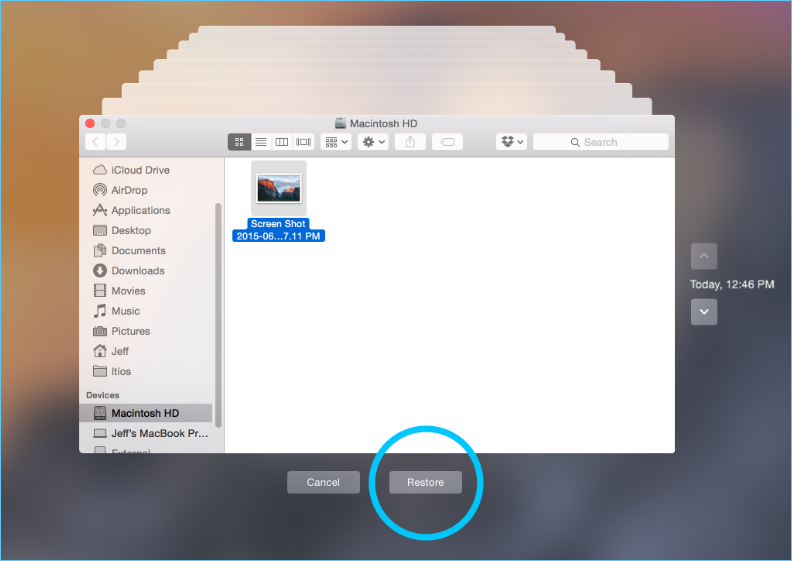
You can restore the file to its original place on your computer using Time Machine.
Bonus Tip: Recover Mac Data After Mis-Format
Qiling is a well-Deep Data Recovery for Mac is a well-known and widely used brand for utility software. It allows you to scan and recover data, and then filter the results by file type or location. Once you've identified the most critical files, you can click the "Recover" button to begin the recovery process.
Deep Data Recovery for Mac
- Recover lost or deleted Mac files, documents, photos, audio, music, and emails with ease using specialized software, such as Disk Drill or Deep Data Recovery Wizard, which can scan the computer's storage devices and retrieve lost data, even from formatted or corrupted drives, providing a high chance of successful recovery.
- You can recover files from various storage devices, including a formatted hard drive, emptied recycle bin, memory card, flash drive, digital camera, and camcorder, using specialized software. This software can retrieve deleted or lost files, even if they've been permanently deleted or the device has been formatted.
- Quick Mode and Deep Scan mode are two data scanning modes that can help achieve better results, with Quick Mode being faster but less thorough, and Deep Scan mode being more comprehensive but taking longer.
To learn how to use this efficient software, follow these steps:
Step 1. Launch Deep Data Recovery for Mac, select the desired file types and click "Next" to initiate the recovery process.

Step 2. Select the disk location where you lost data and click the "Scan" button.

Step 3. Deep Data Recovery for Mac will immediately scan your selected disk volume and display the scanning results on the left pane.

Step 4. Select the desired file(s) from the scan results and click the "Recover" button to restore them.
Conclusion
To sell your MacOS device, make sure to back up all important data, erase irrelevant information, and then restore the data using the steps described above. We highly recommend using Deep Data Recovery to restore any lost data.
Related Articles
- Repair Photos Library and Recover Lost Photos on Mac
- How to Recover Deleted Applications on Mac with Free and Proved Ways
- Does Reinstalling macOS in Recovery Mode Delete Everything on Mac
- [macOS Guide] | How to Reinstall macOS
- How to Recover Deleted SQL Server Rows [2022]
Don't worry when you deleted a single or several rows in SQL Server. On this page, with the provided methods by Qiling software, you'll be able to recover deleted rows and repair corrupted MS SQL Server with ease. - How to Recover Deleted Tweets and Twitter Photos/Pictures/Images
If you've accidentally deleted your tweets or memories on Twitter, don't worry! You can recover them using the methods outlined in this tutorial. First, learn how to retrieve deleted Twitter pictures using two methods, and then discover how to recover deleted tweets.