iPhone Keeps Asking for Apple ID Password (10 Ways)
Summary
If your iPhone keeps asking for your Apple ID password, you're not alone - this is a known bug that can be frustrating. Fortunately, fixing the issue is relatively easy, and there are several solutions to try. In this article, we'll provide you with ten ways to resolve the problem, and also recommend Qiling MobiSaver to help you recover any lost iPhone data.
iPhone Keeps Asking for Apple ID Password
If your iPhone is continuously asking for your Apple ID password, try restarting your device, checking your internet connection, or updating your iPhone to the latest software. You can also try resetting your Apple ID password, checking for any pending updates or changes on your Apple ID account, or contacting Apple support for further assistance. If none of these steps resolve the issue, there may be a more complex problem that requires professional help.
The frustrating issue of an iPhone repeatedly asking for an Apple ID password is a common problem that can hinder productivity and communication. To resolve this issue, we will explore the steps needed to fix an iPhone that keeps requesting the Apple ID password, providing a solution to this annoying problem.
Why iPhone Keeps Asking for Your Apple ID Password
The iPhone asking for an Apple ID password can be caused by various reasons, such as issues with iCloud and backup services, which run in the background, requiring a seamless experience.
When there's a lack of an account on an iPhone, it continuously asks for the account details to be fixed. This error can appear in the "Settings" or "System Preference" due to various reasons, including a lack of an account.
If you change your Apple ID or password on a Mac or desktop computer, your iPhone or iPad will be signed out and prompt you to add your ID in apps like Apple Music, App Store, and iCloud.
- The iCloud app may experience data corruption or automatically sign out of your account, which could be caused by various factors such as software glitches, hardware issues, or account settings problems. This might lead to unexpected behavior, data loss, or account access restrictions.
- Problems with in-built iPhone apps such as iMessage or FaceTime.
- Pending apps in App Store or iTunes download section.
- This is a temporary glitch or bug, which might be fixed in a day or two (a rare occurrence).
- Using an older version of iOS and updated.
- The iPhone feature that's failing is the ongoing application or authentication process, which is causing the app to continuously ask for the Apple ID, even after the user has already authenticated. This is resulting in a frustrating experience for the user.
The factory reset on an iPhone without removing the Apple ID is a common reason why some users are unable to set up their device.
Removing your Apple account is important before resetting your phone, apps, or features like App Store or iCloud, as it prevents data loss and ensures a smooth transition to a new account.
10 Ways to Fix an iPhone That Keeps Asking for Apple ID Password
If your iPhone keeps asking for an Apple ID password, there are several fixes you can try. You can check for any hardware-related issues, but if everything is fine, you can try restarting your iPhone, resetting the password, or checking for any software updates. If none of these solutions work, you can also try restoring your iPhone to its factory settings or visiting an Apple Store for further assistance.
If you're experiencing this error, don't worry! We've got 10 fixes to help you resolve the issue. Each solution targets a different potential cause, so let's get started and see which one works for you.
- Method 1. Restart Your iPhone
- Method 2. Update Your Software
- Method 3. Check Your Apps Update
- Method 4. Turn off iMessage And FaceTime
- Method 5. Sign Out from Apple ID and iCloud
- Method 6. Reset Your Apple ID Password
- Method 7. Reset All Settings
- Method 8. Check iCloud Is Working
- Method 9. Force Quit All Apps
- Method 10. Backup and Restore Your iPhone
Method 1. Restart Your iPhone
To fix an iPhone that keeps asking for authentication, you can try restarting your iPhone. This is often due to a glitch or an app continuously asking for authentication. To restart your iPhone, simply press and hold the Sleep/Wake button until the "Slide to Power Off" option appears, then slide it to the right to turn off your iPhone. Wait for about 30 seconds, then press and hold the Sleep/Wake button again until the Apple logo appears to turn it back on. This simple reset can often resolve the issue.
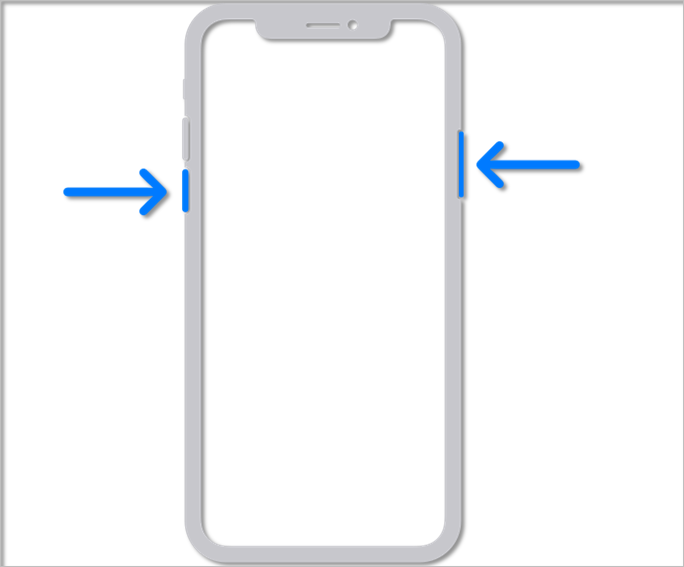
Step 1. Press and hold one of the two-volume buttons.
Step 2.Wait until the power slider appears.
Step 3.Drag the slider.
Step 4.Wait for your device to turn back on again.
To restart an iPhone 8 or earlier, or iPhone 6, press and hold the Sleep/Wake button and the Volume Down button at the same time for at least 10 seconds, until the Apple logo appears. This will restart your iPhone.
Step 1.Press and hold the power button.
Step 2.Wait until the power-off slider appears.
Step 3.Slide all the way and wait for your iPhone to shut down.
Step 4.Press the power button until your iPhone turns back on.
If your phone's screen doesn't turn on after a restart, try the other fixes. If none of them work, consider visiting a professional for further assistance. If your phone's screen doesn't turn on after a restart, try the other fixes.
Method 2. Update Your Software
If your iPhone keeps asking for your Apple ID password, try updating your iPhone's software. An outdated iOS may be the culprit behind the issue, so make sure your phone is running the latest version of the operating system. This simple fix might resolve the problem and prevent your iPhone from repeatedly asking for your Apple ID credentials.
To update your iPhone, go to Settings, then General, then Software Update. Tap on the "Download and Install" option, and follow the prompts to complete the update. Make sure your iPhone is connected to a power source and has a stable Wi-Fi connection before starting the update process.
Step 1.Plug your iPhone into a power brick.
Step 2.Go to "Settings".
Step 3.Tap "General".
Step 4.Tap "Software Update".
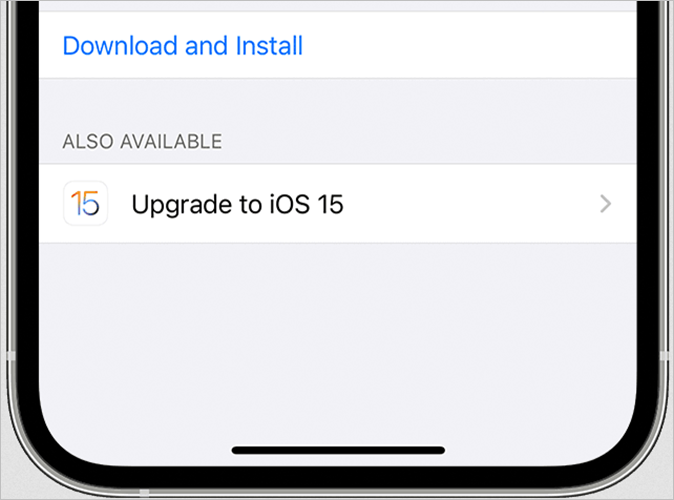
Step 5.Tap on Upgrade to iOS 15 (at the time of this writing, 15 is the latest, so it's subject to change).
If you're experiencing software-related issues, running a system update may resolve the problem within an hour, depending on your internet connection.
Method 3. Check Your Apps Update
If one single app is causing the issue, you can try removing it to see if that resolves the problem. If you're an avid user of the app, you can try updating it to the latest version to see if that fixes the issue. To update an app, you can usually do so through the app store or play store where you originally downloaded it from. Simply search for the app, select it, and follow the prompts to update it to the latest version.
Step 1.Open "App Store" from the home screen.
Step 2.Tap your user icon on the top-left.
Step 3.Scroll down, and you might see "Available updates".
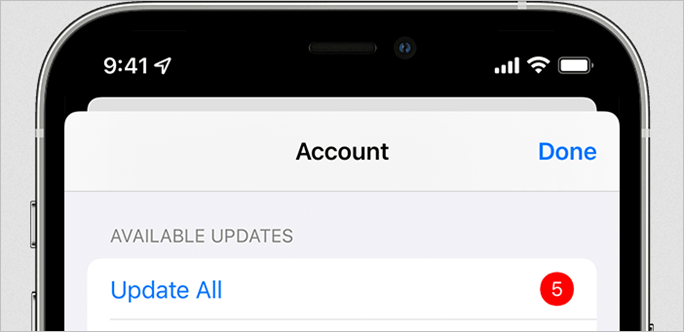
Step 4.Pick the apps you wish to update.
Step 5.Or tap "Update all".
This will fix any app-To stop your iPhone from asking you for your Apple ID, go to Settings > [your name] > Password & Security, and toggle off 'Require Password' under 'Password'. This will prevent your iPhone from asking you for your Apple ID when you restart it.
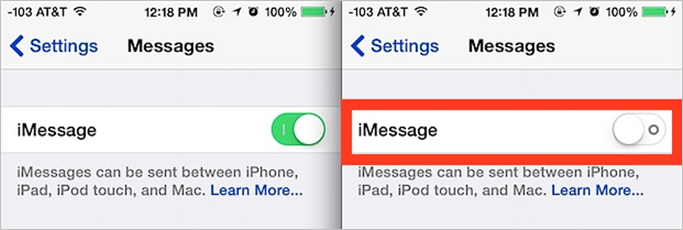
Method 4. Turn off iMessage And FaceTime
To stop iMessage and FaceTime, follow these steps: go to Settings, then tap on Messages, toggle the switch next to "iMessage" to the "off" position. Next, go to Settings, tap on FaceTime, and toggle the switch next to "FaceTime" to the "off" position. This should resolve the error.
Step 1.Go To "Settings" (Tap the setting cogwheel icon on your home screen).
Step 2.Tap "Messages".
Step 3.Tap "Turn off iMessage".
For FaceTime, you'll follow the same steps, like this.
Step 1.Go to "Settings".
Step 2.Tap "FaceTime".
Step 3.Tap "Turn FaceTime Off".
To resolve the issue, you can try closing the "Find My" and "iCloud" apps on your device. This will stop both these applications and stop the Apple ID password prompt in the process.
Method 5. Sign Out from Apple ID and iCloud
To sign out of your Apple ID or iCloud, go to Settings > [your name] > Sign Out. If you're using an iPhone or iPad, you can also go to Settings > iCloud > Sign Out. If you're using a Mac, go to System Preferences > Apple ID > Sign Out.
Step 1.Go to "Settings".
Step 2.Tap your username.
Step 3.Scroll all the way down.
Step 4.Tap "Sign Out".
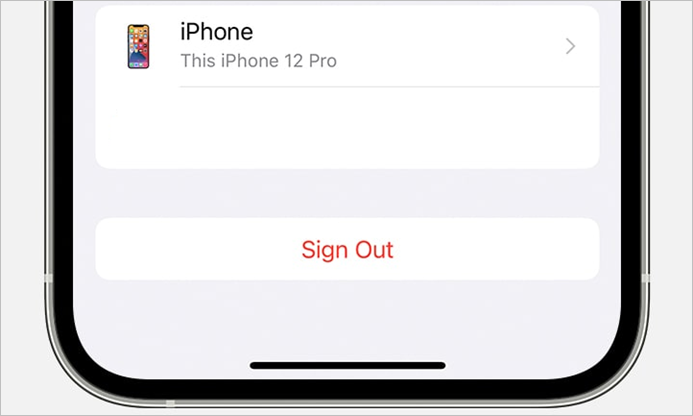
Step 5.Enter your Apple ID password.
Step 6.Tap "Turn Off".
Step 7.Tap "Sign Out" and confirm when prompted.
If the problem persists, then keep on checking the next few steps. If it stops, the problem was with iCloud or Apple ID settings.
Method 6. Reset Your Apple ID Password
If you've changed your Apple ID from another device, you may need to reset or change it from your iPhone to resolve the issue. To do this, go to Settings, then tap on your profile picture or name at the top of the screen. Tap on "Sign Out" and then confirm that you want to sign out. This will reset the Apple ID on your iPhone.
Step 1.Go to "Settings".
Step 2.Tap your name at the top.
Step 3.Head to "Password & Security".
Step 4.Tap "Change Password".
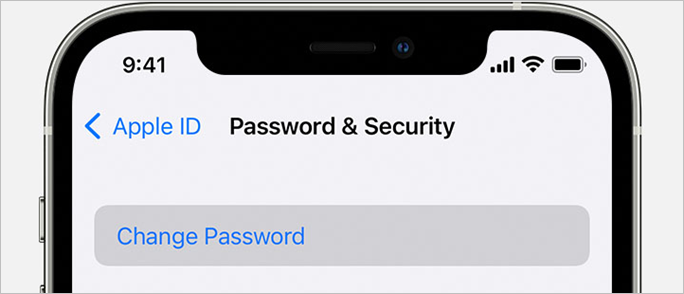
Step 5.Enter the current password.
Step 6.Enter the new password & confirm it again.
Step 7.Tap "Change Password".
Step 8.Sign in again.
Method 7. Reset All Settings
To reset your device, go to Settings > System > Recovery > Reset this PC. If you want to keep your files, select "Keep my files." If you want to remove everything, select "Remove everything." Then, follow the prompts to complete the reset.
Step 1.Head to "Settings".
Step 2.Tap "General".
Step 3.Tap on "Transfer or Reset iPhone".
Step 4.Tap on "Reset".
Step 5.Navigate the options and pick "Reset All Settings".
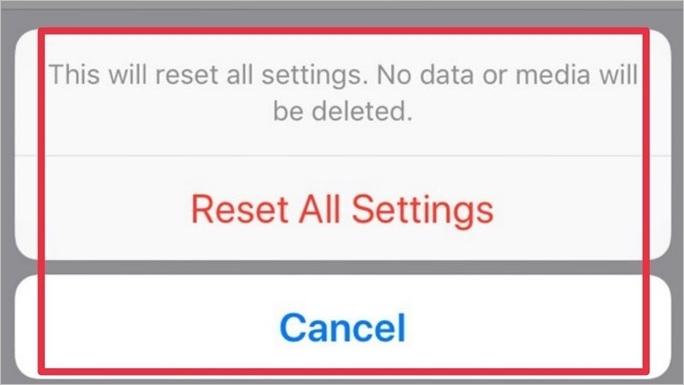
To reset your settings, go to Settings > System > Recovery. Then, select "Reset this PC" and follow the prompts. This will only reset your settings, not remove your data. However, you must stay on the safer side and back up before you do this.
Method 8. Check iCloud Is Working
To check if your iCloud is working, go to Settings > [your name] > iCloud. If it's working, you should see your iCloud status, including any data that's being backed up or synced. If you're unable to see your iCloud status, try restarting your device.
Step 1.Head to "Settings".
Step 2.Tap on your name.
Step 3.Go to iCloud.
Step 4.Tap "iCloud Backup".
Step 5.Check the date below the "Back Up Now" option (it should read like Last successful backup Yesterday).
If the backup was done recently, that means your iCloud is working properly and doesn't need any adjustments.
Method 9. Force Quit All Apps
Force quitting all applications can also cause the recurring problem to stop, which can be done by holding down the Option (⌥) key and clicking on the Apple logo in the top left corner of the screen, then selecting "Force Quit All Applications" from the dropdown menu. This will close all currently running applications, which may resolve the issue. However, this method should be used with caution, as it will close all applications, including any unsaved work. It's recommended to save any open work before proceeding.
Step 1.To open the "App Switcher", tap and hold on the bottom of your screen, then swipe up.
Step 2.Swipe left and right to see all the open applications.
Step 3.Tap your screen with two fingers and swipe up.
Step 4.Continue until all apps are closed.
This will close any background apps, including the ones causing the issues.
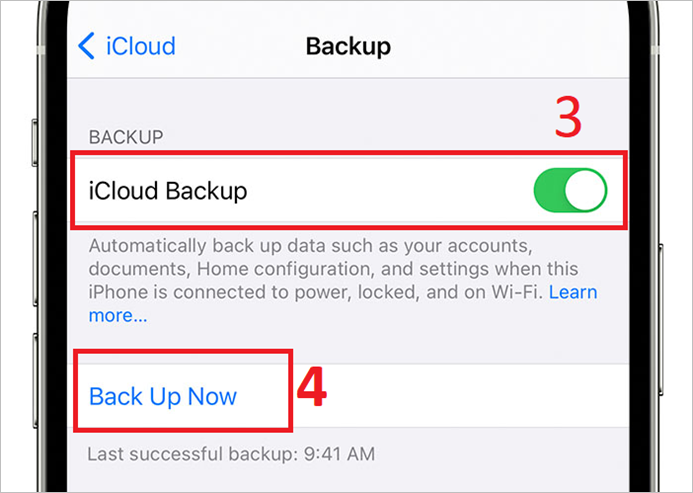
Method 10. Backup and Restore Your iPhone
Before resorting to a factory reset on your iPhone, it's crucial to back up your data first using the following steps. This ensures that all your important information, such as contacts, photos, and messages, are safely stored elsewhere and can be easily restored once the reset is complete.
Step 1.Go to "Settings" andtap your Name.
Step 2.Head to iCloud, then iCloud backup.
Step 3.Turn on "iCloud Backup".
Step 4.Tap "Back Up" Now.
Once your backup is set, reset your iPhone using the settings mentioned in Method 7. Then, follow these steps to restore your iPhone: connect your iPhone to your computer, open iTunes, select your iPhone, and click on "Restore iPhone" to restore your iPhone from the backup you set earlier. This will erase all data on your iPhone and restore it to its original settings.
Step 1.Turn on your device.
Step 2.Follow the setup steps until the phone launches.
Step 3.Sign in to iCloud with Apple ID.
Step 4.Choose the latest backup.
Step 5.Wait for it to restore.
This process typically takes 20-30 minutes, depending on your internet connection speed, and can resolve app or software-related issues. However, it should only be used as a last resort when all other options have failed.
Pro Tip: Restore iPhone Data for Free (Recommend)
The tenth method is known to work wonders and fix all the issues with an iPhone, but some users might be worried about losing their data. To avoid this, using professional backup software is a good step further to ensure all data is safely backed up.
Qiling MobiSaver is a powerful iPhone data recovery tool that can restore lost or backed up data from iOS devices, iTunes, and iCloud backups, available for both Windows and Mac.
- It's easy to use.
- It makes backing up easy.
- It takes a lot less time to recover.
- It recovers contacts, messages, photos, and other media.
- It can recover data fromWhatsApp, Line, Kik, etc.
Thousands of iPhone users and professional recovery experts rely on this tool, which makes it a safe choice for backing up and restoring iPhone data.
Steps to Restore iPhone Data Using Qiling MobiSaver
To restore data using Qiling MobiSaver, follow these steps: First, download and install the software on your computer. Next, connect your device to the computer via a USB cable. Then, launch the software and follow the on-screen instructions to select the data you want to restore.
Step 1. Connect iPhone to Your PC
Download and launch Qiling MobiSaver. Click "Recover from iOS device" on the left and click "Start".
Step 2. Scan for Lost iPhone/iPad/iPod Data
Qiling MobiSaver will automatically scan your devices, and find all the lost data for you, just wait for the scan to complete.
Step 3. Recover Lost iPhone/iPad/iPod Data
You can select the lost data you want to recover, such as photos, videos, contacts, messages, notes, voice messages, and other files, and save them to another location.
Setting up and recovering your iPhone has never been easier or safer, thanks to this convenient feature. It makes the process a lot simpler and more secure, making it a great option for anyone who needs to set up or recover their iPhone.
Conclusion
If your iPhone keeps asking for an Apple ID password, try using various methods one after the other to diagnose the issue. This involves trying different approaches until you find the solution.
If no other options work, you can try Qiling MobiSaver to recover efficiently and save time.
Related Articles
- Top 3 Ways to Recover Permanently Deleted Voicemail iPhone
- Free iPod Music Recovery
- How to Share Screen in Facetime on iPhone/iPad
- Top 9 Best iPhone Photo Recovery Software
- How to Delete Files That Won't Delete
Wanna know how to delete files that cannot be deleted? Here in the article, 3 ways for how to delete files won't delete are covered for your reference. - How to Delete Videos from GoPro Hero 5/4 Session
Step-by-step guide for how to delete videos from GoPro 5 and 4 session lead you go through the whole process.