LINE Notifications Not Working iOS 15? [Fixed]
Summary
LINE app is free to use and available across all platforms, offering all the functions of a normal messaging app, including notifications. However, sometimes LINE notifications may not work properly, and don't worry, we have some quick fixes to help solve this issue without losing any data.
| Workable Solutions | Step-by-step Troubleshooting |
|---|---|
| Method 1. Check Device Settings |
Open "Settings" from the home screen. Then head to the "Notifications" button...Full steps |
| Method 2. Check LINE App Settings |
Tap "Settings" on the home screen. Then find and tap on the "LINE" button...Full steps |
| Method 3. Check Battery Saver Mode |
Open the "Settings" app. Then navigate and find the "Battery" settings...Full steps |
| Method 4. Contact Customer Support |
Head to LINE login page.Tap on the "Continue" button without logging in...Full steps |
| Software to Recover Lost LINE Data |
Qiling MobiSaver has helpediPhone users recover their lost or deleted LINE data...Full steps |
To resolve the issue of LINE notifications not working on iOS 15, try restarting your iPhone, checking the notification settings within the app, and ensuring that you have the latest version of LINE installed. Additionally, verify that the Do Not Disturb feature is not enabled, and that the app is allowed to send notifications. If the problem persists, reach out to LINE's support team for further assistance.
Line, a popular messaging app, has been around for over 11 years, offering a simple interface, great chatting options, and a fun experience, making it a favorite among iPhone users.
On iOS 15, users can try resetting the notification settings for the LINE app by going to Settings > [app name] > Notifications, then toggle off and on again. If the issue persists, they can try deleting and reinstalling the app, or checking the app's settings to ensure that notifications are enabled. Additionally, users can check their device's Do Not Disturb mode and ensure that it's not blocking notifications from the LINE app. If none of these steps resolve the issue, users can try restarting their device or reaching out to LINE's support team for further assistance.
LINE is a freeware communication app available on Android and iPhones, used for texting, sending images, videos, and audio clips, one of the most common names in communication apps besides WhatsApp.
LINE's communication app has all the key essentials needed in today's modern age, but many iPhone users, especially those with iOS 15 or later, have stopped receiving notifications.
So, we'll be exploring a few key things, such as:
- Causes of LINE Notifications Not Working
- How to Fix No LINE Notifications
- How to Recover Lost LINE Data on iPhone
So, let's dive right into it.
Why Are LINE Notifications Not Working
LINE notifications not showing up could have a variety of underlying issues. For example, if LINE notifications are not working on an iPhone, it may be due to issues such as incorrect notification settings, a faulty notification switch, or problems with the iPhone's operating system, among other possibilities.
- Using an older version of LINE
- Incompatibility with your iOS device
- Problems with your own phone
- Storage or device-related issues
Users may experience issues with LINE notifications not working on iOS 15 due to various reasons, such as the notification disappearing or not being received at all. To troubleshoot, we can explore possible causes and solutions, aiming to identify the root of the problem.
4 Ways to Fix No Notification on LINE
Now that we've identified the cause of the problem, let's move on to the solution. We'll explore four different methods that users can try to resolve the issue. Each method has the potential to help solve the problem, so let's get started.
Method 1. Check Device Settings
For both iPhones and Android devices, the problem could be caused by an error in the device's notification settings. On iPhones, go to Settings, then Notifications, and check if LINE is enabled. On Android devices, go to Settings, then Apps, then LINE, and check if notifications are enabled. If you find the issue, simply toggle the switch to turn notifications back on.
For iPhone
To disable location services on your iPhone, go to the Settings app, then tap on "Privacy" and select "Location Services". From there, you can toggle off the switch for each app that is currently using your location, or tap on "System Services" to disable location services for system apps. If you want to disable location services for all apps, tap on "Location Services" and toggle off the switch at the top of the screen.
Step 1. Open "Settings" from the home screen.
Step 2.Head to "Notifications".
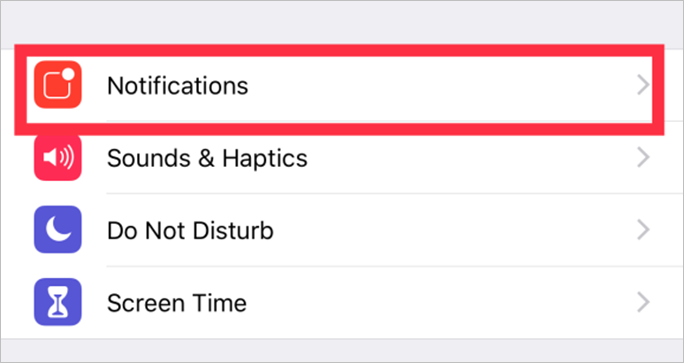
Step 3.Toggle "Allow Notifications" on.
The most likely reason for your LINE notifications not showing up is that the app is not enabled to receive notifications. This is a common issue that can be easily fixed by following the steps provided, which should resolve the problem for many users.
For Android
To remove a saved Wi-Fi network on an Android device, follow these steps:
Step 1.Open "Settings" from the settings cogwheel in the notification bar.
Step 2.Scroll down to "Device", then find and tap"Notifications".
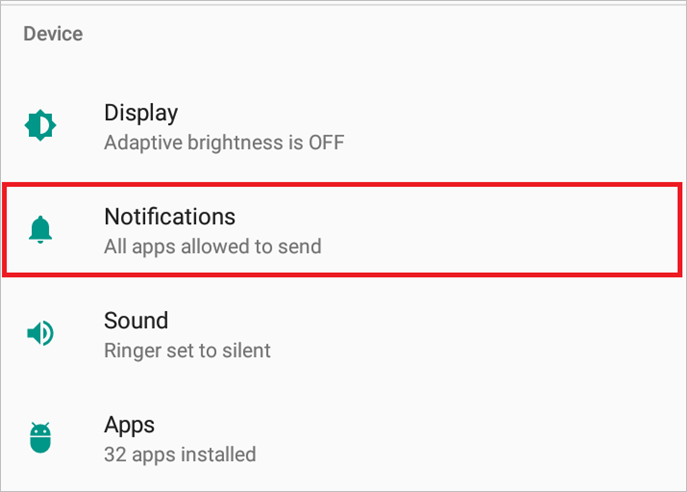
Step 3.Fine"LINE" application and tap to open the settings.
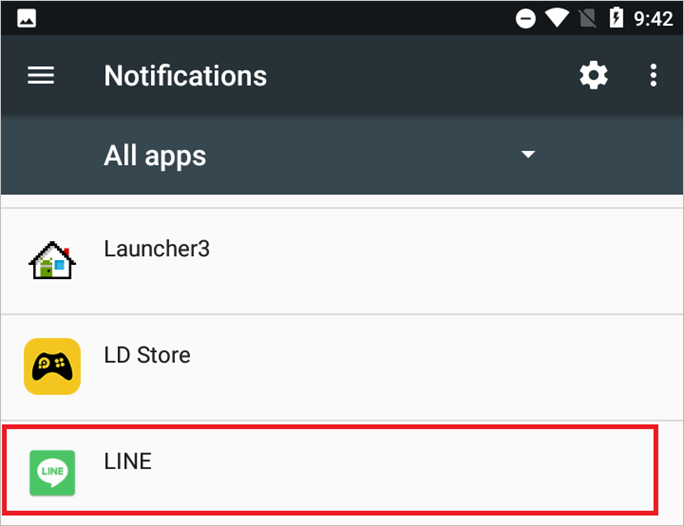
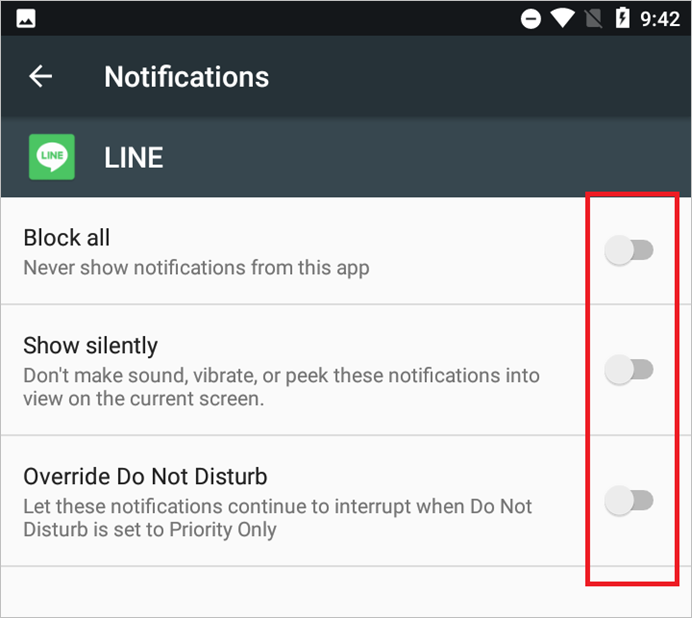
Step 4.To ensure that you're receiving notifications from the Google Home app, make sure "Block All, Show Silently" and "Override Do Not Disturb" are all unchecked. This will allow you to receive notifications from the app even when your phone is set to do not disturb mode.
To resolve the issue of notifications not showing up on your Android device, you can try resetting the app's notification settings. This can be done by going to Settings > Apps > [App Name] > Notifications. From there, you can toggle the switch to turn notifications on or off, and then toggle it back on.
Method 2. Check LINE App Settings
If the device settings have no issue, then it's most likely an error on the side of the app's settings. To explore settings in both iPhones and Android, follow these steps: Go to the LINE app, tap on the three horizontal lines on the top left corner, then tap on Settings. On the Settings page, scroll down and look for the option that says "Push notifications" or "Notification settings", then toggle it on. If you're using an iPhone, you might also need to go to your device's Settings app, then tap on "Notifications", find the LINE app, and make sure it's allowed to send notifications. On an Android device, go to Settings, then tap on "Apps" or "Application manager", find the LINE app, and make sure it's allowed to send notifications.
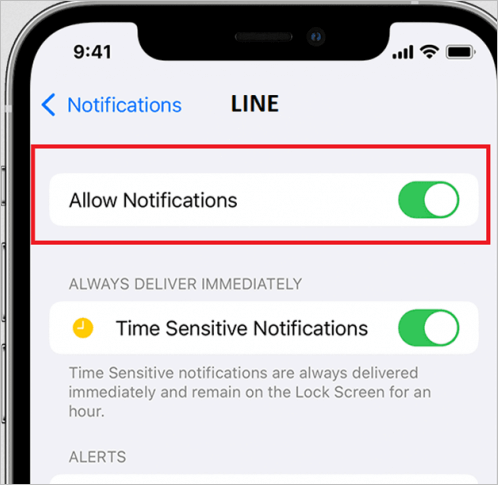
For iPhone
To check LINE app settings, you'll need to head to settings. Here's how you can do it in one paragraph:
Step 1.To access the LINE settings, tap the "Settings" icon on your home screen, and then select and tap on the "LINE" app from the list of available apps.
Step 2.Tap"Notifications".
Step 3.Toggle "Notifications"on.

Make sure to toggle on other settings, such as notifications for new messages, in addition to enabling location services.
For Android
For Android users, they'll have to follow these steps:
Step 1.Tap and hold on the LINE app icon.
Step 2.Tap on "App Info".
Step 3.Open "Permissions".

Step 4.Toggle everything on.
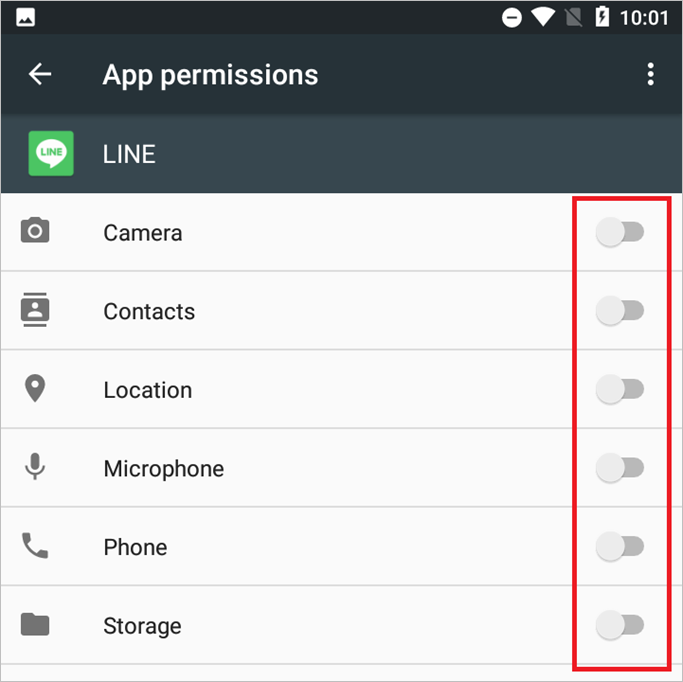
In some phones, these options will include an additional toggle called Notifications, allowing the app to show notifications on an Android device.
Method 3. Check if Battery Saver Mode Is Enabled
To avoid Battery Saver Mode causing issues in your LINE app, try turning it off on your iPhone or Android device. If you're unsure how to do this, follow these steps:
For iPhone
To turn off the iPhone's camera, go to Settings, then tap on "Camera". From there, toggle off the switch next to "Camera" to disable it. This will prevent the camera from being used, but keep in mind that this will also disable the camera's access to the iPhone's camera roll.
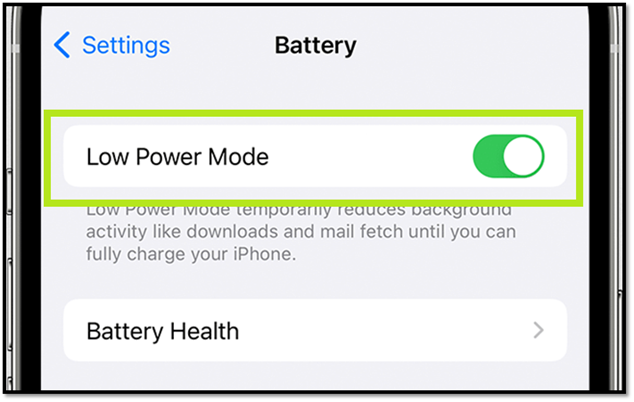
Step 1.Open "Settings" app.
Step 2.Navigate and find "Battery" settings.
Step 3.To turn off low power mode on an iPhone, go to Settings, then Battery, and toggle off the switch next to Low Power Mode. This will disable battery saver mode and allow your iPhone to function normally.
For Android
On your Android phone, go to Settings, then scroll down and click on the option called "Battery" or "Battery Saver". From there, you can toggle the switch to turn off Battery Saver mode.
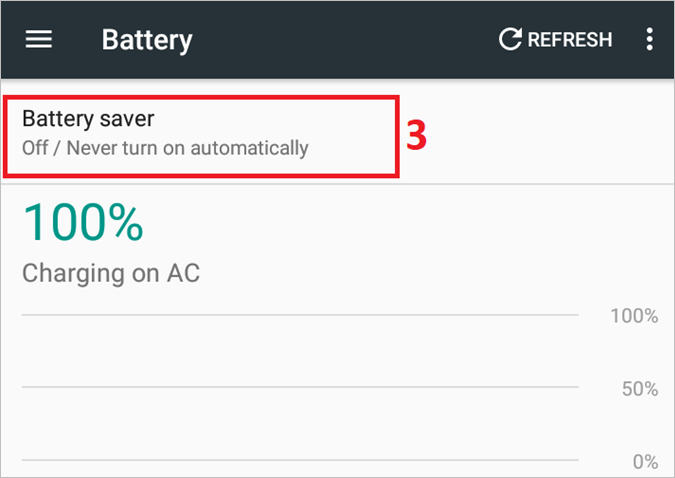
Step 1.Open "Settings" from the notification bar.
Step 2.Navigate and tap on "Battery" options.
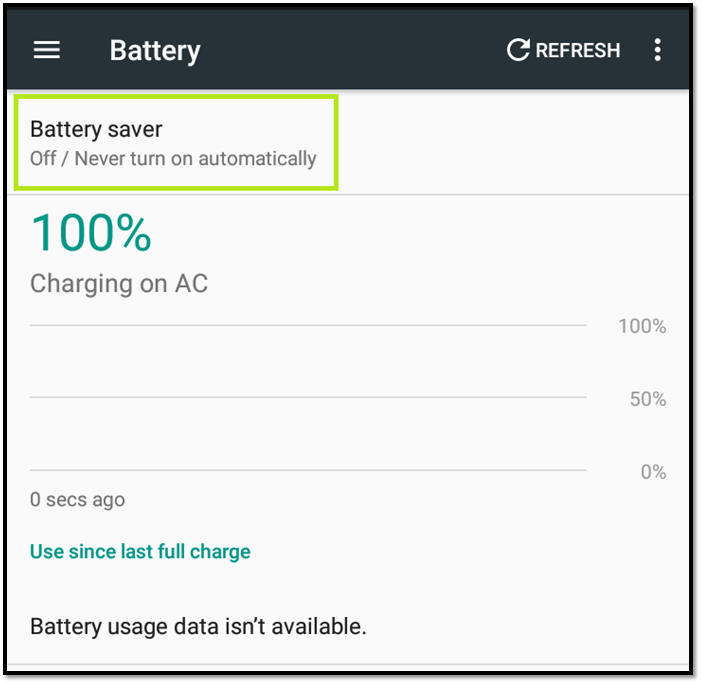
Step 3.Tap "Battery Saver" options.
Step 4.Toggle "Battery Saver" off.
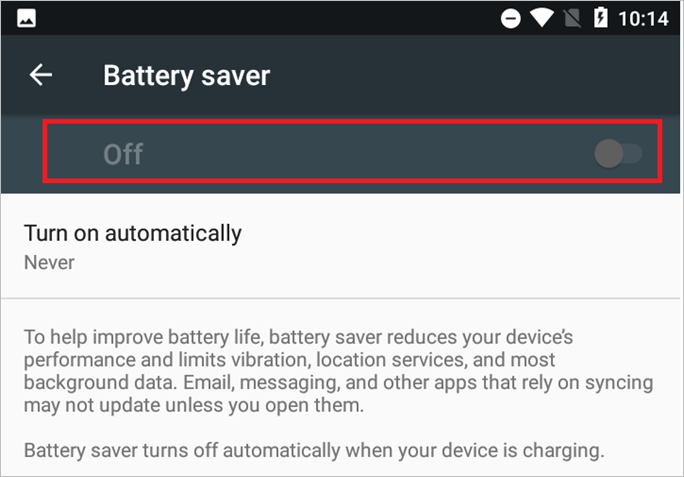
These methods will turn off battery saver modes and ensure it's not stopping LINE from showing notifications about new messages.
Method 4. Contact Customer Support
If you're experiencing issues with LINE, and none of the troubleshooting steps work, it's best to consult with LINE's experts directly. To do this, you can contact LINE's customer support team. You can reach them by following these steps:
Step 1.Head to LINE login page.
Step 2.Tap on "Continue" without logging in.

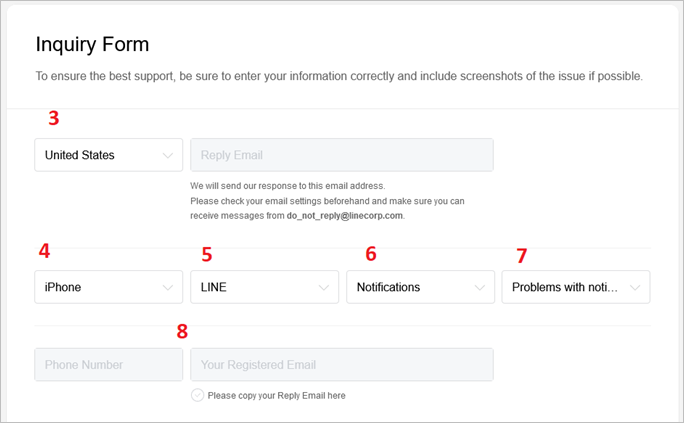
Step 3.To participate in the survey, you would need to select your country from a dropdown menu, enter your email address, choose your phone type, and select the LINE app as your preferred messaging platform.
Step 4.Pick the problem area and pick the problem, i.e., notifications.
Step 5.Add a phone number and email address.
Step 6.Send the complaint.
To resolve the issue, you'll need to contact LINE's customer support, which will prompt them to reach out to you. They'll then guide you through the process of fixing the problem via email or phone call.
Bonus Tip: A Free App to Recover Lost LINE Data on iPhone
For our bonus tip, we'll tell you about a professional but free application called Qiling MobiSaver that can be used to recover lost LINE data on an iPhone. This outstanding program has helped many iPhone users recover or secure their LINE data.
This program can help you:
- Recover lost messages
- Restore lost images
- Recover deleted videos or audio
- Recover contacts or other content on any iOS device
- Preview each file before you restore them
The MobiSave app is a great companion for any iOS user, especially those who often lose their data, due to its ability to automatically back up and sync data across devices, and its user-friendly interface that makes it easy to set up and use.
Steps to Recover Lost LINE Data Using Qiling MobiSaver
To recover lost LINE data, follow these steps with Qiling MobiSaver: First, download and install the software on your computer. Then, connect your Android device to the computer and enable USB debugging on your device. Next, launch Qiling MobiSaver and select the type of data you want to recover, such as LINE messages, contacts, or media files. The software will scan your device and display a list of recoverable data.
Step 1. Connect iPhone to Your PC
Launch Qiling MobiSaver, choose the "LINE" button, and select "Device Storage" to access the app's storage management feature.
Step 2. Analyze iPhone/iPad/iPod
The software will analyze your device to perform LINE data recovery.
Step 3. Scan iPhone and Find LINE Data
Qiling MobiSaver will automatically scan iPhone 13/12/11/X/XR/XS/8/7/6/5/4 to find and recover present and lost LINE data.
Step 4. Preview and Restore LINE Chats or Attachments
To recover your LINE data, select "LINE" or "LINE Attachments" on the left to preview them. Then, choose "Recover to PC" or "Recover to Device" to save your LINE data.
Qiling MobiSaver has been proven to be highly efficient and unmatched in its ability to restore or recover lost LINE data, making it a reliable solution for users who have lost their LINE data due to various reasons.
Conclusion
If LINE notifications aren't working, try checking your app settings, restarting your device, or updating the app to the latest version. Additionally, ensure that notifications are enabled in your device's settings and that you have allowed LINE to send notifications. If the issue persists, try uninstalling and reinstalling the app, or checking for any app updates.
Related Articles
- 2 Methods to Recover Deleted/Lost iOS 11 Data from iPhone 8/8 Plus/iPhone X
- How to Restore Old & Deleted Voice Memos on iPhone
- Free iPod Music Recovery
- Recover Deleted Files on iPhone with/Without Backup
- How to Recover Data from WD My Book Essential/Live
The WD My Book Essential and Live are excellent options for storing files, but knowing how to recover data from WD My Book is just as important. If you've lost access to your files, deleted them, or are experiencing other issues, having a plan in place for data recovery is crucial. - How to Recover Deleted/Lost Files from Pen Drive
When you delete files from a pen drive, unlike a computer, they are not moved to the recycle bin and are instead permanently deleted. This means that you have no way to recover them unless you use a data recovery tool, which is what this article will show you how to do.