MacOS Update Cannot Be Installed? See Here!
Updating macOS is typically a seamless experience, with automatic alerts on your screen prompting you to click "update now" to start the process. However, issues may arise when the update gets stuck or an error message appears, stating that the macOS installation cannot be installed on the current disk.
When updating macOS, encountering the "macOS Could Not Be Installed" error can be frustrating, preventing you from getting new features. This issue can arise due to various reasons, and in this article, we will explore the most common causes and provide effective solutions to fix it.
Why macOS Can't Be Installed on Disk?
The "MacOS Update cannot be installed on this disk" error doesn't necessarily mean the update will never succeed. It can fail at a particular point in time due to various reasons, such as a problem with the installation process, insufficient storage space, or a corrupted system file. These issues can be resolved by restarting the update process, checking for sufficient storage space, or running a disk utility to repair any corrupted system files. In most cases, the update will successfully complete once the issue is addressed.
- Older Macs may not be able to run the latest update due to their limited power and capabilities.
- An insufficient amount of disk space can also lead to macOS update failures.
- An unreliable internet connection or server issues can also cause updates to stall from completing.
- Incorrect settings of time and date in your mac display can also prevent the macOS update from working.
- When your Mac is running updates, it's not recommended to unplug it, as this can cause issues and prevent it from functioning properly.
How to Solve macOS Cannot Be Installed
If you're experiencing issues with the macOS update, try troubleshooting by protecting your data first and making backups of important files. This will ensure your information is safe while you attempt to resolve the installation error.
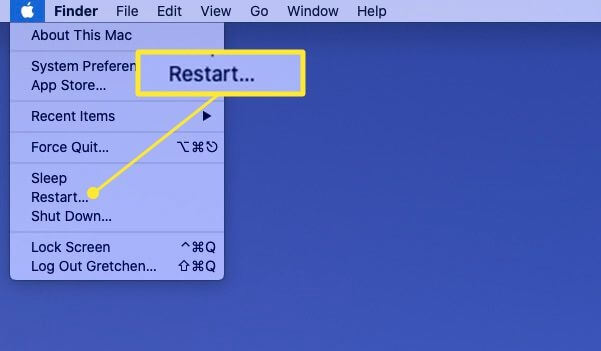
Method 1: Restart your Mac and retry the installation
It is the most commonly used method to solve the problem of macOS installation.
Step 1: To restart your Mac, go to the Apple menu located in the upper left corner of the screen, and select the option to restart.
Note* If your Mac isn't responding to the command, you'll need to shut it down forcefully by pressing and holding the Power button.
Step 2: Now, when it starts again, try the installation one more time, and see if it works.
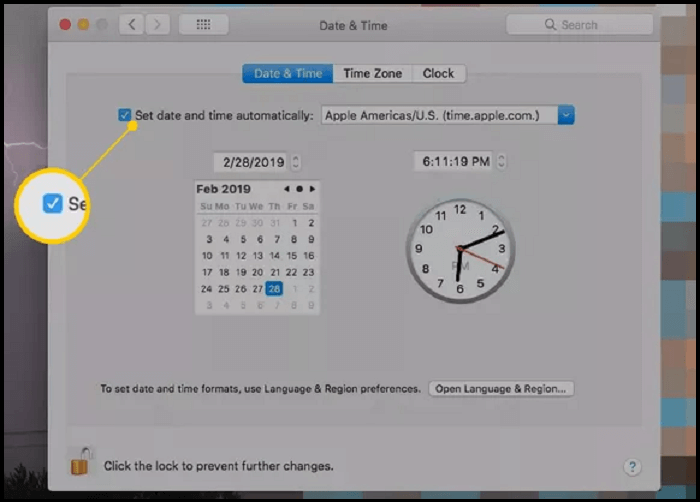
Method 2: Check Your Date & Time Settings
The date or time on your Mac may be incorrect, which can prevent your system from connecting to the Apple server, leading to syncing issues.
To fix the issue, go to System Preferences and click on Date & Time, then set the date and time.
To configure the date and time, click the lock icon and enter the admin password. Next, select the option to set the date and time automatically.
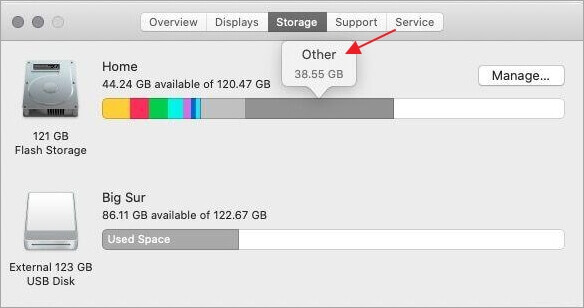
Method 3: Free Up Storage Space
The macOS installers are around 5GB, but the system requires about 20GB of free space to install macOS.
Follow the method to check the space on your Mac.
To check storage, click on the Apple menu and select Storage under the About This Mac option.
You can see on the right side that the free space is marked as Available. To see which files are using the most storage space, click on Manage.
The "Other" storage on your Mac is a catch-all category that includes various system files, logs, and other data that don't fit into the more specific categories like "Documents," "Videos," or "Music." This can include things like system logs, crash reports, and other temporary files.
On a Mac, you might notice an "Other" item taking up significant space in the Storage tab. But what is this mysterious category, and how can you free up space by getting rid of it? This article will provide the answers, helping you understand what the "Other" item is and how to remove it to declutter your Mac's storage.
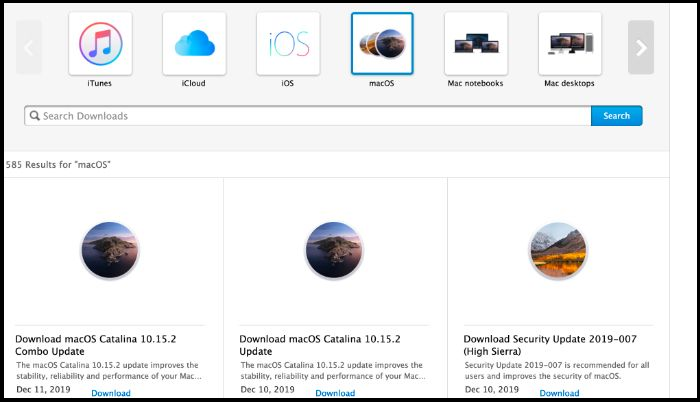
Method 4: Download macOS Installer File Again
If the downloaded macOS Installer file has become corrupt, delete the file from the Downloads folder by moving it to the Trash.
To install macOS, you'll need to download the latest version from the App Store, then follow the prompts to complete the installation.
Method 5: Reinstall macOS
If you've tried all the previous methods and your macOS still isn't installed, it's likely time to reinstall the macOS operating system. This process can be time-consuming, but it's a surefire way to resolve the issue. To begin, you can start the reinstallation process by going to the Apple menu, selecting Restart, and immediately holding down the Command (⌘) + R keys to boot into Recovery Mode. From there, follow the on-screen instructions to select your language and country or region, then choose the option to reinstall macOS.
Step 1: Hold the Command + R keys on your Mac keyboard and restart it. Press and hold the keys for 15 to 20 seconds until you see the Apple logo. This will boot your Mac in Recovery Mode, allowing you to access various system utilities and options.
Note* This will lead your system to recovery mode.
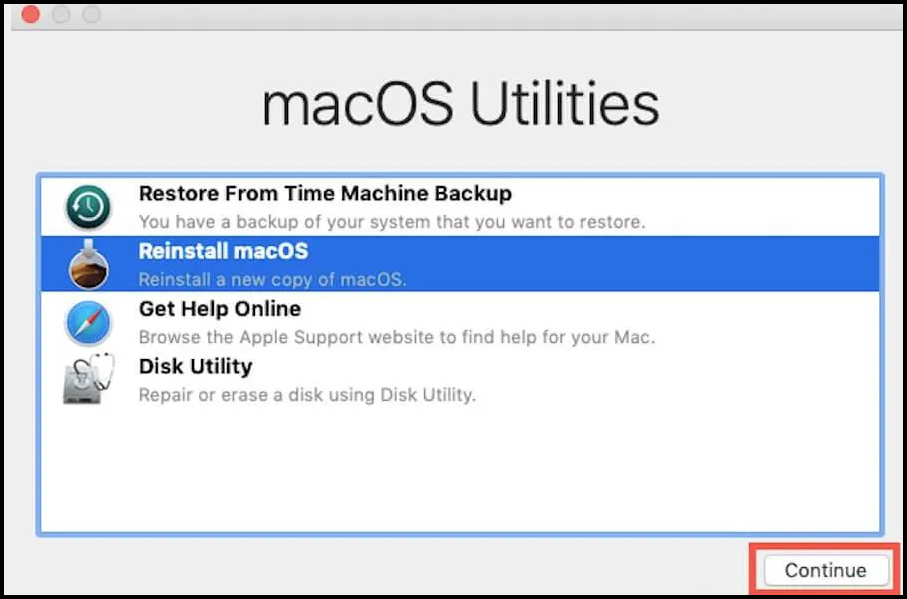
Step 2: Choose the main language and select macOS Utilities, then continue.
Step 3: Select the Reinstall macOS and click continue.
The reinstallation process can take some time, so ensure your Mac remains awake until the reinstallation is complete. Once the process ends successfully, your Mac will restore to its earlier version.
You can now install the latest version of macOS to your system.
What to Do When macOS Corrupted after Upgrading
Losing data during a macOS upgrade can be frustrating, especially when it involves confidential information like text, photos, contacts, videos, audio, documents, and executable files. Fortunately, there are methods and tools available to help recover lost data. A highly effective and user-friendly software can thoroughly and safely retrieve all lost files without any issues.
Deep Data Recovery for Mac is a widely used software that can recover lost data. It allows for smooth restoration of accidentally deleted or corrupted data on the hard drive with a simple scan. Users can preview recoverable files and select all files to recover according to their preference. This software is capable of resolving challenging data loss problems and can restore various types of files, including videos, music files, documents, and emails.
Follow the steps below to retrieve your data with a few clicks:
Step 1. Launch Deep Data Recovery, select the file types you want to recover, and click "Next" to initiate the recovery process.

Step 2. Where was data lost after operating system update? Choose the location and click Scan.

Step 3. Deep Data Recovery for Mac scans the selected disk volume and displays the results on the left pane, showing the files that can be recovered.

Step 4. After the scan, select the target files that were unknowingly lost during or after the update, and click the "Recover" button to retrieve them.
People Also Ask
1. Why won't my Mac let me install the new update?
If you're having trouble updating your Mac, try restarting it, which can resolve random errors. After restarting, go to System Preferences, select Software Update, and install any available updates. Alternatively, you can manually download the update from Apple's support page.
2. Why can't macOS be installed on Macintosh HD?
It can happen due to following reasons:
- Bugs in macOS Monterey.
- Not enough storage space on your Macintosh HD.
- You might have downloaded a corrupted macOS installer.
- Due to poor internet connection.
- Your Mac startup disk has some errors
- macOS Monterey might not be compatible with your Mac model.
3. Can I use an external hard drive to update my Mac?
You can plug in an external drive to update your Mac when running out of storage, which is an affordable and easy way to expand your Mac's storage capacity.
Conclusion
macOS updates cannot be installed on this disk due to various reasons. To resolve this issue, it's recommended to regularly check for updates, which can help identify and fix potential errors before they become major problems. This proactive approach can help keep your system in top condition and reduce the likelihood of encountering update installation issues in the future.
If you accidentally delete an application from your Mac, it can lead to data loss or corruption, but fortunately, tools like Deep Data Recovery for Mac can help you recover deleted applications with just a few simple steps.
Related Articles
- Ring Deleted Video Recovery: How to Recover Deleted Ring Doorbell/Camera Videos
- Help! Mac Trash Bin Won't Let Me Empty it, How to Fix?
- Solved: USB Flash Drive Not Showing Up on Mac
- Fix Corrupted Hard Drive on Mac with Two Methods
- Deleted File Not in Recycle Bin | Proven Fixes
If you've accidentally deleted a file and it's not in the Recycle Bin, don't worry! This tutorial will cover three tested solutions to help you restore the deleted file with ease. - [4 Fixes] Desktop Files Disappeared in Windows 7
If your desktop files have disappeared in Windows 7, don't worry, this guide has got you covered. We've got 4 feasible solutions to help you recover missing desktop folders and files with ease.