How to Reset iPhone Without Losing Data
Summary
If your iPhone is running slower than usual, you may want to consider resetting it to improve its speed. If you're looking for solutions to reset your iPhone without losing important data, this guide provides helpful answers.
You can reset your iPhone by going to Settings > General > Reset and choosing the type of reset you want, such as a soft reset or a factory reset. This can help fix issues with your iPhone's speed and connectivity, but be aware that a factory reset will erase all of your data. To securely reset your iPhone without losing data, you can try a soft reset, which will restart your iPhone without deleting any data. If you're experiencing issues with your iPhone's speed and connectivity, a soft reset may be a good place to start. However, if the problem persists, you may want to consider contacting Apple support or visiting an Apple Store for further assistance.
You might want to reset an iPhone without losing data for various reasons, such as to remove junk apps or files that slow down your iPhone, or to fix software problems. Fortunately, there are three handy methods to do it, which can help bring your iPhone back to normal and make it run faster without losing any data.
| Workable Solutions | Step-by-step Troubleshooting |
|---|---|
| Fix 1. Soft reset iPhone | Shut down the iPhone > Then, slide the Power switch right > Wait for a while, restart your iPhone...Full steps |
| Fix 2. Force reset iPhone | On iPhone 8/8 Plus/X/XS/SE/11: Press and quickly release the Volume Up button > Press and...Full steps |
| Fix 3. Factory reset iPhone | Connect your device such as iPhone, iPad, or iPod Touch to WiFi > In iOS 8 or later, tap...Full steps |
Method 1. How to soft reset iPhone without losing data
A soft reset can fix various small iPhone issues, such as slow performance, app malfunctions, freezing, and unresponsiveness. The process is easy, but steps may vary slightly depending on your iPhone model.
Step 1. Shut down the iPhone.
To force restart an iPhone X, XR, or 11, press and hold the Sleep/Wake button and the Volume Down button simultaneously. Release the buttons when the "Slide to power off" prompt appears, and then slide to power off. This will initiate a force restart.
On iPhone SE or an iPhone 8 or earlier, press and hold the Sleep/Wake button only until the shutdown icon appears.
Step 2. Then, slide the Power switch right.
Step 3. Wait for a while, restart your iPhone.
To restart an iPhone X, Xr, or 11, press and hold the Side button until the Apple logo appears.
On an iPhone SE or an iPhone 8 or earlier, to restart, hold down the Side (Power) button again until the Apple logo appears.
Method 2. How to force reset iPhone without data loss
If your iPhone is completely unresponsive, a practical way to fix this issue is to perform a force reset, which may vary slightly among different iPhone models.
To reboot your iPhone 8/8 Plus/X/XS/SE/11, press and quickly release the Volume Up button, then press and immediately release the Volume Down button, and finally press and hold the Sleep/Wake button until the Apple logo appears.
On the iPhone 7 and iPhone 7 Plus, press and hold the Sleep/Wake and Volume Down buttons until the Apple logo appears.
On the iPhone 6s and earlier, press and hold the Sleep/Wake and Home buttons together until the Apple logo appears.
Method 3. How to factory reset iPhone without data loss
This is the last-To fix iPhone problems, back up all your files to iCloud or iTunes first, as this will wipe out your current data. We recommend using iCloud for data security. Once backed up, go to Settings > General > Reset > Erase All Content and Settings to factory reset your iPhone via iCloud. Alternatively, you can use iTunes to back up and restore your iPhone.
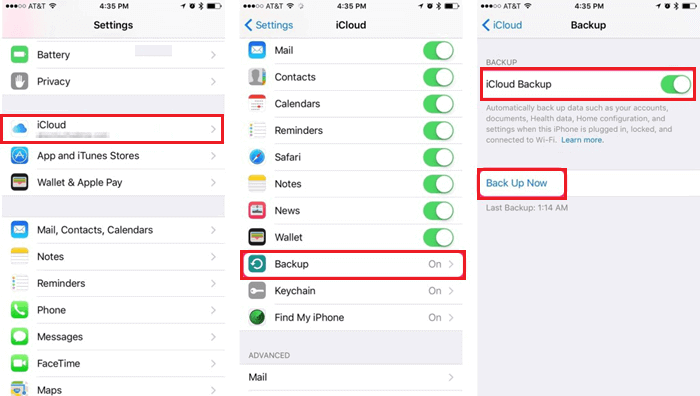
Back up iPhone data to iCloud before resetting
Step 1. Connect your device, such as an iPhone, iPad, or iPod Touch, to a WiFi network. This will allow you to access the internet and use various online features on your device.
Step 2. In iOS 8 or later, tap Settings > iCloud > Backup (or Storage & Backup on iOS 7 or earlier).
Step 3. To back up your iPhone, make sure that iCloud Backup is turned on, then tap Back Up Now.
- Notice:
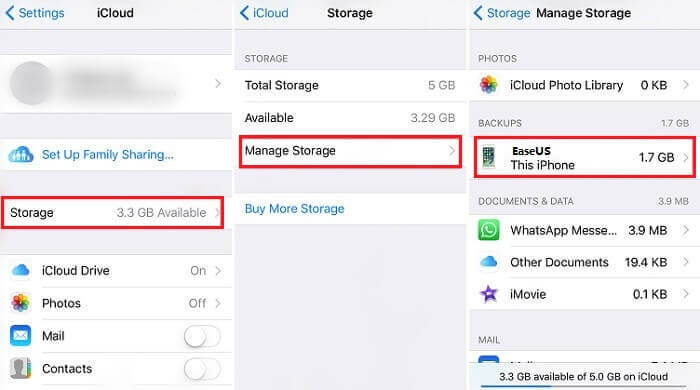
- If you want to back up specific data like contacts, photos, or videos to iCloud, you can also check if all your data have been backed up by going to Settings > iCloud > Storage > Manage Storage and selecting your device.
Reset iPhone, iPad or iPod Touch with ease
Step 1. Go to Settings > Tap General > Tap Reset.
Step 2. Choose resetting mode: Reset All Settings.
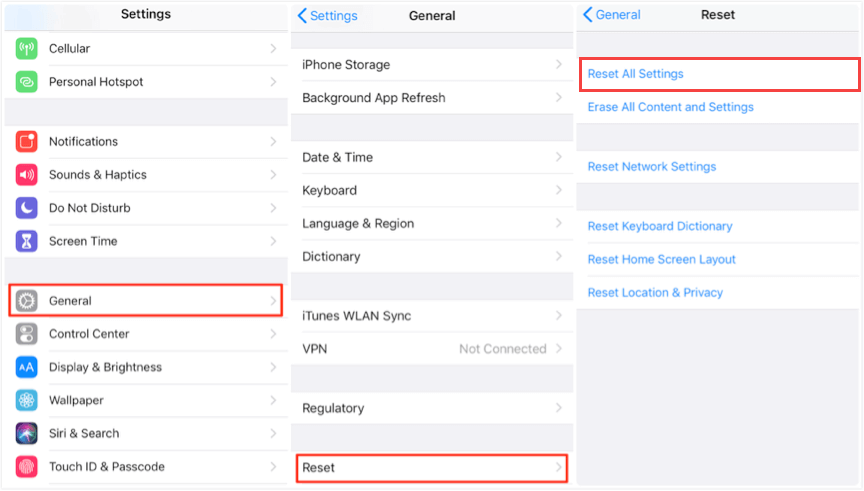
- Notice:
- Be careful not to tap on Erase All Content and Settings, as this will delete all your settings, apps, and data.
Restore iCloud backup after resetting iPhone
After setting up your iPhone, you can restore your backups from iCloud. You can either directly restore the iCloud backup to your iPhone or use iPhone data recovery software, which allows you to selectively restore data from the backup, making it easier to organize your iPhone by deleting unnecessary items.
Option 1. Restore iCloud backups to iPhone
Step 1. To view and manage your iCloud storage, go to Settings > iCloud > Storage. (On iOS 7 or earlier, it's Storage & Backup.)
Step 2. To restore a backup, go to Settings > [your name] > Manage Storage > Tap iCloud Backup > Choose your backups to restore.
Step 3. Once the iCloud backup has been restored to your iPhone, you should see your data and apps reappear on your device. This process can take some time, depending on the size of your backup and the speed of your internet connection.
If you find some data or text messages are not restored to your iPhone, you can try restoring all data with iPhone data recovery software from Qiling, or selectively restore the iCloud backup to your iPhone.
Option 2. Selectively restore iCloud backups to iPhone
Download Qiling MobiSaver and connect your iPhone to your PC, then follow the steps to start restoring your iCloud backups.
Step 1. Choose "Recover from iCloud"
Connect your iPhone to your PC, launch Qiling MobiSaver, choose "Recover from iCloud", and click "Start".
Step 2. Turn Off "Find My iPhone"
Turn off "Find My iPhone" on your iPhone/iPad/iPod to continue.
Step 3. Type Code in the Confirmation Box
Type "123456" in the confirmation box and then click "Continue" button.
Note: This step will completely erase all data and reset all settings, so make sure you have backed up any important information beforehand.
Step 4. Reset iPhone
Move through the iPhone setup process until you reach the reset screen, then select "Restore from iCloud Backup" on Your phone. Enter the Apple ID and password for the account you want to restore the backup from, and click "Next" on your PC.
Step 5. Select the Files
To recover data, select the type of data you want to recover, such as all files, and click the "Select All" button below if necessary.
Step 6. Analyze the iPhone
The software will analyze your phone. This process may take a few minutes, during which time you should not disconnect or use your device.
Step 7. Scan Lost Data and Recover
Qiling MobiSaver will automatically scan your iCloud backup file to find the lost data, a process that may take a few minutes. Once complete, select the desired data and click the "Recover" button to retrieve it.
The Bottom Line
Upon reading this step-by-step tutorial, we hope you have reset your iPhone successfully. Of all methods mentioned above, Method 3 is the most effective solution to fix iPhone problems. Almost all iPhone issues can be addressed by performing a factory reset. Don't forget to back up your iPhone before doing a factory reset. That's all about our guide. If you have any questions or additional advice about this topic, don't hesitate to contact us.
Related Articles
- How to Recover Deleted Text Messages from iPhone SE
- Qiling MobiSaver 7.6 Crack with Serial Key, Code [Latest]
- How to Recover iPhone Data After Restore Without Backup
- 3 Ways to Recover Lost Data on iPhone 7
- How to Recover Hike Chats, Messages and Images on Android & iPhone
To recover deleted messages, chat history, conversations, pictures, images and old data on Hike messenger, you can download the Qiling Hike recovery tool. This tool can also be used as a Hike chat backup reader to read, open, and restore Hike chat backup files. - IMO Delete Message Recovery: How to Recover IMO Chat History
If you deleted your chat history in the IMO app, you can try using a third-party IMO chat recovery software to recover the deleted or lost content, including photos, videos, audio, and other media files.