5 Easy Ways to Retrieve Your Suddenly Disappeared Files on Mac
If you're unable to find a specific file on your Mac, you can try searching for it using Spotlight. To do this, click the magnifying glass icon in the top right corner of the screen, type in the name of the file you're looking for, and press Enter. This will search your Mac for the file and display the results.
Many laptop users have a habit of saving files on the desktop for easy access, but it can be frustrating when they can't find a file, even after checking that it hasn't been deleted or moved.
A number of Mac users have been reporting that some of their files have suddenly disappeared, leaving them wondering what could be the reason behind this issue. To address their queries, we'll explore the possible explanations for this phenomenon and provide answers to their concerns.
Why Did My Files Disappear on Mac?
Losing a file on a Mac can be frustrating, and the first questions that come to mind are "how?" and "why?". There are several reasons that can lead to this situation, including accidental deletion, formatting a drive or partition, using a third-party app that deletes files, or even a system crash.
1. Virus attack or Power failure: A Mac device can be vulnerable to data loss due to virus attacks or power failures, resulting in permanent deletion of files. In such cases, having a robust Mac data recovery software is crucial to retrieve disappeared files and prevent data loss.
2. Accidental deletion without your notice: If you've accidentally deleted an important file while cleaning up your desktop, check your Trash bin first. Most deleted files are stored in this folder, so you may be able to recover your lost file.
3. Switching the location of your files: Many users forget the new location of their files after making new folders or renaming specific folders on their Mac device, so it's a good idea to check the trash folder or other important folders for misplaced files.
4. Wrong sync settings on iCloud drive: If your files are moving to iCloud from your desktop, it's likely because your default setting is set to keep desktop or document files on iCloud. To resolve this, simply recheck your iCloud settings and customize them to your preferences.
5. Stack hides the files in recent macOS: If you have enabled the stack feature on your macOS, your files may be organized by category. To move them back to their original location, you can disable the stack feature. This will allow you to place your files back where they belong.
How to Recover Lost Files on Mac?
If your files have gone missing on your Mac, try troubleshooting by checking the Trash, using Spotlight to search for the files, and looking in the Desktop and Documents folders. You can also try using the "Find My Mac" feature to locate your device and recover your files.
Method 1. Unhide settings in Finder
macOS Finder can help you organize your files on your Mac device. If you're having trouble locating your files, you can unhide them using Finder by following these steps:
Step 1. To resolve the issue, click on the apple logo in the top left corner, then select "Force Quit" from the drop-down menu, choose "Finder", and finally click "Relaunch". Alternatively, you can click on the Finder icon in the bottom menu bar. This should resolve the issue and allow you to access your files again.

Step 2. Now open the Macintosh HD folder.
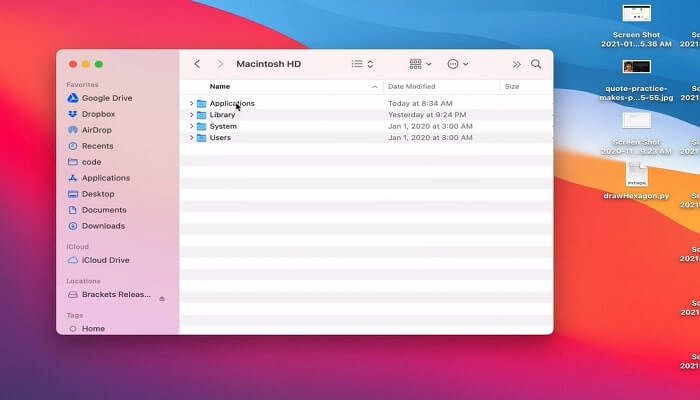
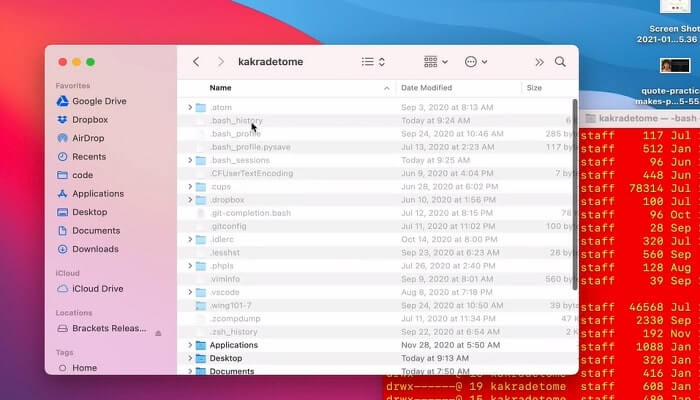
Step 3. To make hidden files appear on your Mac, press Command + Shift + . (dot) on your keyboard. This will reveal the hidden files and folders that are normally invisible.
Note: This step can be followed inside applications, documents, and desktop folders.
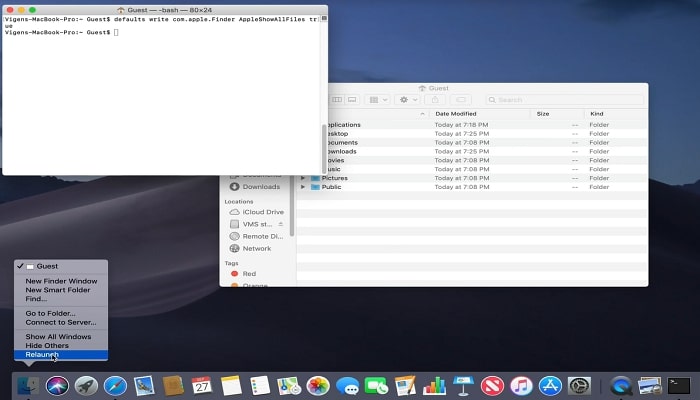
Method 2. Unhide settings through Terminal
To unhide your hidden or lost data on a Mac device, you can use the terminal app. Simply follow these steps:
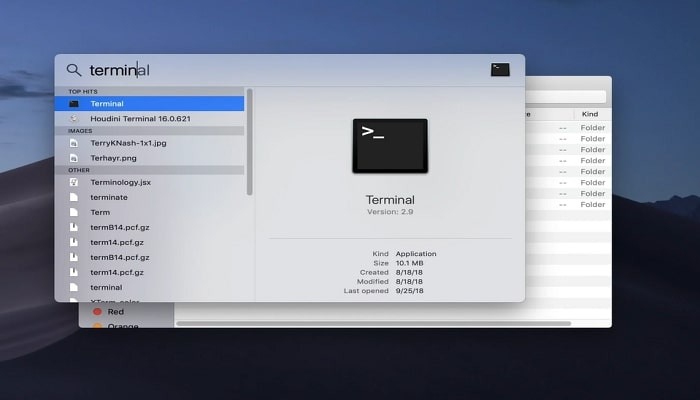
Step 1. Open terminal by clicking on Finder > Applications > Utilities > Terminal or manually search it
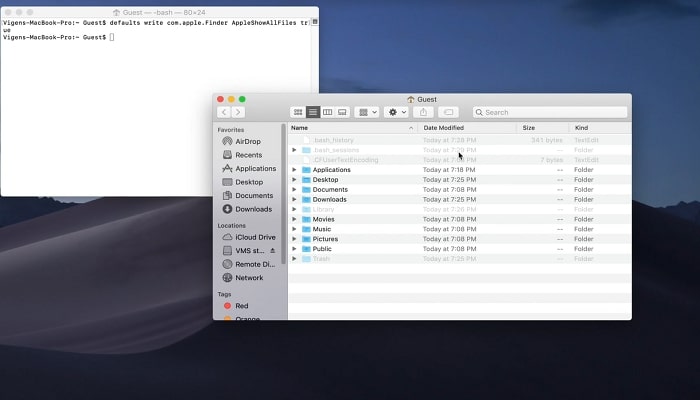
Step 2. Once the terminal opens, type ''com.apple.finder AppleShowAllFiles true'' and click on return.
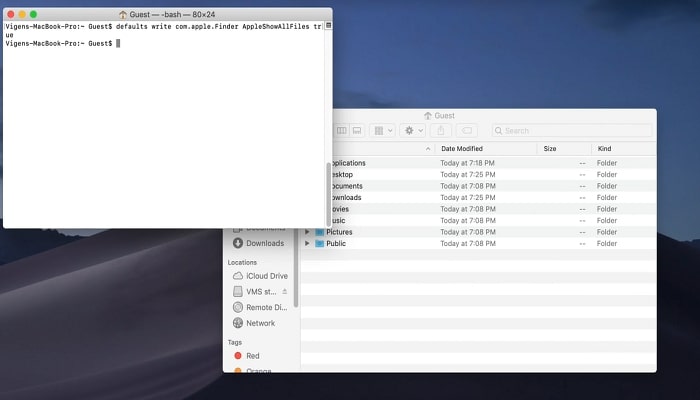
Step 3. Now click on the "Finder'' and choose ''relaunch''
Step 4. While the command is running, you can view all your hidden files, as well as any temporary files saved on the desktop.
Method 3. Find files through Stack
To help you find suddenly disappeared files on your Mac, you can enable the stack feature which organizes files in a specific category, and when clicked, expands to show all content on the desktop.
Step 1. Click on view from the top of your desktop and select "Use stacks".

Step 2. To organize your files, find the missing folder and place it back in its correct location, ensuring all your files are properly organized.

If your file has gone missing but you're certain it wasn't deleted by mistake, these steps can help you find it. The file might be hidden, so you'll need to follow these steps to locate it.
Method 4. Correct your iCloud settings
macOS allows its users to save their files and data in iCloud storage, enabling them to access their information from anywhere using their Apple devices on iCloud.com.
If you can't find your files or any folder on your desktop, you may need to change your iCloud setting by turning off iCloud and recovering your lost file. To rectify your documents from iCloud, follow these steps: follow the steps below.
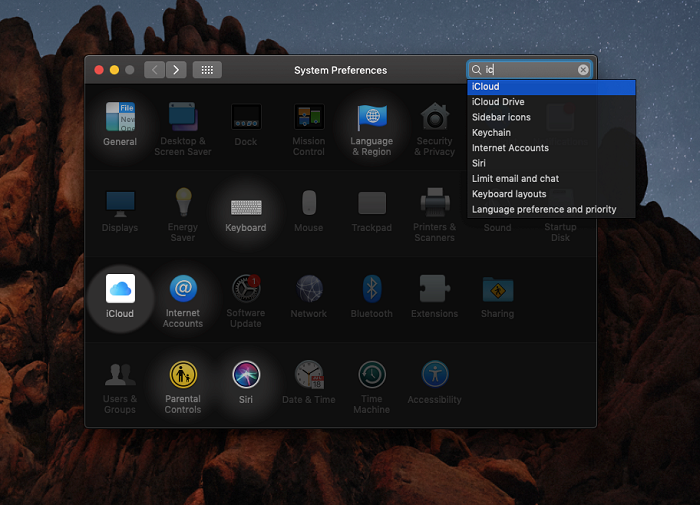
Step 1. From the Apple ''menu bar'' select ''Preferences'' and go to ''iCloud''.
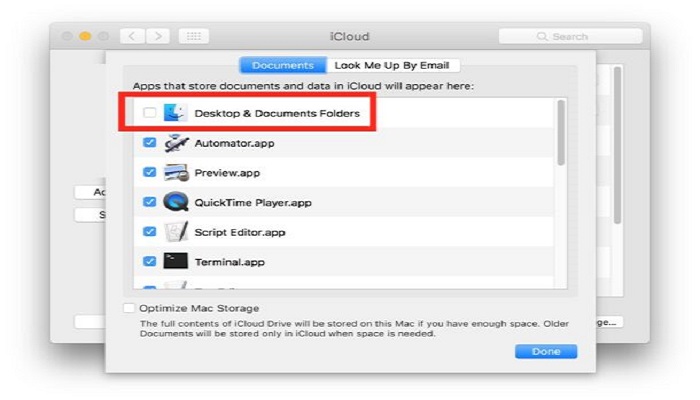
Step 2. From the options available at iCloud, unselect your "desktop and document folder'' and click on ''Done''.
Method 5. If the files are still missing, you can use a data recovery software
If you've lost files due to accidental deletion or another cause, you can recover them using Deep Data Recovery, a professional Mac data recovery software that can effectively and feasibly restore your missing data.
Using Qiling Mac data recovery software can provide numerous benefits, including the ability to recover lost data, restore deleted files, and even retrieve data from corrupted or damaged storage devices. This can be especially helpful in situations where important files have been accidentally deleted or a hard drive has failed.
- Qiling software can recover deleted files, formatted hard drives, inaccessible storage devices, and even emptied trash.
- This software supports all the versions of Mac (macOS 10.15-10.9)
- It can recover hundreds of files, including videos, audio files, excel, and even deleted and unsaved word documents.
This Mac data recovery software is professional and 100% free for you to download, so don't wait any longer - download it for free and give it a try!
Step 1. Launch Deep Data Recovery on your computer, select the desired file types, and click "Next" to initiate the recovery process.

Step 2. Select the location where your important data & files were deleted and click the "Scan" button.

Step 3. The software will perform both a quick scan and a deep scan on the selected volume, working hard to identify as many deleted files as possible.

Step 4. The scan results will be displayed in the left pane, allowing you to select the desired file(s) and click the "Recover" button to restore them.
Conclusion
Don't freak out if you lose a file or document on your Mac - try these easy ways to retrieve it. You can start by checking the Trash, then look in the Recent Items list. If that doesn't work, try searching for the file using Spotlight, and if you still can't find it, try looking in the Cloud Storage services like iCloud Drive or Google Drive.
Here are some alternative solutions to help you recover lost files: manual backups, cloud storage, external hard drives, and file recovery software. These solutions can help you recover lost files and prevent data loss in the future.
Related Articles
- How to Recover Data from A Fusion Disk
- Solved: How Can I Stop Trash Deleting Files Immediately on Mac
- How to Delete Files on Mac that Won't Delete: Methods Vary from Specific Errors
- Mac Trash Recovery | Restore Trash Data on Mac
- Does Updating to Windows 11 Delete Files? Here's the Answer
Updating to Windows 11 does not delete files, and you can upgrade for free. However, if you do lose data after the upgrade, you can recover lost and deleted files using Deep Data Recovery software. - Halo Infinite Won't Download? Download Halo Infinite Free
If you're having trouble downloading Halo Infinite, there are several potential solutions to try. You can check for Windows updates, try reinstalling the game through the Xbox app, or troubleshoot the download process by checking for any errors or issues with your internet connection.