2022 Best Solutions for SSD Secure Erase in Windows 10/11
| Workable Solutions | Step-by-step Troubleshooting |
|---|---|
| Method 1. Qiling File Shredder | Step 1. Run Qiling File Shredder. Click the "+" button; Step 2. Select the targeted HDD or SSD to wipe...Full steps |
| Method 2. DiskPart Clean All Command | Step 1: Press the Windows+S keys; now type the Windows Terminal on the search bar. Right-click...Full steps |
Is Secure Erase Bad for SSD?
A solid-state drive, also popularly known as SSD, is a widely used storage device on computers. Overall, SSD is one of the best upgrades you can make to your system, as they are the best in terms of cost, space, speed, and higher capacity. You can only write to an SSD number of times like other types of flash memory, which shows an issue if you want to erase or wipe the solid-state drive clean too often. If you use a standard tool, it can damage the SSD and consequently reduce its lifecycle.
Overall, SSDs are designed smartly with advanced technology and algorithms. Manufactures are intended to ensure the data is discarded ideally without hampering the drive's life. These are usually coming with SSD wear leveling protection. This protection process tackles damages and distributes stored data between SSD blocks to ensure even wear. Traditional hard drive stores data in a physical location; on the other hand, SSD writes data to block. Each writing process causes the memory to degrade or wear.
Due to the unique data deletion handling mechanism, we recommend users not wipe their disks too often because most disk wiper tools lower the performance and life of the SSD disks. So now the question is how to perform secure SSD drives erase in your Windows system? No need to worry! We have the solution. Here in this post, we will guide how you can securely erase SSD on your Windows system in two different methods, so read the entire post and follow the exact steps given in the two methods below.
How Do I Secure Erase an SSD in Windows 10/11? [2 Fast Ways]
If you want to secure erase of SSD in your Windows 10/11 system, you can do it manually and with the help of third-party software. Make sure to take a backup of all your necessary data from your SSD to another secure disk or external hard drive before performing these erase processes.
As we already mentioned, you can perform the SSD erase process in two different methods like
While the File Shredder offers a user interface, DiskPart is a command-line tool. The form is usable even if you have no technical skills and want to perform a quick and safe SSD erase. We will recommend going with Method 1, which is with the help of Qiling File Shredder software, the best file shredder. Download this software and follow the steps below to perform the process entirely and safely.
Method 1. Secure Erase SSD in Windows with Qiling File Shredder
If you want a safe and secure erase SSD in Windows without any technical knowledge, we recommend using the Qiling File Shredder. It is one of the most trusted tools with advanced Disk Wipe features and multiple disk wipe algorithms.
This top-rated tool lets Windows users securely erase SSD and wipe all the available data without affecting or spoiling the disk performance. So, what are you waiting for? Download the application and then it will be easy to erase SSD disks on your system immediately and safely.
Step 1. Launch Qiling File Shredder and click the "+" button.
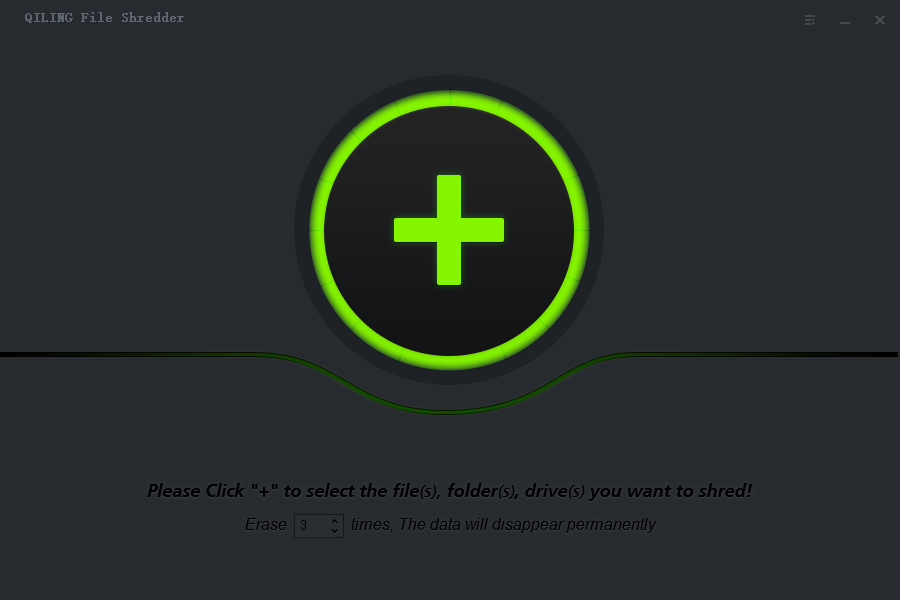
Step 2. Select the targeted HDD or SSD to wipe.
Notice: Please make sure you have chosen the correct HDD or SSD. Once the wiping starts, your data is irrecoverable.
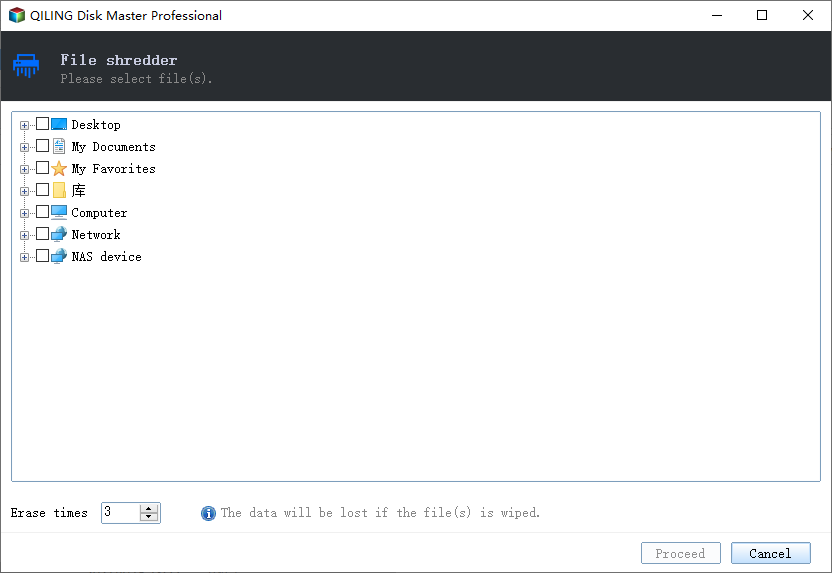
Step 3. Choose Wiping Method.
Choose a suitable wiping method. Recommend Qiling Secure Erase!
Step 4. Check the warning message and click "Proceed" to confirm.
Step 5. Wait for wiping finish.
Key features
- Secure erase usb drive or disk partition.
- Remove shared and permanently eliminate private files and folders that are further unrecoverable.
- Advanced software supports wiping data and partitions on all types of storage devices.
- Wipe computer OS drive with bootable disk.
- Supports all kinds of Windows versions and Windows Server 2022-2012.
- Supports all types of storage space, including SSD/HDD/USB Drives.
Method 2. Wipe and Erase SSD with DiskPart Clean All Command
DiskPart is a built-in tool from Windows that allows you to manage disks and storage space on the PC. You can create, delete, merge, and do all other operations. However, there is no user interface, and it works from the terminal.
When it comes to SSD secure erase, you can do it with the help of Diskpart Clean All Command. For the complete process. Before going ahead, ensure you have a backup of all the data.
Follow the exact steps given below.
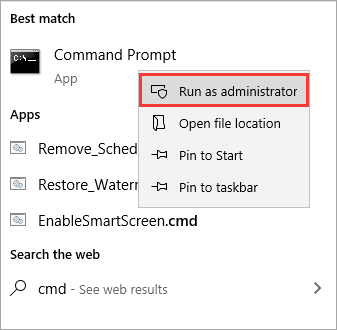
Step 1: Press the Windows+S keys; now type the Windows Terminal on the search bar. Right-click Windows Terminal from the search result and select Run as Administrator.
Step 2: Click yes to allow Windows Terminal to run on your system. To open the Disk Management tool, type diskpart and press the Enter key to launch it.
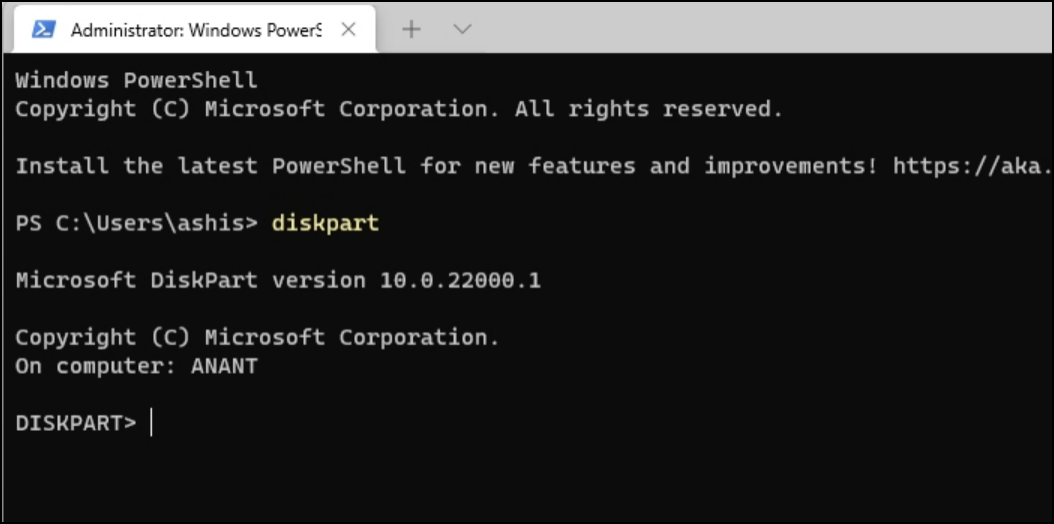
Step 3: A new Diskpart window will appear on your screen; now type the following command lines and hit the Enter key each time.
- list disk
- select disk 1 (you can replace 1 with the disk number which you want to wipe)
- clean all
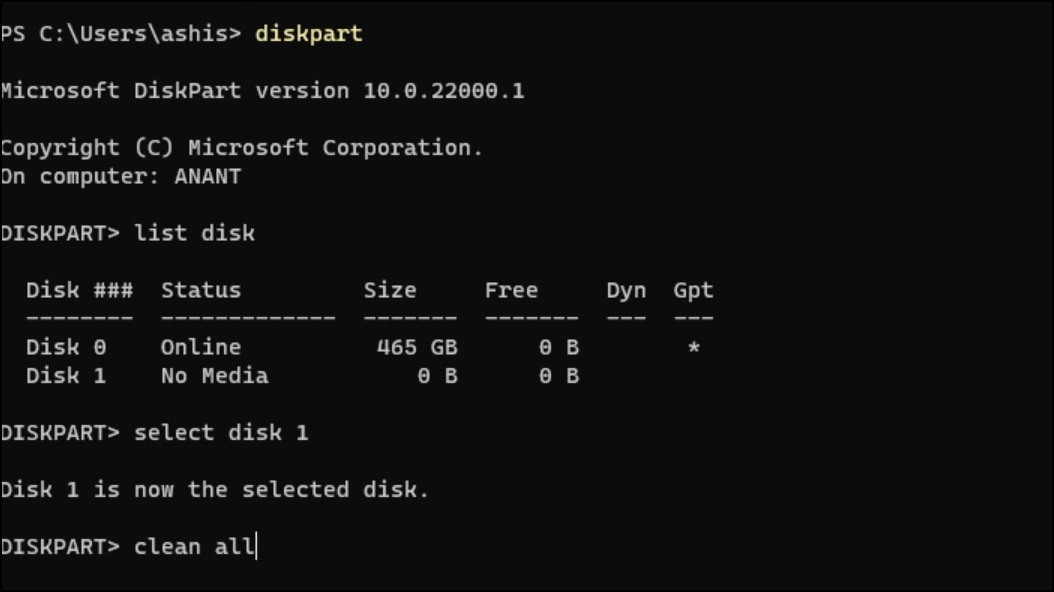
Note: Disk 1 can be changed to anything else. The first command shows a list of all connected disks on your PC. Make sure to match it with Windows explorer by looking at the label or the name of the disk.
Step 4: Now wait for few times till the erase process completes. After completing the process, type exit and check whether your disk is empty or not.
Since the tool doesn't offer any user interface, it is best to try it on a disk which is empty to understand the process. If you accidentally delete a working drive, and there is no backup, you will land up in trouble.
Conclusion
If you are still following our post, you must understand all the solutions for SSD secure Erase in Windows 10/11. Follow the exact steps given in both methods and take a backup of all critical data available in your SSD disk before executing any secure erase process on the drive.
Related Articles
- How to Clear a Pen Drive in 2022 [3 Easy Methods]
- How to Clean or Wipe a Hard Drive Including The OS
- Secure Methods to Erase SSD Disk on Windows and Mac
- How to Securely Erase SD Card? 2022 Full Guide
- HDD Secure Erase: How to Securely Erase HDD to Its Original State
Are you looking for a complete guide for HDD secure erase? Follow this page, you'll learn new latest guide in 2022 for securely erasing HDDs, SSDs, external storage devices, etc., successfully on your own. - How to Clean My PC? 5 Sensitive & Essential Tips You Must Try in 2022
Are you looking for a complete guide that could help you clean computers ultimately? On this page, we'll show you the complete solutions for successfully cleaning up a PC in Windows 11/10/8.1/8/7.