Cloned to the Wrong Disk: Recover the Overwritten Drive
Quick Navigation:
- What the Wrong Destination Erased
- Stop Every Write Immediately
- Find the Disk That Still Holds Your Data
- Recover the Overwritten Volume
- Frequently Asked Questions
Two drives of the same model sit in one case, the clone dialog lists them by capacity, and the row that gets ticked turns out to be the archive drive instead of the empty one. The job reports success, the old disk letter disappears, and the folders that were there an hour ago are nowhere in Explorer. What happened is exact and instant: before a single data block was copied, the clone wrote a new partition table over the one that described your volumes, and with it the entries that pointed to your files.
What the Wrong Destination Erased
A disk clone does not start by copying files. It starts by writing a partition table and the boot code in the first sectors of the target, then recreates each volume and fills it with blocks from the source. That first write is what makes the destination's existing volumes vanish: the partitions are still on the media, but nothing in the table points at them any more.
How much survived depends on how far the job ran. A clone stopped in the first minute may have replaced only the table and the first volume, leaving most of the old data clusters untouched. A job that ran to completion has written the whole source over the destination, and the old content is gone from every block the copy covered. In the first case recovery is usually good; in the second it is limited to whatever lay beyond the end of the copied data on a larger disk.
The warning dialog exists precisely to prevent this. It names the disk, states that all partitions on it will be deleted, and asks for confirmation. Once that confirmation is given, the write is not something Windows can undo, because no backup of the old table is kept anywhere on the disk.
Stop Every Write Immediately
The first minute decides how much you get back. Every write to the overwritten disk can land on a cluster that still holds an old file, so the rule is simple: stop writing to it now, and keep every later read-only until the recovery is finished.
Do not format the disk to make it usable again, do not initialize it when Windows offers to, and do not let a repair tool rebuild the partition table. Do not install recovery software on that disk, and do not let Windows index it, defragment it, or run a scheduled backup to it. If the drive is external, unplug it after the job and reconnect it only when the recovery tool is ready, ideally through a write blocker or a read-only adapter.
Keep the machine otherwise unchanged. A recovery scan reads the disk; it does not need the disk to be mounted, and a volume that shows no letter is not a problem for the scanner. If the drive still appears with a letter and the system wants to check it, cancel that prompt rather than letting chkdsk write repairs to a file system that is no longer the one you want.
Find the Disk That Still Holds Your Data
Before scanning, confirm which disk was actually written. In most cases the source is still intact, because the clone only reads from it, and the mistake cost you a second copy rather than the original. In that situation the fastest fix is not recovery at all: the source can be cloned again, this time to the correct destination, and the overwritten disk can be dealt with afterward.
When both disks were touched, for example when the job ran the wrong way round or a second attempt wrote to the original, decide which one holds more recoverable data. Capacity is a poor guide on its own; disk number, model, and the order in the list are what identify a drive, and Disk Management shows all three. Write them down before attaching anything else.
Attach only the disk you plan to scan, and do not write to it while the scan runs. Creating a volume, formatting, or copying a file back onto that disk overwrites the very sectors the scan is trying to read, which is the one mistake that turns a recoverable volume into a lost one. A free USB drive is still useful once the scan is done, because the files inside the rebuilt partitions should be copied out before the disk is used again.
Recover the Overwritten Volume
Qiling Disk Master includes a recovery wizard that reads the disk in read-only mode, rebuilds the partition layout it finds in the free space, and shows the result on a preview before the table is written back. Scan the overwritten disk, restore the partitions it finds, and copy the files out before the disk is used again.
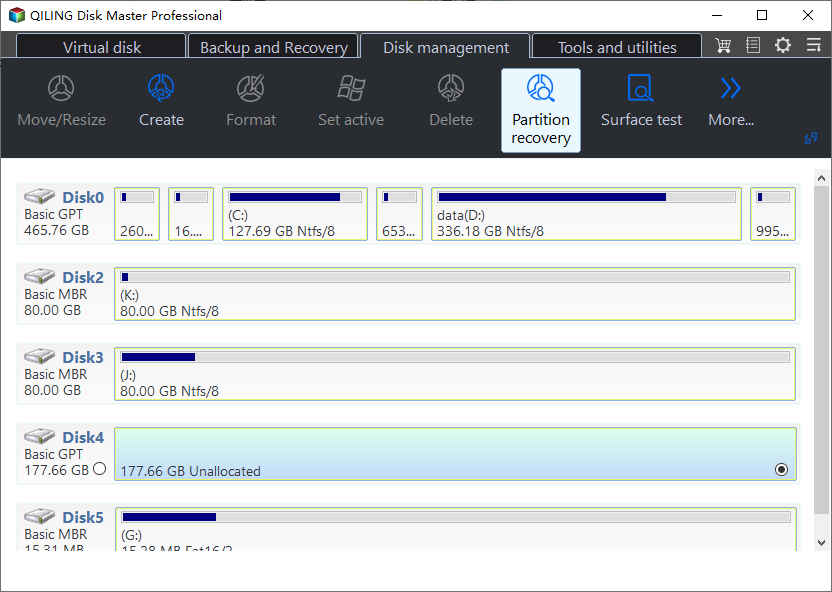
Step 1. Open Partition recovery from the Tools and utilities tab. The disk map shows every attached drive with its number, model, capacity, and current layout. Compare those rows with the disk that lost its volumes, and confirm that the drive you are about to scan is the overwritten one rather than the source.
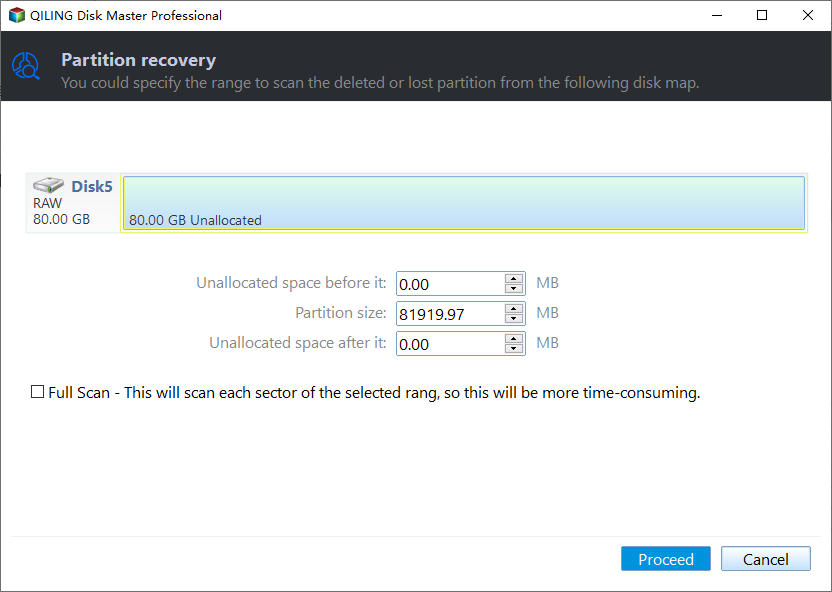
Step 2. Point the scan at the erased range and enable Full Scan. The wizard asks which part of the disk should be examined. Leave the unallocated fields at their full values so the whole space is covered, and tick Full Scan so that every sector is read instead of only the most recent table entries. Click Proceed to start.
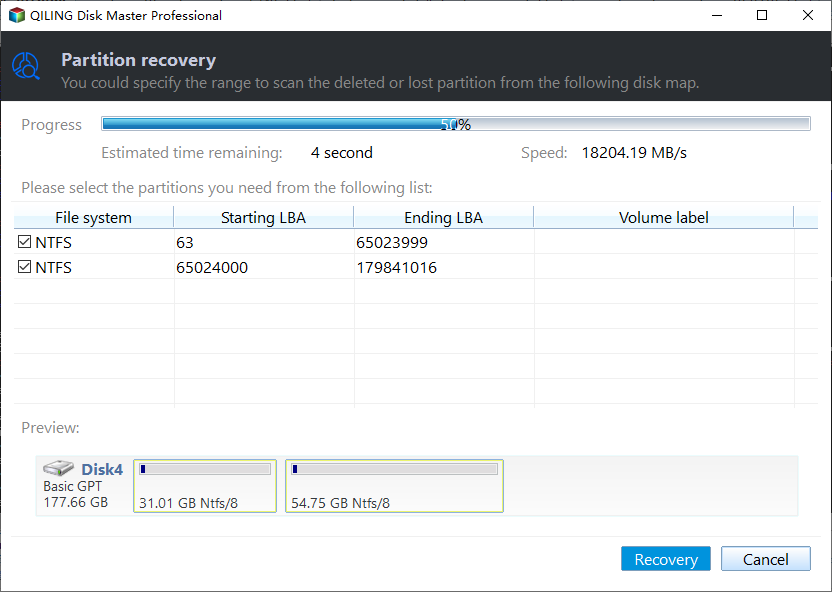
Step 3. Tick the partitions the scan rebuilt and check the preview. Each row carries a file system, a starting and ending LBA, and a volume label, and the panel at the bottom draws the layout that will be restored. Match those values with the volumes the clone erased, tick the partitions you need, then click Recovery. The wizard writes the rebuilt partition entries back to the disk, so keep every other program, format, and window away from it until the job reports that it has finished.
Once the partition appears in File Explorer again, copy the files you care about to another drive before the disk is used for anything else. A full format can follow at that point, because nothing on the overwritten disk is needed any more.
Frequently Asked Questions
Are the files gone as soon as the clone starts?
The partition table is, and with it the links to the files, but the data clusters usually survive until the copy writes over them. That is why the outcome depends on how far the job ran and why every further write reduces what can be recovered.
Can I just undo the clone?
No. A clone keeps no backup of the target's old partition table, so there is nothing to roll back to. The only route is to rebuild the layout from what remains on the disk with a recovery scan, or to clone again from a source that is still intact.
Should I format the disk before running the recovery?
No. Formatting writes a new file system over the sectors the scan needs to read, and the old partition entries are lost for good. Rebuild the partition table first, then copy the files out to a separate drive.
Related Articles
- Target Disk Unallocated After Clone: Why and How to Fix
- Recover Files After a Canceled Clone
- Cloned Drive Shows as RAW
- RAW Drive Recovery
- Recover a Deleted Partition on Windows 11
Products
Articles & Tutorials
- Data Recovery
- Data Backup
- File Recovery
- File Backup
- System Backup and Restore
- Disk and Partition Clone
- Technical articles
- Mobile articles
- Disk Master Help
- Windows Data Recovery Tutorials
- Windows Secure Delete Tutorials
- Windows Partition Management Tutorials
- Windows File Backup and Restore Tutorials
- Windows System Backup and Restore Tutorials
- Windows Disk Backup and Restore Tutorials
- Windows Clone Tutorials