Target Disk Unallocated After Clone: Why and How to Fix
Quick Navigation:
- Why the Target Disk Looks Empty
- Back Up Before You Retry
- Read the Disk in Disk Management
- Clone Again with Qiling Disk Master
- Frequently Asked Questions
A clone finishes with a green check, the new disk goes into the machine, and Disk Management shows it as one long bar of unallocated space. Nothing was written. Two milder versions of the same surprise are common as well: the target reports a capacity far below the number printed on the label, or it carries a single volume where the source had four. In every case the transfer itself was not the problem. The result was decided earlier, when the source row was ticked, when the destination was chosen, and when the layout on the preview page was confirmed or skipped.
Why the Target Disk Looks Empty
Unallocated means the disk holds no partition table entries, not that the copy ran slowly. A disk clone writes a partition table together with the volumes it copies, so a target that shows no volumes at all is either a disk the job never touched or one that came back to Windows under a different identity than the one it had when the job started.
The usual cause is a destination mix-up. Two drives of the same model and capacity are hard to tell apart in a list that shows only size and model, and an external enclosure can expose the same drive twice, once through its bridge and once through a port that re-enumerated it. A USB target that drops off the bus during the job and returns with a new disk number ends up looking empty as well, while the write landed on whichever disk was selected at the start.
A capacity that looks wrong has a different reason. The copy reproduces the partition geometry of the source, so a 500GB layout placed on a 2TB disk leaves 1.5TB unallocated behind the last partition. That space is not lost, it was simply never assigned, and a cloned SSD that shows less capacity explains how to claim it without another copy.
A single partition on the target usually means the wrong mode was used. Disk clone moves every partition on the source, while System clone moves the Windows volume and the boot files it needs. A partition-level copy of C: alone produces exactly the result described here, one volume on a disk that looks half empty. A signature clash between source and target can also leave the copy offline until Windows resolves it.
Back Up Before You Retry
Before any further step, decide which disk holds the only complete copy of your data. In most of these cases it is still the original source disk, untouched, and it has to stay that way until the new disk has started and opened your folders. Nothing in this guide needs a write to the source.
Copy the folders you cannot lose to a third disk, or create a full image of the source when you have the space. The target is the disk at risk: initializing it, formatting it, or letting a repair tool write a fresh partition table destroys whatever the last job did manage to place there.
Keep both disks connected until the result is confirmed, label them by model and capacity, and write down the disk numbers Windows assigns. A retry that starts from a clear picture of which disk is which avoids the mix-up that caused the problem in the first place.
Read the Disk in Disk Management
Open Disk Management and read the row for the target from left to right: disk number, partition style, status, and capacity. A disk marked Offline is present but not mounted, and the menu offers Bring Online. A disk flagged with a signature collision is a copy that still carries the identifier of the source, which Windows refuses to mount twice.
The difference between unallocated and RAW matters here. Unallocated space has no partition entry, so there is nothing to mount. RAW means an entry exists but the file system inside cannot be read, which points at an interrupted write rather than a missing one. Only the first case is solved by assigning space to the disk.
Disk Management, diskpart, and the boot and file system utilities named in this article are Microsoft tools that ship with Windows. None of them is part of Qiling Disk Master, and the clone engine never initializes, formats, or assigns a letter to the target by itself. Use them to read the state of the disk, not to rewrite it before the copy is understood.
diskpart prints the same disk numbers and partition style in text form and is easier to quote when several drives are attached to one machine. Read the list, compare the capacities with the labels on the drives, then close the window without writing anything.
Clone Again with Qiling Disk Master
Qiling Disk Master shows the source and the target side by side before anything is written, and that is the stage that failed last time. Work from the same machine, keep both disks attached, and compare the disk numbers in the list with the ones you wrote down in Disk Management.
Operation 1: Select the Source and the Target
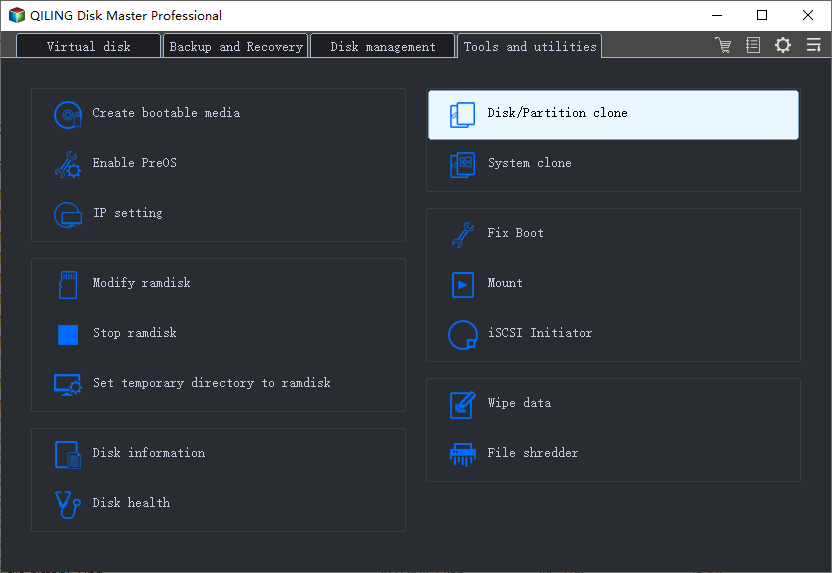
Step 1. Select the source disk or partition. Open Disk/Partition clone from the Tools and utilities tab and choose Disk Clone for a whole disk or Partition Clone for a single volume. The disks attached to the machine are listed and selectable directly: tick the row that boots today, with no separate step to add it. Tick Sector by Sector Clone only when the source reports bad sectors or an unclean file system, because the option copies free space as well and takes far longer.
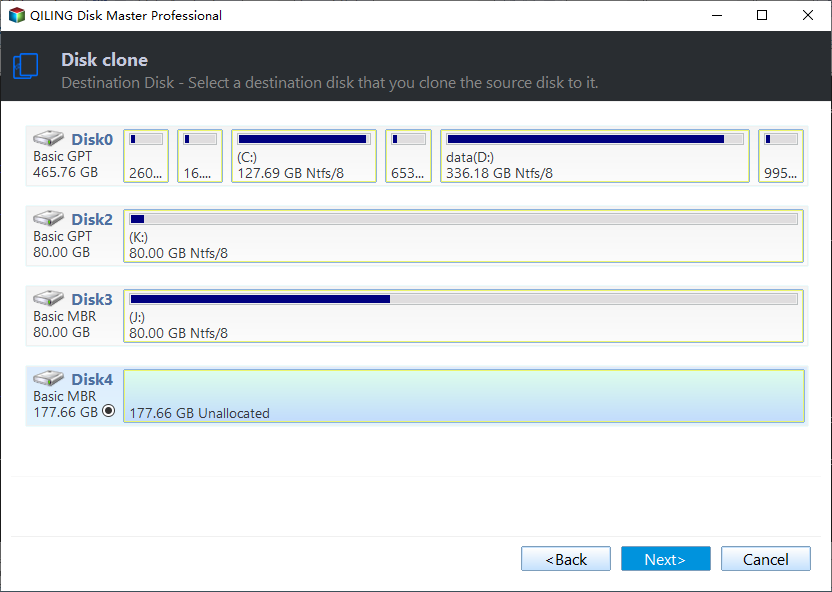
Step 2. Select the target disk. Read the model, the capacity, and the disk number of every row before you click one. Two identical drives are separated only by their number and their position in the list, and the disk you pick loses its current partitions the moment the job starts.
Operation 2: Preview, Align, and Size the Target
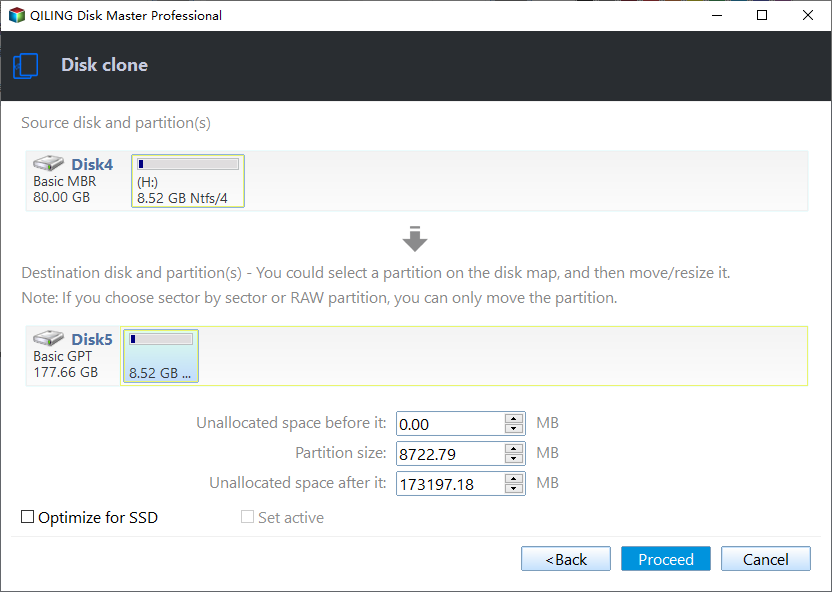
Step 3. Preview the layout, align the SSD, and adjust the partitions. The preview page shows the source partitions on the left and the planned target on the right. Turn on SSD alignment so every partition starts on a 4K boundary, drag the end of the last partition into the unallocated space when the target is larger, and move or shrink a partition when it is smaller. Confirm that each source volume, including the EFI system partition and the recovery partition, appears on the target side.
Operation 3: Run the Copy and Check the Result
Step 4. Click Proceed and watch the progress to the end. Accept the warning about the partitions on the target, then leave the machine alone while the bar advances. Do not sleep or hibernate the system and do not unplug an external target in the middle of the job. Wait for the window that reports completion and enables Finish.
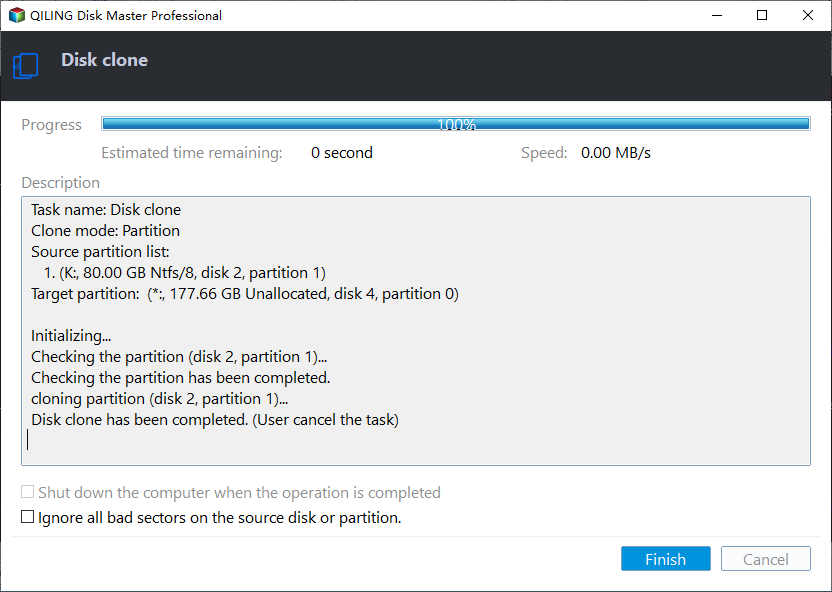
Reopen Disk Management and rescan the disks. A finished job leaves the target with the volumes from the preview and letters of its own. If it is still unallocated at that point, the write went to another disk, so compare capacities and disk numbers again instead of initializing the empty drive.
Frequently Asked Questions
Does an unallocated target mean the clone failed?
Not necessarily. A job that reached the end always writes a partition table, so a disk that shows no volumes was not the disk that received the copy, or it returned under a new number after a dropped connection. Check the other drives and the enclosure before you assume data loss.
Can I initialize the empty disk to make it usable?
Initializing writes a brand-new partition table and removes any partition the copy did place there, including a volume that only needs a letter. Confirm that the drive holds nothing you need, and that the real copy is not sitting on another disk, before you accept that dialog.
Why is the cloned disk smaller than the source?
Because the copy keeps the partition sizes of the source and leaves the extra space on a larger target unassigned. Set the sizes in the preview before the job, or extend or merge the unallocated space afterward with a partition tool.
Related Articles
- Cloned SSD Shows Less Capacity Than Expected
- Merge Unallocated Space After Cloning to a Larger Drive
- Cloned SSD Not Showing Full Capacity
- SSD Not Detected After Cloning
- Drive Letter Changed After Cloning
Products
Articles & Tutorials
- Data Recovery
- Data Backup
- File Recovery
- File Backup
- System Backup and Restore
- Disk and Partition Clone
- Technical articles
- Mobile articles
- Disk Master Help
- Windows Data Recovery Tutorials
- Windows Secure Delete Tutorials
- Windows Partition Management Tutorials
- Windows File Backup and Restore Tutorials
- Windows System Backup and Restore Tutorials
- Windows Disk Backup and Restore Tutorials
- Windows Clone Tutorials