iPad Screenshot Not Working in iOS 11? Fixes Here!
Question: "The screenshot function on my iPad Pro is not working. Pressing the home button and the power button does not work to get one. If I hold them it eventually goes into its sleep mode. I can hold down one or the other button and hit the remaining one and still nothing happens. I had hoped that updating it to iOS 11 would make it work, but no luck so far. Any idea?"
Some iPad and iPhone users have found that screenshot not working after updating to iOS 11. In our last page, we have talked about how to fix iPhone screenshot not working in iOS 11 Here, we will continue discussing how to fix iPad screenshot not working in iOS 11 and show you the most effective and easy-to-use solutions to settle the matter.
How to fix iPad screenshot not working in iOS 11
Below we demonstrate 5 top methods to help you troubleshoot iPad screenshot not working in iOS 11. No matter which type of iPad you are using, following solutions equally work.
1. Restart or force restart your iPad
Restart iPad: press and hold the Power button until the "slide to power off" occur. Slide to power off, after about 30 seconds, turn on again.
Force restart iPad: press and hold the Home button and the Power button for at least 10 seconds till you can see the Apple logo on the screen. Wait for the device to reboot and try take a screenshot on iPad again.
2. Check the iPad Home button works well
Make sure the Home button on iPad works well, if not, go to the Apple store to repair it if you have no idea.
3. Press and hold the Home + Power buttons at the same time
Make sure you press and hold the Power button and Home button simultaneously, or you may lock your iPad or activate Siri.
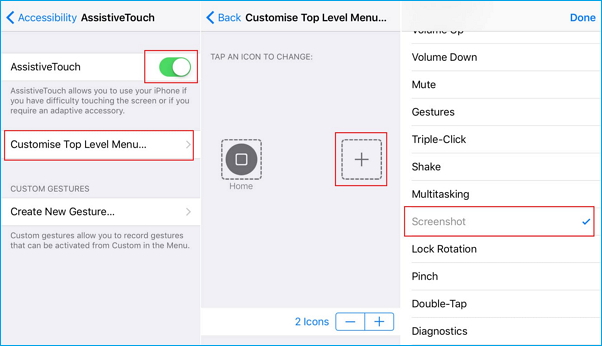
4. Take a screenshot on iPad using AssistiveTouch
If you are unable to take a screenshot on iPad in iOS 11 with Home and Power buttons, you can try it by using AssistiveTouch.
1. Go to "Settings" > "General" > "Accessibility" > "AssistiveTouch" > turn on "AssistiveTouch".
2. Tap on "Customize Top Level Menu"... > Tap on the "+" button > Find "Screenshot" and tap on it > Tap "Done" to add it to AssistiveTouch.
3. Open the screen you want to take a screenshot on iPad, open AssistiveTouch and tap screenshot to take a screenshot on iOS 11.
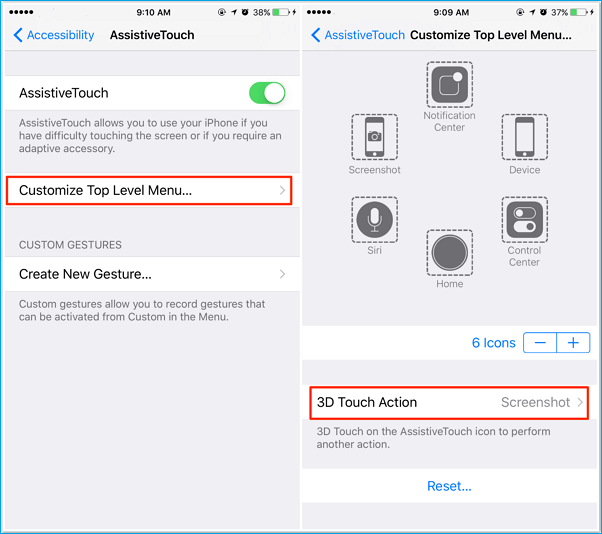
5. Take a screenshot on iPad with 3D Touch
For users who are still using iOS 10, you can take a screenshot on iPad by adding Screenshot to 3D Touch Actions.
1. Go to "Settings" > "General" > "Accessibility" > Enable "AssistiveTouch".
2. Tap on "Customize the Top Level Menu..." > "3D Touch Actions".
3. Find "Screenshot" to add it to "3D Touch Action".
4. Then press strongly on the AssistiveTouch icon with 3D Touch, and the screenshot will be taken.
Note: To transfer manage all photos on your iPhone and iPad devices, including screenshots, camera roll, photo stream, photo library, and live photos, you are highly recommended to use Qiling MobiMover Free, the 100% free iPhone data transfer and manager program that enables you export screenshots and other photos from iPhone/iPad to the computer for data backup with only one-click or sync the pictures to another iOS device without data loss. Now, download and install MobiMover Free to have a try.
How to transfer files from iPhone to computer with MobiMover
Step 1. Connect your iPhone to your computer running Windows or Mac OS systems with a USB cable > Start Qiling MobiMover > Click "Phone to PC" > Click "Next."
Step 2. Choose the type of files you wish to export > Customize the destination for exported iPhone data > Click "Transfer" to copy iPhone files to the computer at a fast speed.
Step 3. When the transferring finished, you can view, edit, keep or delete the content as you like.
Related Articles
- How to Take A Screenshot on iPhone 7
- How to Find Safari Download on iPad
- [Guide]How to Upload Photos to iCloud from iPhone X/8/7
- How to Download Music from iCloud to iPhone/iPad/iPod