[Detailed Guide] How to Burn iPhone Videos to DVD on Mac/PC for Free
Applies To: Any iPhone running iOS 8 and later
The increasingly improved iPhone camera enables you to take videos with high quality. Whether you prefer 1080p videos or 4K videos, you can use your iPhone (iPhone 6s/6s Plus and later) to capture the video as you wish. However, to enjoy your precious 1080p or 4K videos to the most, you may need to burn your iPhone videos to DVD and watch them on TV, which is also a good way to keep a backup of your important files and save space on your devices. To burn your iPhone videos to DVD on Mac or PC, there are two main procedures:
Part 1: How to transfer videos from iPhone to computer
Whether you want to burn iPhone videos to DVD on Mac or Windows PC, it's no doubt that you first need to transfer videos from iPhone to computer. To copy all your recorded videos and downloaded videos in MP4, MOV, M4V, WMV, RM, MKV, AVI, or FLV format from your iPhone to Mac/PC, you can use the freeware for iOS data transfer, file management, and video download, Qiling MobiMover Free.
What can Qiling MobiMover do for you?
With Qiling MobiMover installed on your Mac or PC, you can do the following things at no cost:
Transfer files between an iOS device (iPhone/iPad in iOS 8 or later) and computer or between two iOS devices. Videos, photos, music, ringtones, contacts, messages, and more are all supported by MobiMover.
Manage content on iPhone/iPad.
Download videos from websites to your computer or iPhone/iPad.
With these features, you can effortlessly do things like saving iPhone text messages to computer, putting music on iPhone, deleting iPhone photos from PC, and downloading Vimeo videos to iPhone.
Now, follow the steps below to transfer videos from your iPhone to the computer with four steps.
Step 1. Connect your iPhone to your computer and tap "Trust" on your iPhone screen to continue. Run Qiling MobiMover and choose "Phone to PC" > "Next".
Step 2. Select "Videos" among the options and click the default path to set a custom storage path if you need to. Afterward, click "Transfer".
Step 3. When the transfer process has finished, you can go to view the videos on your computer.
After getting your iPhone videos onto your computer, you can apply one of the methods below to burn the videos to DVD.
Part 2: How to burn iPhone videos to DVD
To successfully burn your iPhone videos to your DVD, you should check the space of your DVD disk and make sure it's enough to store your videos.
Method 1: Burn iPhone videos to DVD on Mac
Step 1: Make sure your Mac has a built-in optical drive (or an external DVD drive) and insert a blank DVD disc into the optical drive.
Step 2: When a pop-up menu appears, click it and choose Open Finder.
Step 3: Double-click the DVD disc shown on your desktop and drag the videos you transferred to your Mac just now to the window.
Step 4: Arrange and rename the video files according to your needs.
Step 5: Go to File > Burn [disc], and follow the onscreen instructions to burn your iPhone videos to DVD.
Method 2: Burn iPhone videos to DVD on Windows 10 PC
To burn your iPhone videos to DVD on PC, you will need a DVD recorder drive (also called DVD burner) and a blank DVD. Here is the way to burn videos to DVD on PC with the help of Windows Media Player.
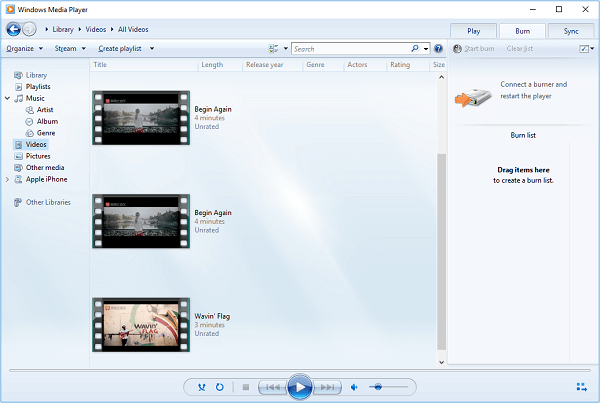
Step 1: Click the Search button on your taskbar and enter Windows Media Player.
Step 2: Double-click WMP to open it. Then go to Organize > Manage libraries > Videos and add the folder that contains the videos imported from your iPhone to the library.
Step 3: Click the Burn tab, choose the Burn options (under the Sync tab) and select Data CD or DVD.
Step 4: Insert a blank disc into your DVD burner.
Step 5: Search the iPhone videos you want to burn to DVD in your Player Library and drag the items to the list pane.
Step 6: Tap on Start burn to initiate the burning process.
Part 3: How to take 1080p or 4K videos on iPhone
Watching high-quality videos is a real enjoyment for your eyes. Learn how to take 1080p or 4K videos with your iPhone from the guide below:
Step 1: Open Settings App on your iPhone.
Step 2: Go to Camera > Formats and choose High Efficiency.
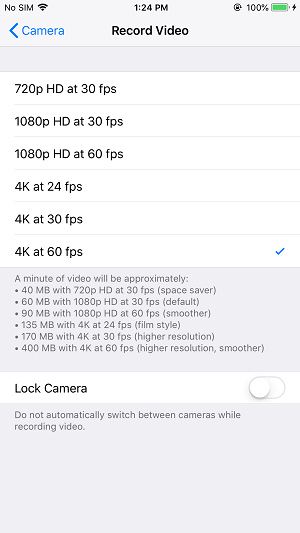
Step 3: Back to the Camera page and choose Record Video.
Step 4: Choose the resolution and frame rate according to your need.
A video with higher resolution and faster frame rate will take more space on your iPhone. Thus, you may need to free up storage on your iPhone regularly.
Related Articles
- How to Export and Read iPhone Messages on PC
- Fix VoiceMail Not Playing on iPhone
- Fixes to Cannot Connect to iTunes Store Issue
- How to Erase iPhone X/iPhone 8/iPhone 8 Plus Safely and Quickly