7 Things Everyone Needs to Know About Live Photos
This instruction compiles the most often asked SEVEN things about live photos. Now, give this guide a glimpse and find the answer to your question.
Note: Live Photos were introduced in the iPhone 6s series. So all of the below tips apply to iPhone 6s and later.
How to Take Live Photos
To take live photos, you can follow these simple steps:
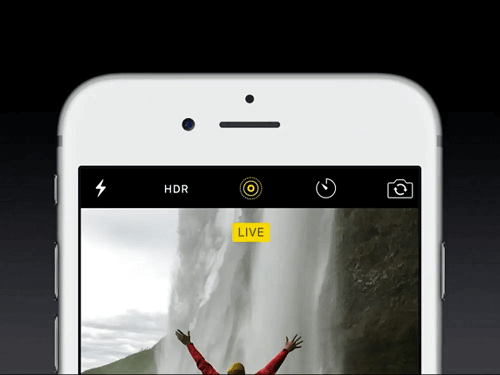
Step 1. Open the Camera app on your iPhone.
Step 2. Find the icon that is three concentric circles, as shown in the pictures, enable it.
Step 3. Next, you can take photos as usual.
How to Set a Live Photo as Wallpaper
If you want to use a live photo as wallpaper, there are two ways for your purpose.
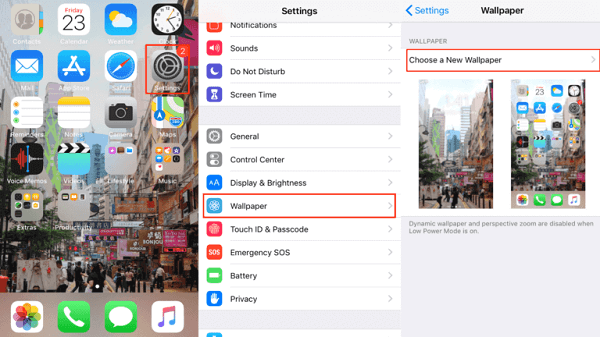
Set a live photo as wallpaper via Settings:
Step 1. Go to Settings, scroll to find "Wallpaper," tap "Choose a New Wallpaper."
Step 2. Choose "Live Photos," then select a live photo you wish to set.
Step 3. Move or scale the picture and tap "Set."
Step 4. Choose "Set Lock Screen" or "Set Home Screen" or both, depending on your needs. Then, tap "Set."
Step 5. Then, you can tap and hold your screen to animate your wallpaper.
Set live photos as wallpaper via the Photos app:
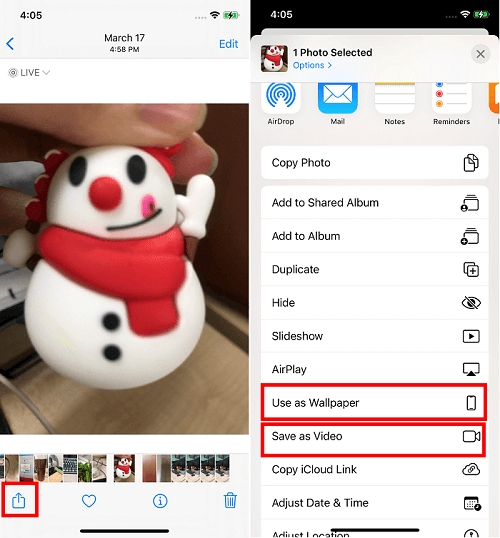
Step 1. Open the Photos app on your iPhone and find the live photo you wish to set as wallpaper.
Step 2. Click on the "Share" icon and choose "Use as Wallpaper."
Step 3. After setting, you can press and hold your screen to animate your wallpaper.
Note: If you're using an old iOS version, the live photo will show on the lock screen as a still image.
How to Transfer Live Photos from iPhone to PC/Mac
Whether you know it or not, live photos take up approximately twice the space of regular images. To free up more space for your device, it's wise for you to upload it to the cloud or transfer live photos from your iPhone to your computer for safekeeping. To do this, you will need this iPhone data transfer program - Qiling MobiMover to help. You can quickly transfer all photos or albums from your iPhone to your PC/Mac and back.
Besides, you can also use it to manage iOS data by deleting apps on your iPhone, downloading videos from popular video-sharing sites, converting HEIC pictures to JPG, etc.
To transfer live photos from iPhone to computer:
Step 1. Connect your iPhone to your computer (Mac or PC). Launch Qiling MobiMover, then choose "Phone to PC" and click the "Next" button to continue. If you prefer to transfer photos from your iPhone to computer selectively, go to "Content Management" > "Pictures" > "Photos" instead.
Step 2. Choose "Pictures" from the displayed data categories. You can also transfer other files together to free up iPhone space or for backup. And, you are free to save the exported iPhone files on your local computer or USB flash drive.
Step 3. Then click the "Transfer" button to start transferring photos from iPhone to computer. Wait patiently for the process to finish and then go to check the exported items.
How to Turn Live Photo into Video
Starting from iOS 13, Apple allows its users to turn live photos into videos directly within the Photos app. To do this, you can follow these steps:
Step 1. Open a live photo in the Photos app.
Step 2. Tap the Share icon at the bottom of your screen.
Step 3. Tap "Save as Video." Then, a new video will appear next to the live photo.
How to Convert Live Photo to Still
It is easy to make a live photo a regular photo. Here are the steps:
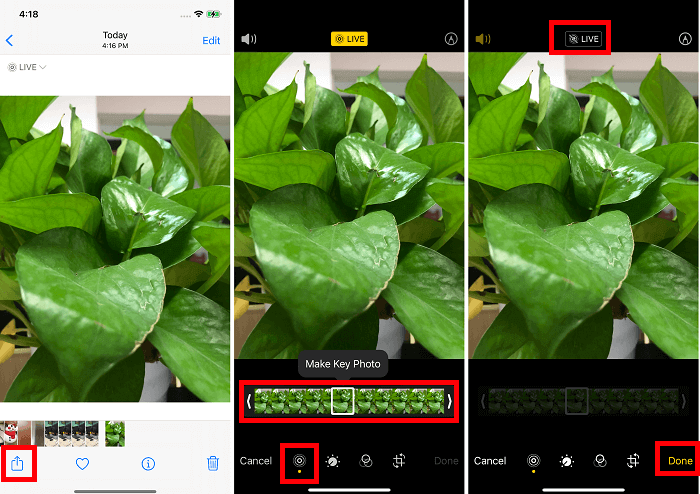
Step 1. Open the Photos app and find the live photo you wish to edit.
Step 2. Tap "Edit" and tap the live photo icon at the bottom of your screen.
Step 3. Scrub on the timeline to find the key photo you want to set and tap "Make Key Photo."
Step 4. Tap "Live" at the top of your screen to disable the live photo. Once you've disabled that feature, the Live icon will be grayed out.
Step 5. Tap "Done."
Tips: You can also convert live photos to JPG with Qiling MobiMover.
How to Edit Live Photos
To do some simple edits to your live photos, refer to the steps below. If you want more advanced edit options, you can find some professional editing tools online.
Step 1. Open the live photo you want to edit in the Photos app.
Step 2. Tap on "Edit" in the upper right corner.
Step 3. Then, you will have several editing options at the bottom of your screen. You can delete the sound, enhance the photo, trim the video, add filters, etc.
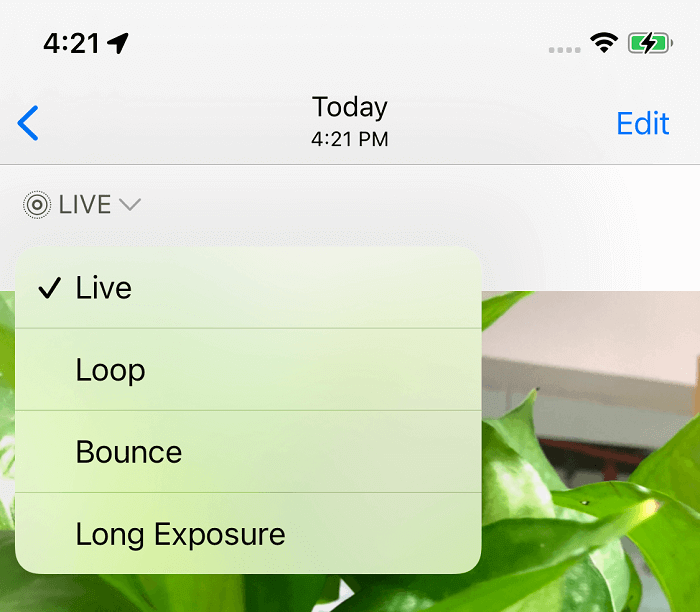
How to Turn Live Photos into GIFs
Apple makes it pretty simple to turn live photos into GIFs, no third-party program is needed. Here's how to do it.
Step 1. Open the Photos app on your iPhone. Find the photo you wish to convert to GIF.
Step 2. Tap the "Live" button at the top left corner of your screen.
Step 3. Then, choose the "Loop" or "Bounce" option.
The Final Words
Those are all tips you may want to know about Live Photos. Hopefully, these tips can help you make better use of Live Photos. If you have any problems using these tips, you can contact us to help out.
Related Articles
- iPhone Backup Taking Forever? - How to Speed Up iPhone Backup
- How to Restore iPhone from Computer Backup, iTunes, and iCloud
- How to Sync Photos from Mac to iPhone X/iPhone 8 in 3 Ways
- How to Get iPhone Text Messages on Windows 10