How to Import Videos from iPhone to Mac in 5 Ways
There are altogether five effective ways for you to import videos from iPhone to Mac. Whether you want to transfer videos from iPhone to Mac without iTunes or copy videos from iPhone to Mac wirelessly, you will find the solution here.
Why Do You Need to Import Videos from iPhone to Mac
The photos and videos are probably taking up most space on your iPhone. To free up your iPhone storage, you may want to import photos and videos from your iPhone to a computer to make a backup and then remove these items from your iOS device to get more space.
In addition to the main factor described above, there are many other reasons for which you want to copy videos from your iPhone to Mac. For example, you prefer to enjoy the videos on a bigger screen or need to edit videos from the computer to make a stunning video.
No matter what reasons you have, you can apply the five tips below to get things done. It's worth mentioning that you can also apply these solutions to transfer photos from your iPhone, iPad, or iPod Touch to your Mac if you need to.
Method 1. How to Copy Videos from iPhone to Mac Without iTunes
Applies To: Videos in Camera Roll, Movies, TV Shows, Music Videos
The videos you are going to transfer generally include the videos you took with your iPhone camera or the movies/TV shows/music videos you downloaded to your iPhone. To copy all these videos from your iPhone to your Mac at once, Qiling MobiMover will certainly help.
Qiling MobiMover is a versatile tool for iOS data transfer, content management, and video download. With it, you are able to:
- Transfer files between two iOS devices or between an iOS device and a computer, be it a Mac or PC
- Delete, edit or create items on your iPhone from the computer
- Download videos from YouTube to your computer or iPhone/iPad using URL for free
Except for videos, it also supports videos, music, ringtones, contacts, messages, and other file types on your iPhone/iPad.
To import videos from iPhone to Mac:
Step 1. Connect your iPhone to your Mac and tap "Trust" on your iPhone screen to continue. Run Qiling MobiMover for Mac on your computer and choose "Phone to Mac" > "Next".
Step 2. Select "Videos" among the options and click the default path to set a custom storage path if you need to. Afterward, click "Transfer".
Step 3. When the transfer process has finished, you can go to view the videos on your computer.
You can also transfer videos from Mac to iPhone using this tool. Get it now and you will enjoy much convenience whenever it comes to iOS data transfer.
Method 2. How to Import Videos from iPhone to Mac with Photos
Applies To: Videos in Camera Roll
If you intend to transfer videos that are taken with your iPhone camera, using the Photos app on Mac is enough. The Photos app is a photo management and editing application first released in OS X Yosemite. It replaced iPhoto in earlier versions and can help you transfer photos and videos from your iPhone to Mac.
To import photos and videos from iPhone to Mac with Photos:
Step 1. Connect your iOS device to the computer.
Step 2. Unlock your iPhone and trust the computer. If asked, enter your iPhone passcode to continue.
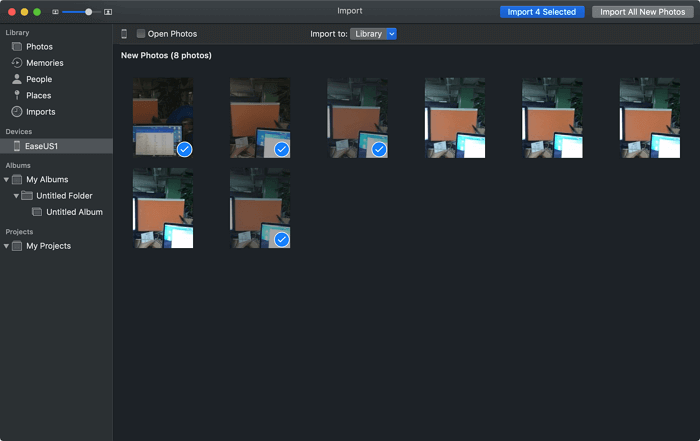
Step 3. Launch the Photos app and choose your iPhone in the "Devices" section.
Step 4. By default, Photos will select all the new photos and videos from your iPhone. You can manually select the items you want to transfer and click "Import Selected" to import videos from iPhone to Mac.
There is also an app on Windows PC called Photos. Similarly, the Photos app on Windows also works to import photos and videos to your PC and manage these items. Using Photos for Windows is an answer for users who want to know how to transfer photos/videos from iPhone to PC.
Method 3. How to Download Videos from iPhone to Mac with iCloud
Applies To: Videos in Camera Roll
If you prefer to download videos from iPhone to Mac wirelessly without a USB cable, using iCloud or other cloud storage services may fit your needs better. As you know, iCloud is a cloud-based file sharing service developed by Apple. By turning on iCloud, you can access your photos and videos from all your devices, including iPhone, iPad, iPod Touch, Mac, and PC. In other words, you can copy videos from iPhone to Mac using iCloud, as long as you meet the requirements below:
- Make sure you are using the same Apple ID on both the iOS device and Mac.
- Make sure the is enough space in iCloud to save your photos and videos.
- Make sure there is a stable and reliable Wi-Fi network for your iPhone to connect to.
Before you start, there is one more thing to remind you of: iCloud syncs all the photos and videos in your iPhone photo library. If you attempt to import videos selectively, you need to download the items from iCloud.com manually.
To transfer all photos and videos from iPhone to Mac via iCloud:
Step 1. Go to the "Settings" app on your iPhone, click [your name] > "iCloud" > "Photos" , then turn on "iCloud Photos".
Step 2. On your Mac, click the Apple menu and choose "System Preferences" > "iCloud".
Step 3. Sign in to iCloud with your Apple ID.
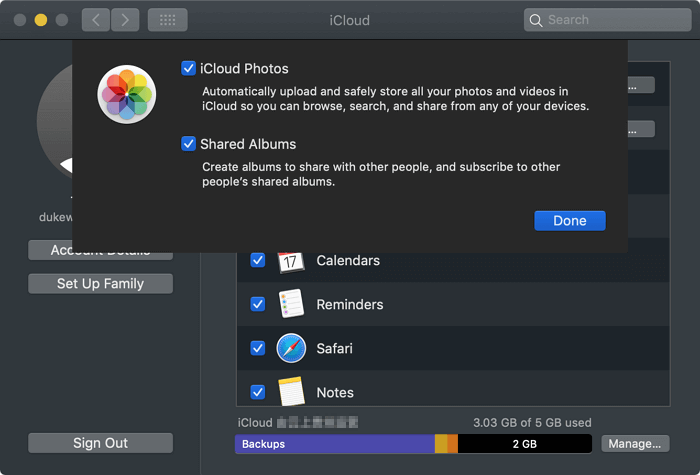
Step 4. Check the "Photos" option and enable "iCloud Photos" in the pop-up window. After the syncing process, you will be able to access your iPhone photos on your Mac in the Photos app.
How can you selectively transfer videos from iPhone to Mac using iCloud? Get help from iCloud.com. Although iCloud automatically uploads the whole iPhone photo library to iCloud, you can selectively download items from iCloud.com to your computer, be it a Mac or PC.
Step 1. Enable "iCloud Photos" on your iPhone.
Step 2. Visit iCloud.com on your Mac and sign in.
Step 3. Choose "Photos" and you will see the items from your iPhone.
Step 4. Select and download the videos from your iPhone to your Mac.

Method 4. How to Transfer Videos from iPhone to Mac via Finder
Applies To: Videos in Camera Roll, Movies and TV Shows
In macOS Catalina, Finder takes responsibility for data syncing between Mac and your iOS device and the device backup tasks. With Finder, you can not only transfer files from iPhone to Mac but also copy data from Mac to your iOS device.
To transfer videos from iPhone to Mac via Finder in macOS Catalina:
Step 1. Open a Finder window and connect your iPhone to the computer with a USB cable.
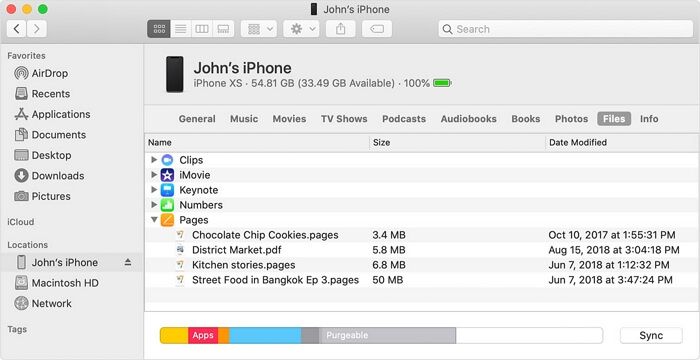
Step 2. Select your device from the left panel.
Step 3. Choose the category you want to transfer, "Movies", "TV Shows" or "Photos".
Step 4. Select the videos you want to transfer and drag them to a Finder folder.
Method 5. How to Import Videos from iPhone to Mac Using AirDrop
Applies To: Videos in Camera Roll
Since AirDrop is available both on your iPhone and Mac, you can also transfer videos from iPhone to Mac using AirDrop. Other than videos, AirDrop also allows you to share photos, contacts, locations, websites, and more between two AirDrop-supported devices. Whether you want to AirDrop contacts from iPhone to iPhone or AirDrop photos from Mac to iPhone, they all can be done using this utility.
To copy videos from iPhone to Mac using AirDrop:
Step 1. Turn on AirDrop on both your iPhone and Mac. You can check the guide on how to enable AirDrop on iPhone and Mac for detailed steps.
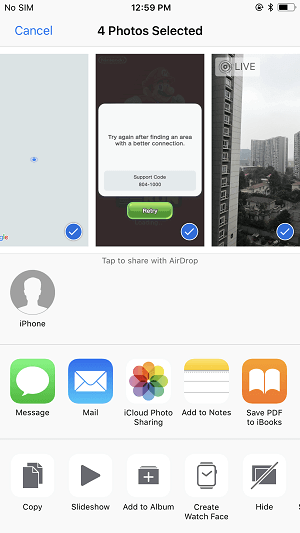
Step 2. Go to the Photos app on your iPhone and select the videos you want to copy to your Mac.
Step 3. Click the share button and choose "AirDrop" > [your Mac's name].
Step 4. On your Mac, click "Accept" to start importing videos from your iPhone.
The Bottom Line
Now you know all the common ways on how to import videos from iPhone to Mac. If you are looking for ways on how to transfer photos from iPhone to Mac, you can apply the very same tips in this guide to get it done.
Depending on the specific items you want to copy, you will need different ways to complete the data transfer. Carry out the method that fits your needs best to transfer videos from iPhone to Mac with a few simple clicks.
Related Articles
- How to Transfer Contacts from iPhone 6/7 to iPhone 8/8 Plus in 3 Ways
- How to Send Photos via Bluetooth on iPhone to Computer
- Free HEIC Converter for Windows 10 (Desktop & Online)
- iPhone 12 Data Transfer: Transfer Data to iPhone 12