How to Transfer Photos from iPhone to Mac in Every Way
How Do You Transfer Photos from iPhone to Computer
When your iPhone storage gets full or you want to make a backup of your iPhone photos, you may need to transfer photos from iPhone to Mac.
But how can you import photos from iPhone to Mac?
Actually, there is more than one way for you to download pictures from iPhone to Mac. More specifically, you can either use a USB cable to get photos off iPhone onto Mac or upload photos from iPhone to Mac wirelessly via services like iCloud and AirDrop.
Keep reading and learn five common ways on how to import photos from iPhone to Mac.
Method 1. How to Transfer Photos from iPhone to Mac Wirelessly
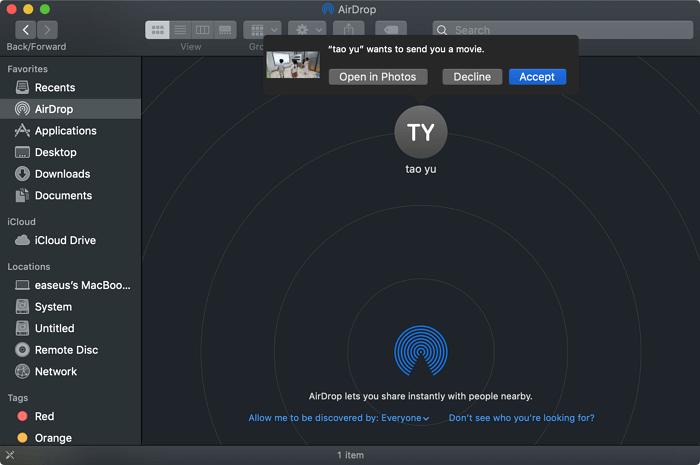
The easiest way to download pictures from iPhone to Mac is to use AirDrop. Using AirDrop is quite convenient, especially when you don't have a USB cable available. To AirDrop photos from iPhone to Mac successfully, make sure your devices are within the Wi-Fi and Bluetooth range. Afterward, follow the steps below to send photos from iPhone to Mac via AirDrop.
Step 1. Turn on AirDrop on your iPhone and Mac.
Step 2. Open the Photos app on your iPhone and select the items you'd like to transfer to your computer.
Step 3. After the selection, tap the "Share" button and choose "AirDrop" > "your Mac".
Step 4. On your Mac, choose "Accept" in the prompt to receive the photos from your iOS device.
Step 5. Wait for the transfer process to complete. Afterward, go to the "Downloads" folder to check the pictures.
The time it will take to AirDrop photos from iPhone to Mac depends on the size of the files and your network speed. If you have a huge collection of photos to send, it may take a long time to finish the transfer process.
Method 2. How to Download Photos from iPhone to Mac Using iCloud
Another common way to transfer photos from iPhone to Mac wirelessly is using iCloud. iCloud is a cloud-based service for you to share files like photos, videos, and documents across your devices, including iPhone, iPad, iPod, Mac, and PC.
By turning on iCloud photos, you can upload photos from your iOS device to iCloud, and then iCloud will sync the photos to your other devices that use the same Apple ID as you use on your iPhone automatically and wirelessly. As long as you have enough iCloud storage and there is a network connection on your device, you can use iCloud to transfer iPhone photos to Mac.
Make sure you are using the same Apple ID on your Mac and iPhone and there is sufficient iCloud space to save the items you are going to share. Then follow the steps below to get photos from your iphone to Mac.
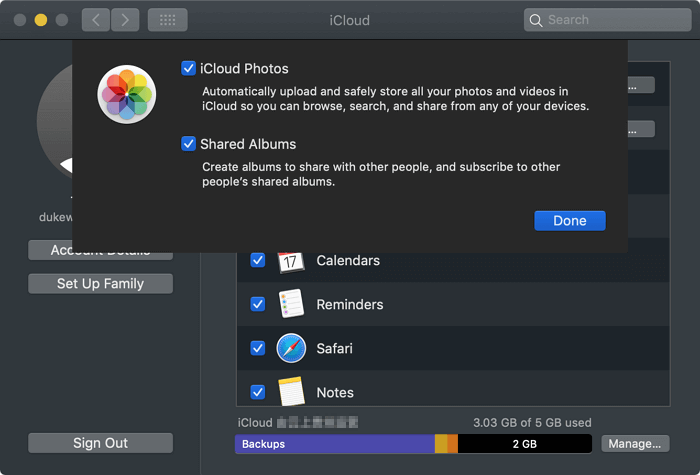
Step 1. On your iPhone, go to "Settings" > [your name] > "iCloud" > "Photos" and turn on "iCloud Photos".
Step 2. On your Mac, click the Apple menu and choose "System Preferences".
Step 3. Choose "iCloud" and sign in with the Apple ID on your iOS device.
Step 4. Click "Options" next to the "Photos" option and enable "iCloud Photos".
Step 5. Wait for the syncing process to finish. When it has done, go to the Photos app on your Mac to check the photos from your mobile device.
Some users prefer to transfer photos from iPhone to Mac wirelessly, while others may want to transfer pictures using a USB cable, especially when they need to move photos in bulk or there is no network connection available. If you are one of them, the three ways below are for you.
Method 3. How to Import Photos from iPhone to Mac Using iPhone Transfer Software
Whether you want to download photos from iPhone to Mac all at once or selectively, the iPhone transfer software - Qiling MobiMover will get it done for you safely and quickly.
As an iOS content manager and a free video & audio downloader, Qiling MobiMover will help you to:
Transfer files between iPhone and Mac
Transfer data from one iPhone/iPad to another
Download online videos and audio files to Mac, PC, or iPhone/iPad using URL
Therefore, it will not only help you import photos from iPhone to Mac but also allow you to many other things, like sharing files between two iOS devices and downloading YouTube videos to Mac.
To transfer photos from iPhone to Mac:
Step 1. Connect your iPhone to Mac with a USB cable. Run Qiling MobiMover, choose "Phone to Mac" and click the "Next" button to continue.
Step 2. Check the category/categories you want to copy from your iPhone to Mac. As you can see, you can copy other supported files together with photos from your iPhone to Mac all at once. After that, don't forget to customize the storage path for the exported photos unless you want to save them on your desktop.
Step 3. Now, click the "Transfer" button to start transferring photos or other files from your iPhone to Mac without iTunes. Exporting files from iPhone to Mac with MobiMover is the right way for backup to avoid unexpected data loss.
Method 4. How to Transfer Photos from iPhone to Computer via the Photos App
Whether you are using a Mac or Windows PC, there is an app called Photos that allows you to import photos from iPhone to your computer. When you want to copy photos from iPhone to Mac, the Photos app is here to help, and all you need to prepare is a USB cable.
To transfer photos from iPhone to Mac using the Photos app:
Step 1. Connect your iPhone to your Mac.
Step 2. Unlock your iOS device and click "Trust" to trust the computer.
Step 3. Launch the Photos app and select your iPhone in the window.
Step 4. Wait for Photos to load all the new photos and videos from your mobile device.
Step 5. Choose to import selected photos and videos or "Import All New Photos (including your videos)".

Afterward, you can check and manage the photos in the Photos app.
Method 5. How to Copy Photos from iPhone to Mac via Image Capture
In addition to the Photos app, Image Capture on Mac will also help to transfer the photos on your iPhone. Both programs work similarly when it comes to importing photos from iPhone to Mac. However, unlike the Photos app, Image Capture mainly enables users to upload pictures from digital cameras or a device that has a camera to the Mac computer.
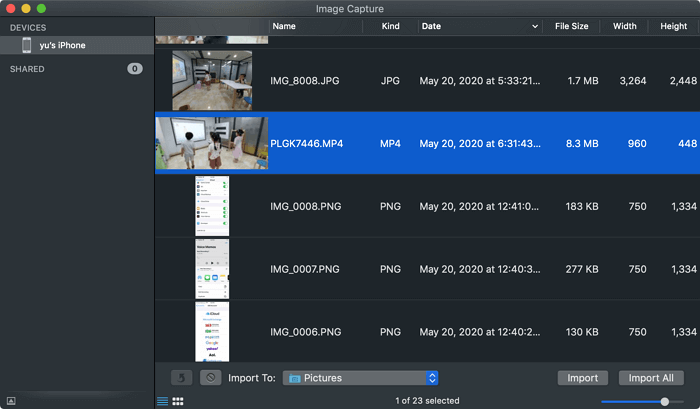
Step 1. Connect your iOS device to Mac via a USB cable.
Step 2. Unlock your iPhone, trust the computer, and launch Image Capture from the launch pad.
Step 3. Wait for the program to load the new items on your iPhone.
Step 4. You can either select the videos you want to share and click "Import" or click "Import All" directly.
The Bottom Line
These are the common ways to transfer photos from iPhone to Mac. Of course, there are other ways to download pictures from iPhone to Mac, like using Dropbox, Google Photos, or other cloud-based services.
Carry out the way best suited to your needs to get your iPhone photos to Mac within minutes.
Related Articles
- 3 Simple Ways to Change HEIC to JPG on iPad
- Download Pinterest Videos with Free Pinterest Video Downloader
- How to Transfer Text Messages from iPhone to Mac Easily
- How to Download Twitch Videos (or Clips)