How to Transfer Photos from iPhone to PC in Windows 10 in 4 Ways
After reading this article, you will learn four ways on how to transfer photos from iPhone to PC in Windows 10, either with or without iTunes. If you need to, you can also use these tips to transfer photos from iPhone to PC running other versions or from iPad to PC.
Among the various kinds of iOS data transfer needs, transferring photos from iPhone to PC is the commonest one. You will want to transfer photos from iPhone to PC when you want to back up your precious iPhone photos and videos, free up the iPhone that has almost full storage, create a video from the photos, and more. Given the necessity, here we will show you four effective ways on how to transfer photos from iPhone to PC in Windows 10:
- Transfer photos from iPhone to Windows 10 using the Photos app
- Import photos from iPhone to PC in Windows 10 via File Explorer
- Transfer photos from iPhone to PC in Windows 10 using iOS data transfer software
- Sync photos from iPhone to Windows 10 PC with iCloud
How to transfer photos from iPhone to PC in Windows in 4 Ways
The common ways to import photos from iPhone to PC running Windows 10 include using the Photos app, File Explorer, third-party iOS data transfer software, and iCloud. Although all of these tips help to import photos from iPhone to PC, what they need and transfer varies. Choose the one best suited to your needs to apply.
- Notice:
- Some of the users may want to know how to transfer photos from iPhone to PC using iTunes. But the truth is you can't import photos from iPhone to PC using iTunes directly. The good news is that you can transfer photos from iPhone to Windows computer via Photos or File Explorer with the help of iTunes since iTunes helps the computer to recognize the iOS device.
Method 1. How to transfer photos from iPhone to Windows 10 PC via Photos
Applies To: Photos and videos in iPhone Camera Roll
Photos is a built-in app in Windows 8, Windows 8.1, and Windows 10 that helps to manage and organize the photos from your PC, mobile phone, or other devices. Thus, when you attempt to transfer photos from iPhone to PC, you can use the Windows 10 Photos app.
However, the Photos app only allows you to import photos and videos taken by your iPhone, namely items in Camera Roll. If you want to transfer all the photos and albums from iPhone to computer, use method 3 instead.
Step 1. Make sure you have installed the latest version of iTunes (iTunes 12.5.1 or later) on your PC.
Step 2. Connect your iPhone (or iPad) to your PC with a USB cable.
Step 3. Unlock the iOS device and click "Trust" in the prompt on the iPhone to trust the computer.
Step 4. Click the "Start" menu and choose "Photos".
Step 5. In the Photos app, click "Import" in the top-right corner of the window, and select "From a USB device".
Step 6. Then Photos will look for a device to import from. When it has done, it will show you the new photos and videos it found.
Step 7. Since the new items will be imported to the PC by default, you need to uncheck the photos you don't want to transfer.
Step 8. Click the "Continue" button to start transferring photos to Windows 10 PC from your iPhone.

If Windows 10 Photos app is not working, learn how to fix it from the related article or switch to the workable ways below to move the photos from your iPhone to PC.
Method 2. How to import photos from iPhone to PC via Windows File Explorer
Applies To: Photos and videos in iPhone Camera Roll
Similarly, you can use File Explorer (called Windows Explorer in earlier versions) to transfer iPhone photos to a Windows PC. And it's the same that File Explorer can only transfer photos and videos from iPhone Camera Roll. To help Windows recognize your iOS device, you also need to download and install iTunes on the computer first. Follow the steps below to transfer photos from iPhone to Windows 10 using File Explorer.
Step 1. Connect your iPhone (or iPad) to your PC with a USB cable.
Step 2. Unlock the iOS device and click "Trust" in the prompt on the iPhone to trust the computer.
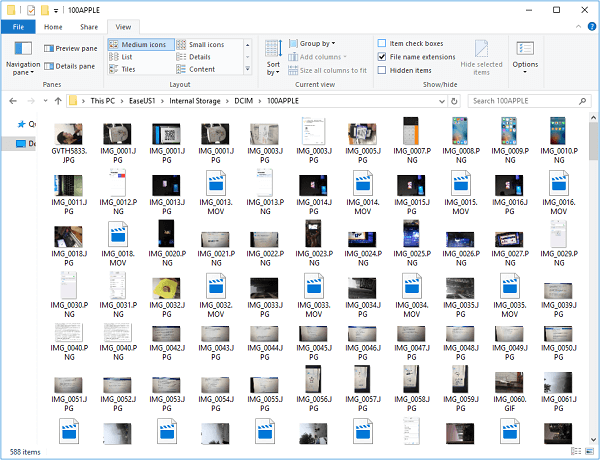
Step 3. When you choose what to do with the device on PC, select "Open device to view files" and go to "Internal Storage" > the "DCIM" folder > the "100APPLE" folder and manually copy the photos and videos you'd like to transfer.

As mentioned, the photos the two methods above can transfer are limited to the items in Camera Roll. What if you want to transfer all the photos and albums from your iPhone to Windows 10? No worry, you can use the methods below to get things done.
Method 3. How to transfer photos from iPhone to PC in Windows 10 with Qiling MobiMover
Applies To: All photos and albums on iPhone
With software like Qiling MobiMover, you can import all the photos and albums from iPhone to Windows 10 PC. In addition to photos, this tool also supports videos, music, ringtones, contacts, messages, books, and other iPhone contents.
To transfer photos from iPhone to PC in Windows without iTunes:
Step 1. Connect your iPhone to PC running Windows 7 or later. Run Qiling MobiMover, choose "Phone to PC" and click the "Next" button on the screen. This mode allows you to transfer data from iPhone to PC in one click.
Step 2. MobiMover supports transferring audio, videos, pictures, books, contacts, messages, etc. from iPhone to PC. Here, choose "Pictures" only. MobiMover will save the files on your desktop by default. You can customize the path as you need.
Step 3. Now, click the "Transfer" button to start transferring photos from your iPhone to PC. The transfer time depends on the file size. Wait patiently
Qiling MobiMover is a reliable tool for iOS data transfer and video download. With this tool, you can transfer files between two iOS devices (iPhone or iPad running iOS 8 and later) or between an iOS device and a computer (Mac or PC) without installing iTunes. Thus, it will not only help you to transfer photos from iPhone to PC in Windows 10 but also import photos from Windows 10 to iPhone without iTunes. If you want to download videos from websites to your computer or iPhone/iPad for offline watching, Qiling MobiMover also helps.
Method 4. How to sync photos from iPhone to PC in Windows via iCloud
Applies To: Any photos on your iPhone
With iCloud on, you can sync your photos across your devices like iPhone, iPad, Mac, and Windows PC. If you are wondering how to transfer photos from iPhone to PC in Windows 10 wirelessly without the USB cable, using iCloud or other cloud storage services is the answer. Make sure your iPhone and PC is using the same Apple ID.
To transfer photos from iPhone to Windows 10 PC using iCloud:
Step 1. Turn on iCloud Photos on your iPhone.
- On iOS 10.3 or later, go to "Settings" > "your name" > "iCloud" > "Photos".
- Turn on "iCloud Photos".
Step 2. Set up iCloud Photos on PC.
- Open iCloud for Windows.
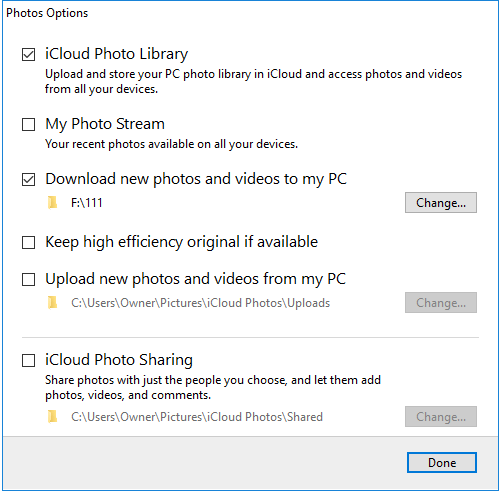
- Click "Options" next to Photos and check the "iCloud Photo Library" option.
- Click "Done" > "Apply".
Step 3. New photos and videos synced to iCloud will be downloaded to your PC automatically. You can check the pictures in the location you set in iCloud Photos Options.

If you don't want to download iCloud for Windows, there is another way for you: Turn on iCloud Photos on the iPhone to upload iPhone to iCloud and then visit iCloud.com on your computer to download iCloud photos to PC.
Although both Qiling MobiMover and iCloud allow you to transfer photos in all albums, they work differently. Qiling MobiMover provides you with a more flexible solution since it enables you to transfer all items all at once or copy files selectively. While iCloud sync all photos automatically. Specify your needs and select the method accordingly.
The Bottom Line
These are the proven ways to transfer photos from iPhone to PC in Windows 10, including using Windows 10 Photos, Windows Explorer, third-party iOS data transfer software, and iCloud. For your information:
- To transfer photos in Camera Roll only, select Photos or Windows Explorer.
- To import any photo from iPhone to PC flexibly, use software like Qiling MobiMover.
- To sync all iPhone photos to PC wirelessly, try iCloud.
Although most of the users can transfer photos from iPhone to PC successfully using one of the four ways. It does happen that some users fail to transfer pictures from iPhone to the computer. If you can't import photos from iPhone to Windows 10, learn how to fix the issue yourself.
Related Articles
- How to Convert YouTube to MP3 on Mac Quickly
- How to Download SoundCloud Songs
- How to Transfer Videos from PC to iPad With/Without iTunes in 5 Ways
- Top Best 7 MOV to MP3 Converters You Can't Miss