[Guide]How to Download iCloud Photos to PC in Windows 10/8/7 Easily
iCloud is Apple's built-iCloud is a cloud storage service that helps users back up their data or sync data across different Apple devices, particularly useful for storing large photo and video files that take up space on the iPhone. To download iCloud photos to a PC running Windows 10, you can follow a simple process.
If you don't, just read our guide to get several workable solutions to get the job done.
Note: Every iCloud account comes with 5GB of free storage, so be sure to regularly check your iCloud storage capacity to ensure all your important photos and videos have a place in iCloud.
Part 1. Download All iCloud Photos to PCvia iCloud for Windows
With the iCloud for Windows app, you can easily upload your photos, videos, emails, calendars, and other important files from your iPhone to your computer. To get started, make sure you've installed iCloud for Windows on your computer, and then follow the instructions to complete the process.
Step 1. To enable iCloud Photos on your iPhone, go to Settings, then select Photos, and finally toggle on iCloud Photos. This will allow your photos to be synced across all your Apple devices.
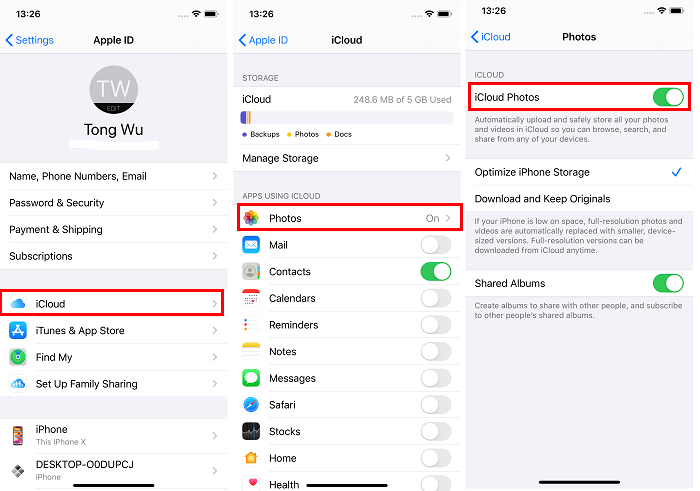
Step 2. To access iCloud on your Windows computer, open the iCloud for Windows application and sign in to your iCloud account using your Apple ID and password.
Step 3. Make sure the "Photos" option is enabled, then click "Option."
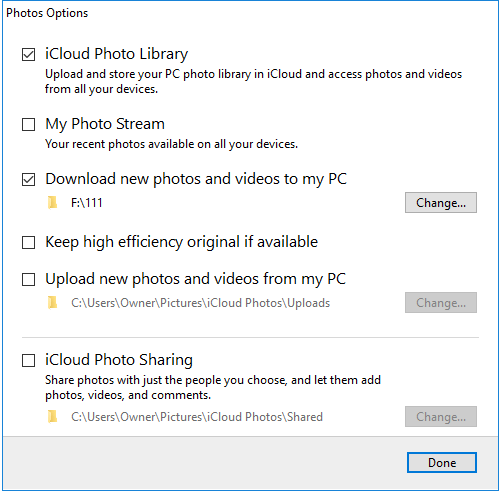
Step 4. To enable iCloud Photo Library and download new photos and videos to your PC, tick the box next to "iCloud Photo Library" and "Download new photos and videos to my PC" in your settings.
Step 5. Click "Done," then "Apply."
Tips: To find downloaded photos and videos, go to File Explorer, click on iCloud Photos, and double-click the "Download" folder, where you'll see all your downloaded content, allowing you to move or copy them to another location.
Part 2. Get Photos from iCloud to Computer via the iCloud Website
To selectively download photos from iCloud to a computer, go to the iCloud website, sign in with your Apple ID, click on the "Photos" tab, select the photos you want to download, and click on the "Download" button. You can also use the "Albums" feature to download all photos from a specific album. After downloading, you can save the photos to your computer's hard drive or external storage device.
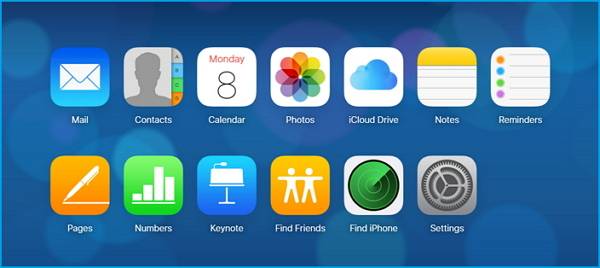
Step 1. Open a web browser and go to icloud.com.
Step 2. Sign in to your iCloud account with your Apple ID and password.
Step 3. Click "Photos" and find the photos you wish to download.
Step 4. When you've selected the wanted images, click "Download."
Step 5. After the download is complete, the photos will be saved in a folder called iCloud Photos.
Part 3. Get Photos from iPhone to PC with an iCloud Alternative
If you don't like the tedious process of downloading iCloud photos from your iPhone to your PC, you can use Qiling MobiMover, an iCloud alternative, to transfer photos from your iPhone to your computer in a quicker and easier way. This program also supports transferring contacts, messages, videos, notes, and more other data.
To transfer photos from your iPhone to your PC, click the button to download and install Qiling MobiMover, then follow the guide to complete the process within minutes.
Step 1. Connect your iPhone to PC with a USB cable and run Qiling MobiMover. Choose the "Phone to PC" transfer mode and click "Next" to continue.
Step 2. To move photos from your iPhone to a PC, select the "Pictures" option, allowing you to transfer all supported files from your iPhone to the computer at once.
Step 3. To start downloading photos from your iPhone to PC, click the "Transfer" button. The transfer process is fast and you won't have to wait too long.
You can save your iPhone text messages to your computer by using a third-party app or by using a feature built into your iPhone, such as iCloud or iTunes. This can be useful for backing up important data or for transferring messages to a new device.
The Bottom Line
We've shown you how to download photos from iCloud to your PC using three methods, with the last one being the easiest and most effective. If you're looking for a hassle-free way to transfer data from your iPhone to your PC or Mac, Qiling MobiMover is a powerful tool that can also help you unlock your iOS screen and download videos, among other features.
Related Articles
- How Do I Back Up My iPhone to the Cloud
- How to Download Music from Computer to iPhone 13/12/11
- How to Delete Photos on iPhone from Computer in Every Way
- How to Transfer Data from iPhone to iPad