How to Delete Photos on iPhone from Computer in Every Way
Quick Navigation:
- Part 1. How to Delete Photos from iPhone from a Computer with Qiling MobiMover
- Part 2. How to Delete Photos from iPhone with iTunes
- Part 3. How to Delete Photos from Windows PC via Explorer
- Part 4. How to Remove Photos from Mac with Image Capture
- Part 5. How to Delete Photos from iPhone via the Photos App
- The Bottom Line
The update applies to iPhone 12, 12 Pro, 12 Pro Max, iPhone 11, 11 Pro Max, iPhone XR, iPhone X, iPhone 8, 8 Plus, iPhone 7, 7 Plus, and iPhone 6, 6s.
Deleting data on your iPhone can free up space, improve performance, and remove duplicates, making it a good habit to regularly reorganize your device. Photos and videos are often the largest data consumers, so deleting them can be a good place to start.
Deleting multiple photos and videos from your iPhone's Album can be a time-consuming task. However, there are easier ways to do this. To remove photos from your iPhone, you can follow a series of steps that make the process more efficient.
Part 1. How to Delete Photos from iPhone from a Computer with Qiling MobiMover
Qiling MobiMover is a versatile iPhone data transfer tool that allows you to delete various types of data from your device, including videos, music, ringtones, voice memos, audiobooks, contacts, messages, and books. In addition to deleting files, you can also use MobiMover to add iPhone ringtones, transfer files between two iOS devices, or download videos from websites to your device. The tool also comes with a Backup & Restore feature, which allows you to back up your photos and videos before deleting them, ensuring that you don't accidentally delete important files.
Now, let's download Qiling MobiMover on your computer and delete iPhone photos from your PC.
To delete iPhone photos from your PC, follow these steps. You can apply similar steps to delete iPhone photos from your Mac.
Step 1. Connect your iPhone to your computer with a USB cable, then launch Qiling MobiMover. Go to "Content Management" > "Pictures" > "Photos" or "Albums" to select the photos you want to remove from your iPhone.
Step 2. To delete all iPhone photos at once, click "Select All" and then click the trash icon. For specific deletions, select the desired photos individually, then click "Delete".
Step 3. A confirmation window will appear asking if you're sure you want to delete the photos. Click "Yes" to confirm and permanently delete the photos from your iPhone.
Part 2. How to Delete Photos from iPhone with iTunes
To delete photos and videos from your iPhone using iTunes, sync your iPhone with iTunes, which will replace your current photos and videos with the ones in your iTunes backup. If you want to remove specific items, use the method from Part 1, but if you want to delete all photos, follow these steps.
Step 1. Download and install the latest version of iTunes on your PC or Mac.
Step 2. Connect your iPhone to your computer and have iTunes open automatically if it doesn't open on its own.
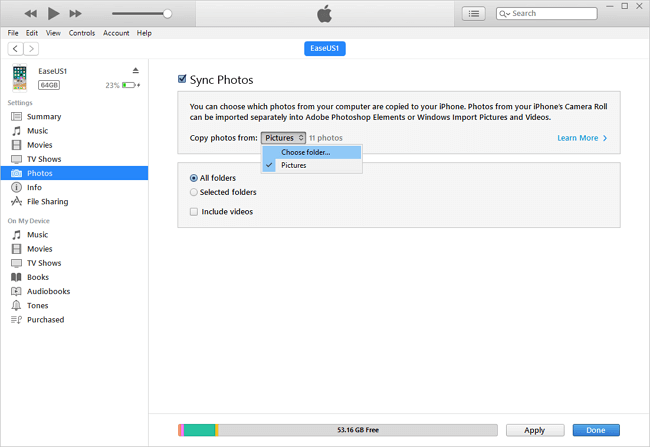
Step 3. Click the device button and choose "Photos."
Step 4. Check the box next to "Sync Photos."
Step 5. From the box next to "Copy photos from," choose "Choose folder..." and select an empty folder to start the process.
Step 6. Click "Apply."
Part 3. How to Delete Photos from Windows PC via Explorer
To remove photos from your iPhone via Windows Explorer, ensure iTunes is installed on your PC to recognize your device. Then, connect your iPhone to the computer and follow the steps to delete photos from the computer.
Step 1. Connect your iPhone to the computer and "Trust/Allow" the PC to access your iPhone.
Step 2. Click on "This PC" from your desktop.
Step 3. To access the DCIM photo folder on your Apple iPhone, navigate to the Photos app, then select the "Media" tab, and finally choose the "DCIM" folder from the list of available albums. Alternatively, you can also access the DCIM folder by going to the "Files" app, then selecting the "DCIM" folder from the list of available folders.
Step 4. To delete specific photos, select them individually by clicking on each photo. You can then press the "Delete" button or use the keyboard shortcut Ctrl+D.
Step 5. Press Shift+Delete to delete these photos from your iPhone.
Part 4. How to Remove Photos from Mac with Image Capture
To delete all pictures on a Mac using the Photos app, start by turning off iCloud Photo Library to avoid any syncing issues. Once that's done, open the Photos app, select all the photos you want to delete by holding down the Command key and clicking on each image, then right-click and choose "Delete Photos." Alternatively, you can select all photos by clicking on the "Select" button at the top right corner of the Photos window, and then choose "Delete Photos" from the "Photos" menu.
Step 1. Connect your iPhone to the Mac using the USB cable.
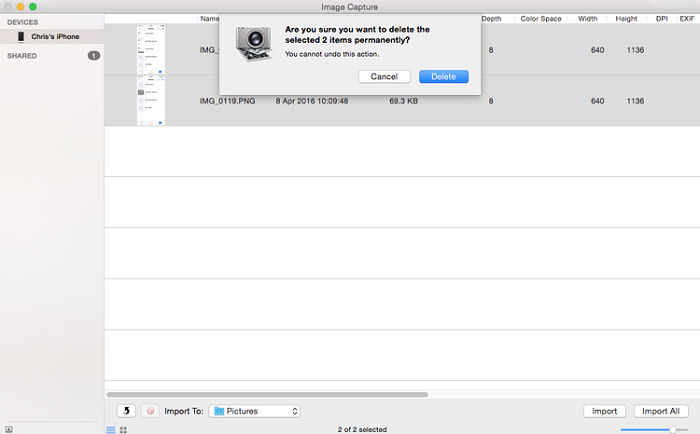
Step 2. Open the Image Capture on your Mac.
Step 3. Trust your Mac on your iPhone if asked.
Step 4. Then, the Image Capture will display all photos it detects.
Step 5. To delete specific items, select them individually and press the delete key. Alternatively, you can select all items by pressing Cmd+A and then delete them.
Step 6. Confirm the deletion.
Part 5. How to Delete Photos from iPhone via the Photos App
Photos can be deleted from the iPhone via the Photos app, which is easy to use. You can delete single or multiple photos, or even an entire album, by following the app's instructions.
To delete photos one by one:
Step 1. Open the Photos app on your iPhone.
Step 2. To delete a picture on an iPhone, you need to tap on the picture you wish to delete and then tap on the trash icon that appears on the top right corner of the screen. Alternatively, you can also swipe left on the picture you wish to delete and tap on the "Delete" button that appears.
Step 3. To delete photos, tap the trash icon located at the bottom right corner of the screen, then select 'Delete Photos' from the menu that appears.
To delete multiple photos:
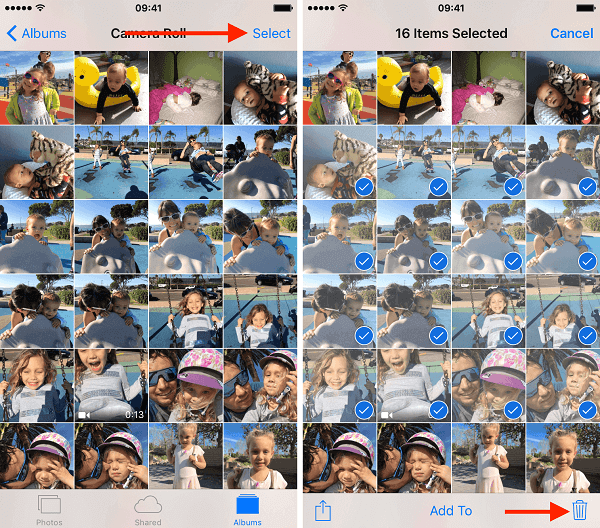
Step 1. On your iPhone, open the Photos app.
Step 2. To delete photos from an album, go to the album's menu and select "Delete Photos" or a similar option. You may also be able to delete photos by going to the album's settings and selecting "Edit" or "Manage Photos.
Step 3. Tap on the "Select" option at the upper right corner.
Step 4. Now, you can mass select photos you wish to delete.
Step 5. Once you've completed the task, tap on the "Trash" icon located on the bottom right of the screen.
To delete an album:
Step 1. On your iPhone, open the Photos app.
Step 2. To delete specific image types from an album, follow these steps: Choose the album that stores the photos. You can only delete particular image types like screenshots, bursts, selfies, Live Photos, etc. This means you can't delete all types of photos at once, but rather select the specific type you want to delete.
Step 3. Tap on "Select" in the upper right corner.
Step 4. Tap on "Select All" on the left.
Step 5. Press the "Trash" icon to remove all photos.
To delete multiple albums:
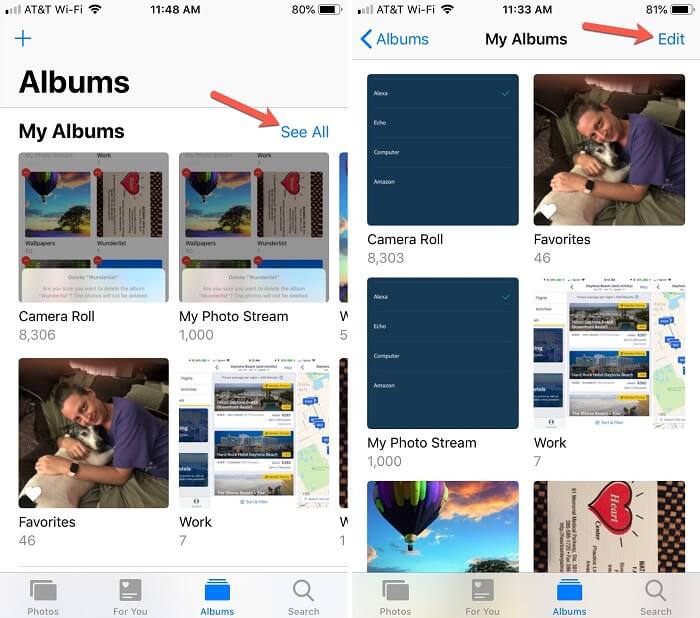
Step 1. Open your Photos app on your iPhone.
Step 2. At the bottom of your screen, choose "Album."
Step 3. Tap on "Select All" next to "My Albums."
Step 4. Tap "Edit" in the upper right corner.
Step 5. To delete an album, tap the red badge on the album you wish to delete. This will prompt you to confirm the deletion.
Step 6. Confirm your choice by tapping "Delete Album."
Tips: All deleted photos are initially stored in the Recently Deleted album for 30 days, allowing for accidental deletion recovery. To permanently delete photos, go to the Recently Deleted album, select all, and tap delete all. After 30 days, the photos are permanently deleted.
The Bottom Line
To delete unwanted photos from your iPhone, you can use the Photos app on your device or access your iPhone data from a computer using iTunes or iCloud. On your iPhone, go to the Photos app, select the photos you want to delete, and tap the "Edit" button to remove them. Alternatively, you can connect your iPhone to a computer, open iTunes or iCloud, and delete the unwanted photos from there.
Related Articles
- How to Transfer Data from Android to iPhone in 5 Ways
- How to Print HEIC Photos on Windows an Mac
- How to Separate Audio from Video in 3 Ways
- How to Download MP3 from YouTube to iPhone with Ease