How to Back Up Photos from iPhone Without iCloud/iTunes
Making a copy of your iPhone photos is a good option to prevent data loss. There are several options to back up your photos, each with its own procedures. Understanding the types of backups and choosing one that suits your needs is a smart move. Before making a decision, it's helpful to briefly consider the features of each backup solution.
| Solutions | Features |
|---|---|
| Local Backup | A cloud storage alternative that is safe and secure, this option does not require an internet connection, and there is no limitation on speed and storage space. |
| External hard drives | Portable; easy to use; capable of storing large files |
| Cloud service | Back up your data in a remote location, allowing you to access it anytime on any device via the internet. |
| iTunes & iCloud | Apple's recommended way to back up files |
Under each backup type, we'll introduce some tools and tricks to back up your photos, allowing you to follow our guide and securely back up your iPhone photos.
Part 1. Back up iPhone Photos to Computer via Qiling MobiMover
If you're searching for a safe backup solution, Qiling MobiMover is your best choice. This versatile data transfer tool can transfer various iPhone data, including photos, between iPhone and computer within just one click, offering a convenient and efficient way to backup and share your data. Compared to iTunes and iCloud, MobiMover has several advantages, making it a popular choice among users.
Unlike iTunes, Qiling MobiMover allows you to selectively transfer only the photos you want to your computer, making them easily accessible and viewable on your computer.
This tool allows you to manage your iPhone photos without an internet connection, avoiding the "iPhone photos not syncing to iCloud" issue. It also enables you to delete photos on your iPhone from your PC, manage iOS files, or download videos from any site.
Now, you can download Qiling MobiMover on your computer and start the backup process.
Step 1. To back up your iPhone photos to your computer, connect your iPhone to your computer (Mac or PC) with a USB cable and run Qiling MobiMover. In MobiMover, select "Phone to PC" to transfer all your iPhone photos to the computer at once, then click "Next" to proceed.
Step 2. To back up your iPhone data, select the desired categories and use the data transfer feature to make a copy of all supported file types on your iPhone. This can be done by customizing the storage path or choosing to back up all data on your desktop.
Step 3. To transfer your iPhone photos to a computer without using iCloud, click the "Transfer" button. This process is high-speed and won't take long to complete, allowing you to quickly and easily back up your photos.
Part 2. Back Up iPhone Photos to External Hard Drive
To back up iPhone photos to an external hard drive, you can use either File Explorer on a Windows computer or Image Capture on a Mac. The steps for each are as follows: on a Windows computer, open File Explorer, select the external hard drive, and then drag and drop the iPhone photos from the iPhone to the external hard drive. On a Mac, open Image Capture, select the external hard drive, and then select the iPhone photos to transfer them to the external hard drive. This allows you to easily transfer your iPhone photos to an external hard drive for safekeeping.
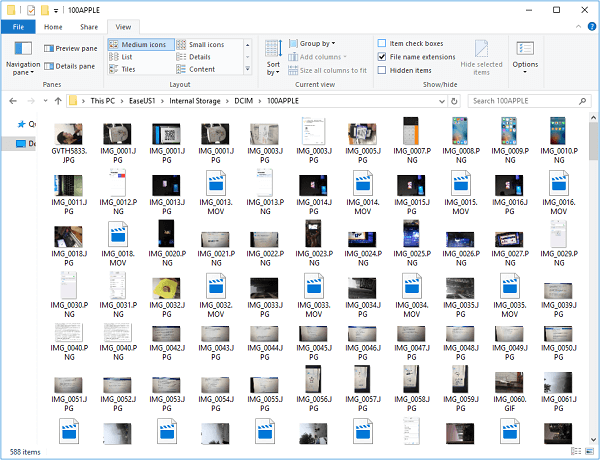
Using File Explorer to Backup iPhone Photos
Step 1.Connect your iPhone and hard drive to the computer your Windows PC.
Step 2.Then a prompt will appear on your iPhone asking for your permission. Click "Allow" to proceed.
Step 3.To access your iPhone's internal storage on your computer, go to "This PC" on your computer, then select "Apple iPhone" followed by "Internal Storage", then navigate to "DCIM" and finally select "100APPLE".
Step 4. Then, you will see all the photos in your iPhone Camera Roll.
Step 5.To back up photos from your iPhone to an external hard drive, simply copy the photos on your iPhone and paste them to the external hard drive. This process allows you to easily and quickly transfer your photos to a safe storage location.
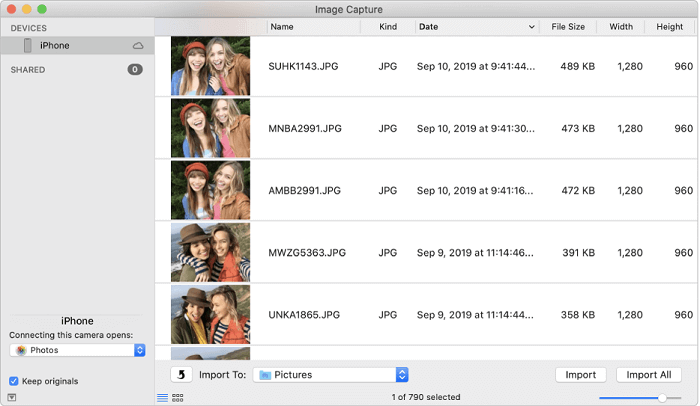
Using Image Capture to Backup iPhone Photos
Step 1.Connect your iPhone/iPad to the computer.
Step 2.Unlock the iPhone and trust the computer.
Step 3.To open "Image Capture" on your Mac, go to Applications > Utilities > Image Capture. Then, select your iPhone from the "Devices" section to begin the process.
Step 4.To save the images to your external hard drive, click the "Import To" pop-up menu and select the external hard drive as the destination.
Step 5.To transfer photos, select the "Import" option and choose either "Import All" to transfer all the photos at once or select the specific photos you want to transfer and click "Import."
Part 3. Backup iPhone Photos to Google Drive
Google Drive offers 15GB of free storage, surpassing Dropbox's 2GB and OneDrive's 7GB, making it the preferred choice.
Step 1. Download and install Google Drive on your iPhone.
Step 2. Open the app and tap the "+" icon.
Step 3. Tap "Upload."
Step 4. Tap "Photos and Videos."
Step 5. Choose the photos you want to backup.
Step 6. Then, you can follow the on-screen instructions to complete the process.
Part 4. Back Up iPhone Photos to iTunes or iCloud
Backing up iPhone photos to iTunes and iCloud is a straightforward process. However, it's essential to note that iCloud only offers 5GB of free storage, so if you have more than 5GB of photos to backup, you'll need to upgrade your storage plan.
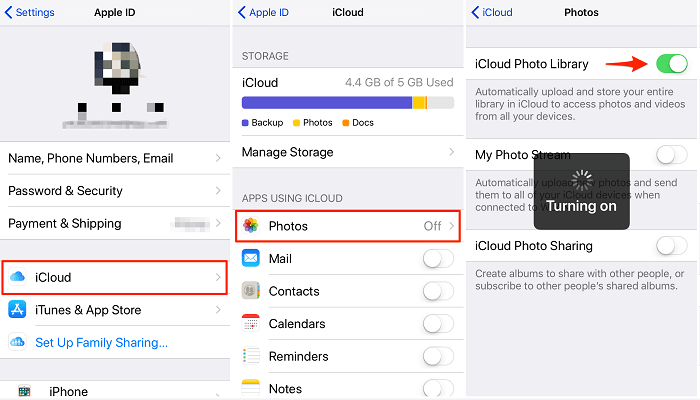
Using iCloud to backup iPhone photos
Step 1. Open the Settings app on the iPhone.
Step 2. Tap [your name].
Step 3. Scroll down to choose iCloud.
Step 4. Move down and look for "Photos" and tap it.
Step 5. Now turn on the iCloud Photo Library from there
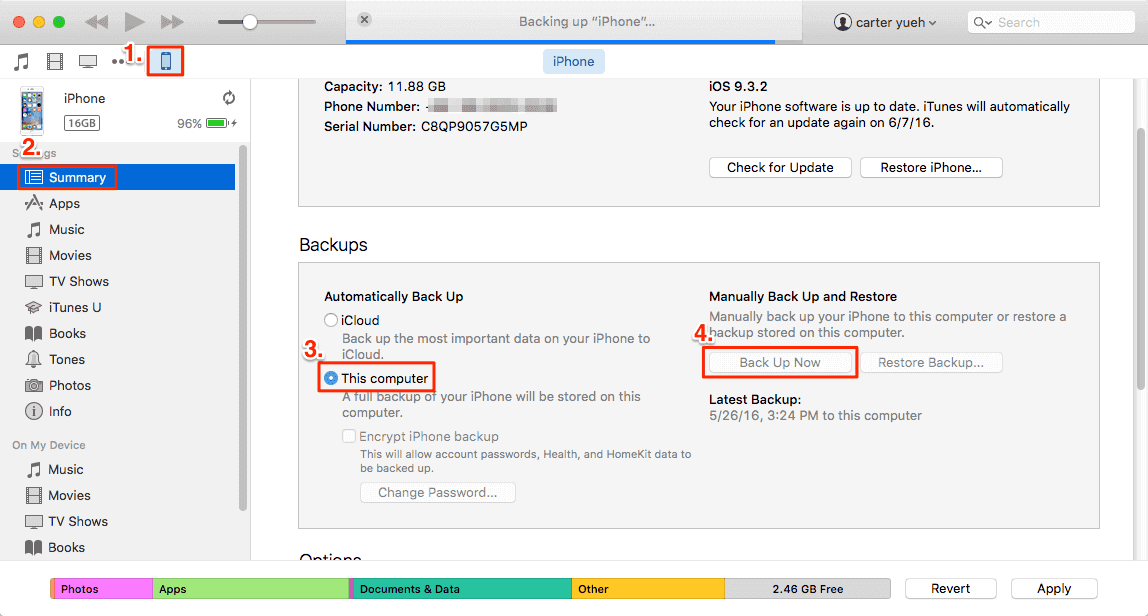
Using iTunes to backup iPhone photos
Step 1. Connect your iPhone or iPad to your computer.
Step 2. Launch the latest version of iTunes on your computer.
Step 3. Click on your device icon and choose"Summary."
Step 4. From the right panel of iTunes, click on"Back Up Now."
The Bottom Line
To back up iPhone photos without using iTunes or iCloud, follow our guide. By doing so, you'll be able to make a copy of your iPhone photos on your computer. If you have any questions or need further assistance, feel free to reach out to us for help.
Related Articles
- How to Transfer Data from Android to iPhone Using Computer
- How to Transfer Files from iPhone to PC Without iTunes
- How to Transfer Voice Memos from iPhone to Computer in 4 Ways
- Step-by-Step Guide to Samsung Laptop Windows 7 Recovery
Find your Samsung laptop in trouble and want to perform Samsung Windows 7 recovery? Read this article carefully to learn a step-by-step guide.