3 Easy Ways | How to Transfer Pictures from HEIC to JPG
HEIC is a new file format adopted by Apple with the introduction of iOS 11. Having half the size of JPGs and offering better quality, HEIC has been well-received by most iOS users since it was released. Though capturing pictures in HEIC format is a good option, it also raises an incompatibility problem because many operating systems and popular apps haven't adopted the HEIC format.
So if you want to open HEIC on your computer or transfer it to another device, your first thing is to convert HEIC to JPG to avoid incompatibility. In this guide, we will present you with some flexible ways to transfer HEIC to JPG.
Method 1. How to Transfer HEIC to JPG on a PC with a Converter
If you want a quick, safe, and reliable transfer of HEIC to JPG, consider this iPhone data transfer tool - Qiling MobiMove. With this tool, you can transfer and convert your iPhone's HEIC pictures to JPG on your computer with ease. And if you want to transfer photos from iPhone to computer without converting them, that's also possible with Qiling MobiMover. If you want to learn more about this program, here's part of its functions.
- Full-way transfer - transfer data between an iPhone and a computer or between two iPhones
- Flexible backup - back up iOS data in your preferred way
- Media downloader - download video/audio from 1000 websites
- Video converter - convert videos to audio in one-click
To transfer HEIC to JPG with Qiling MobiMover, you can follow these steps.
Step 1. Launch Qiling MobiMover on your PC and click "HEIC to JPG" on the navigation panel.
Step 2. Click "Browse" to select and add one or multiple HEIC photos from your PC. You can also drag and drop to import HEIC photos to Qiling MobiMover here.
Step 3. Click "Convert" or "Start All" to convert HEIC photos to JPG. After the HEIC to JPG conversion completes, you can click "View" button to check the converted JPG photo on your PC.
Tips: Qiling MobiMover also allows you to convert while transferring photos from an iPhone to a computer. You need to change the export settings to JPG before transferring photos.
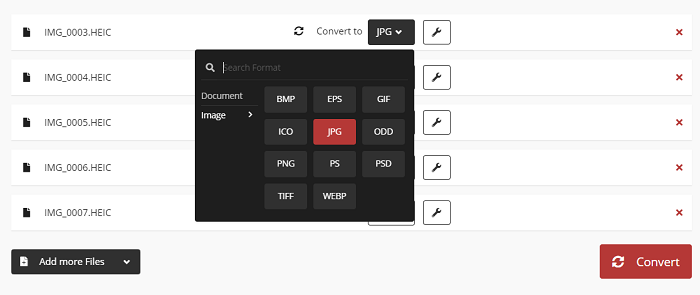
Method 2. How to Transfer HEIC to JPG on a PC with an Online Converter
If you prefer a more convenient way to transfer HEIC to JPG, you can try some online converters like HEICtoJPEG, CloudConvert, FreeConvert, and more. With them, you can directly convert HEIC to JPG online without installing any program on your computer.
But one thing worth noting is that most online converters require you to upload your pictures to their server and then save the converted items, leaving you to have the risk of downloading some viruses and trojans to your computer. Furthermore, online converters are not always equipped to handle large files.
Given that, online converters seem like not a suitable solution. But if you persist in online converters, you can try HEICtoJPEG, CloudConvert, Free Tool Online, FreeConverter, etc.
Method 3. How to Transfer HEIC to JPEG with OndDrive or Dropbox
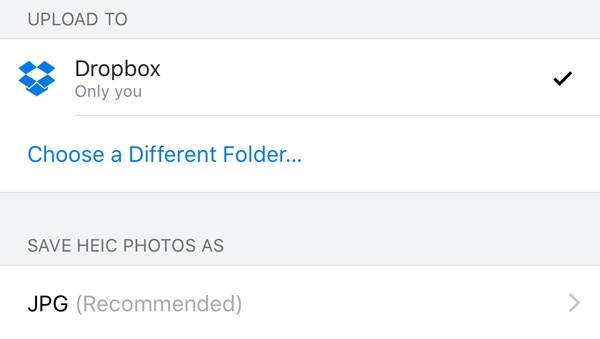
You can also use cloud services like Dropbox and OneDrive to convert pictures to JPG automatically every time you upload HEIC pictures. Let's take Dropbox, for example, and see how it works to convert HEIC to JPG.
Step 1. Open Dropbox on your iPhone.
Step 2. Click on the Settings icon in the upper left corner.
Step 3. Select "Camera Uploads," and then choose "Save HEIC photos as JPG."
Step 4. Open up Dropbox on your computer and download the uploaded pictures.
In Conclusion
That's a wrap! We hope you have learned all ways to transfer HEIC to JPG. Let's make a comparison of these methods.
- Qiling MobiMover converter: Stable, quick, safe, and privacy protected.
- Online converters and cloud services: Free, slow, and privacy risked.
As you can see, each solution has its advantages and disadvantages. You can apply your preferred solution to transfer HEIC to JPG.
Related Articles
- How to Transfer Music from Laptop to iPhone
- How to Back Up iPad in Every Way
- How to Transfer Photos from iPad to PC in 4 Ways
- How to Import Google Contacts to iPhone with 3 Simple and Quick Tips