How to Transfer Photos from iPhone to Computer in 5 Ways
Here are some ways to transfer pictures from iPhone to PC: you can use a USB cable to connect your iPhone to your computer, use a wireless transfer method like AirDrop or Google Photos, or use a third-party app like Image Capture or AnyTrans to transfer your photos. You can also use cloud storage services like iCloud or Google Drive to store and access your photos on your computer. Additionally, you can use a USB drive or an external hard drive to transfer your photos from your iPhone to your computer. Finally, you can also use a service like Flickr or 500px to upload and share your photos. Each of these methods has its own advantages and disadvantages, and the best method for you will depend on your specific needs and preferences.
Part 1. How to Transfer Photos from iPhone to PC Wirelessly
To sync photos from an iPhone to a computer wirelessly, users can enable iCloud Photos on their iPhone and install iCloud for Windows on their computer, or use the iCloud.com website without installing any software on the PC.
To transfer photos from an iPhone to a new device, ensure the iCloud Photos option is enabled on the old device. Open the Settings, tap on [your name], then tap "iCloud" and select "iCloud Photos" to turn it on. Also, check that there is enough iCloud storage left. After that, follow the remaining steps to complete the transfer process.
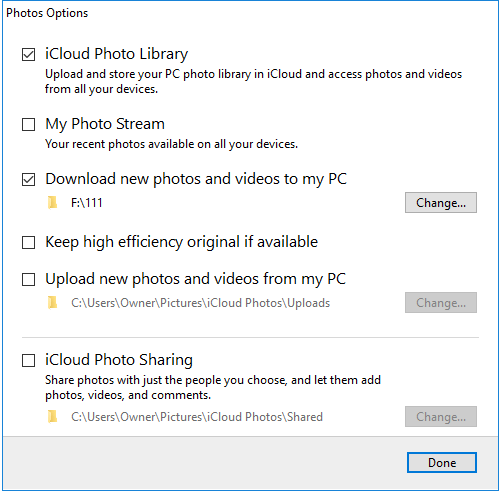
If you prefer to use iCloud for Windows:
Step 1. Download the iCloud for Windows app onto your computer.
Step 2. Open it and tick the box next to "Photos."
Step 3. Select the "iCloud Photo Library" option from a prompt window.
Step 4. Select "Download new photos and videos to my pc."
Step 5. Click "Done," then click "Apply."
If you prefer to use the iCloud website:
Step 1. Open a web browser and go to icloud.com.
Step 2. Sign in to your iCloud account with your Apple ID and password.
Step 3. If you've ever set up two-factor authentication, you'll need to enter a six-digit PIN on your PC.
Step 4. When you enter the main page of icloud.com, choose "Photos."
Step 5. After you've uploaded your photos, they will be displayed. You can then select and download the ones you'd like to keep.
Other cloud storage and file-sharing services like Dropbox, Google Photos, and Microsoft OneDrive can also be used to transfer photos from iPhone to PC or vice versa, in addition to iCloud.
Part 2. How to Transfer Photos from iPhone to PC with a USB Cable
While iCloud offers convenience for data transfer, its transfer speeds can be limited by your network speed and the number of photos you're transferring. This can result in a slow process, especially if you have a large collection of photos or a slow internet connection. For a quicker option, consider using a USB to transfer your photos.
Method 1. Transfer Photos from iPhone to PC with iPhone Data Transfer Software
Applies To: Any photo on your iPhone
If you're looking for a quicker and easier way to transfer photos from an iPhone to a Windows computer with a USB cable, try Qiling MobiMover, a powerful iOS data transfer software that allows you to transfer photos, contacts, messages, videos, and other data between an iPhone and PC or two iOS devices.
The software also comes with additional tools such as a video downloader and WhatsApp manager, making it easier to organize iPhone data. With it installed on your computer, you can start transferring photos from your iPhone to your PC.
Step 1. Connect your iPhone to a PC running Windows 7 or later, open Qiling MobiMover, and click "Phone to PC" followed by "Next" to proceed.
Step 2. Check the category/categories you want to transfer from your iPhone to your PC, and copy other supported files together with photos at once.
Step 3. Now, click the "Transfer" button to transfer the photos from iPhone to your PC in one click. The photos will be saved to the default storage path, which is usually on your desktop or a designated folder. If you've customized the storage path, find the files there. Otherwise, you can check them on your desktop.
Method 2. Copy Photos from iPhone to PC Running Windows 10 via Photos App
Applies To: Photos and videos taken by iPhone
To copy photos from an iPhone to a Windows computer, you can use the Photos app, which is Windows' built-in app that helps import photos and videos. The process is straightforward, but it involves some extra steps.
- Make sure the latest version of iTunes is installed on your computer.
- Connect your iPhone to the computer with a USB cable.
- To unlock your iPhone and tap "Trust" on your iPhone if you're required.
If you are ready, let's follow the instructions below to finish the rest of the steps.
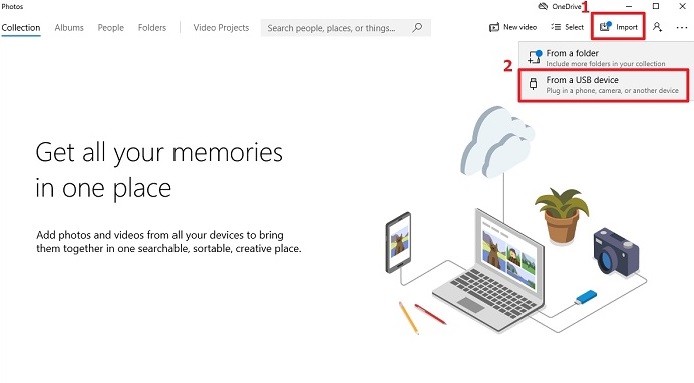
Step 1. To open the Photos app, click on the Start button and select Photos.
Step 2. Select "Import," and then choose"From a USB Device."
Step 3. Windows will scan your phone and display "Import items" to you, allowing you to select the items you want to import.
Step 4. You can choose to transfer select items or transfer all items at once, giving you flexibility in managing your inventory.
Step 5. Click "Import."
Note: If the Photos app in Windows 10 is not working, you can try troubleshooting solutions such as restarting the app, checking for updates, resetting the app, and reinstalling it to resolve the issue.
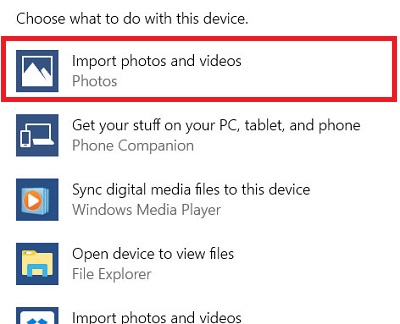
Method 3. Transfer Photos from iPhone to PC via AutoPlay
If you've enabled AutoPlay on your computer, Windows will prompt you to import photos and videos when you connect your iPhone. If not, go to Settings on your computer, click on the "Devices" icon, click on "AutoPlay" on the left, and toggle it on. Once enabled, follow these steps to import your photos and videos.
Step 1.Connect your iPhone to the computer.
Step 2.When the AutoPlay prompt appears, quickly click on it.
Step 3.Select "Import pictures and videos using Windows."
Step 4.Choose the photos you wish to import.
Step 5.Select "Import."
Method 4. Copy Photos from iPhone to PC Running Windows 7/8/10 via File Explorer
To transfer photos from your iPhone to your PC using File Explorer, start by installing iTunes first. Once installed, follow the necessary steps to successfully transfer your photos.
Step 1. Plug your iPhone into your PC with a USB cable.
Step 2. To open Windows Explorer, you can either launch it from your desktop or press the Windows key + E shortcut on your keyboard.
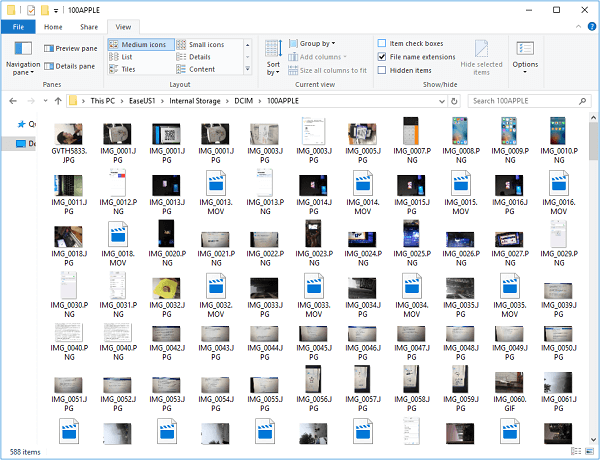
Step 3. Click on the arrow next to "This PC" on the left side of the window.
Step 4. Click Your iPhone.
Step 5. Double-click "Internal Storage," and then double-click "DCIM."
Step 6. Double-click a folder that may include all images.
Step 7. Choose the photos you wish to import.
The Bottom Line
Depending on the computer you're using and the photos you need to copy, the best method to transfer photos from your iPhone to your computer will vary. To simplify the process, choose the most suitable method for your specific needs and carry it out with ease.
Related Articles
- How to Fix iPhone/iPad Calendar Not Syncing
- How to Back Up iPhone to Mac With/Without iTunes
- How to Permanently Delete Text Messages on iPhone 5/6/7/8/X/XR
- Free Software to Transfer Photos from iPhone to PC