Free Software to Transfer Photos from iPhone to PC
When choosing a transfer software, consider three key factors: transfer speed, photo quality, and storage space. A fast transfer speed saves time, while multiple photo quality options ensure your photos are transferred without losing quality. Unlimited free storage also provides convenience for transferring large photos.
Finding a software that meets all requirements can be challenging, but you can choose one that closely matches your needs. If you're looking for a suitable tool, consider trying some of the best free software options available.
- Qiling MobiMover
- File Explorer
- Windows 10 Photos App
- iCloud for Windows
- iTunes
How to Transfer Photos from iPhone to PC via Qiling MobiMover
Qiling MobiMover is the first utility we recommend. With this light iPhone data transfer tool, you can easily get all or part of photos moved to a PC with several clicks, with no restrictions on the number of photos transferred and no internet requirement, making the process incredibly easy and convenient.
Beyond that, it has many other outstanding features:
- Easy to use
- Good transfer speed
- Unlimited storage(This depends on your computer's storage space)
- No quality loss
- No internet required
If you're struggling to copy photos from iPhone to iPhone, it's also a good option to use. You can download it for free on your computer and start transferring photos.
Step 1. Connect your iPhone to a PC running Windows 7 or later, then run Qiling MobiMover, select "Phone to PC" and click "Next" to transfer data from iPhone to PC in one click.
Step 2. MobiMover allows you to transfer various file types, including audio, videos, pictures, books, contacts, and messages, from an iPhone to a PC. To transfer pictures specifically, select the "Pictures" option. MobiMover will save the files on your desktop by default, although you can customize the path to suit your needs.
Step 3. To transfer photos from your iPhone to your PC, click the "Transfer" button. The transfer time will depend on the size of the files, so be patient and wait for it to complete.
How to Transfer Photos from iPhone to PC for Free via File Explorer
File Explorer is a file manager application that can transfer photos and videos between mobile phones and computers without needing an internet connection, with no restrictions on the number of files that can be transferred.
The only drawback of this method is that if you want to transfer photos selectively, it takes a lot of time to select the items since all photos and videos are stored in the folder in an unorganized way.
To transfer photos from iPhone to PC via File Explorer:
Step 1. Connect your iPhone to your PC via a USB cable.
Step 2. To open File Explorer on your computer, press the Windows key + E on your keyboard, or open it by navigating to it in your computer's Start menu.
Step 3. To see your iPhone on your Windows computer, click on "This PC" in the sidebar, and your iPhone will be listed under "Devices and drives." If you're using Windows 7, it will be listed under "Computer."
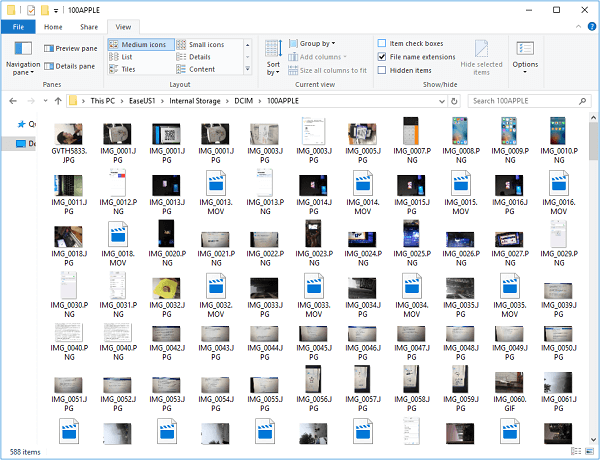
Step 4. To find the DCIM folder on your iPhone, double-click on your iPhone's name in File Explorer, then click on "Internal Storage" and finally select the DCIM folder.
Step 5. Find the folder that holds the photos you'd like to import and drag (copy) them to the folder you want to house them.
How to Transfer Photos from iPhone to PC with the Windows 10 Photos App
The Photos app is a free photo viewer and editor included with Windows 10, allowing users to view and manage photos on their computer or external device without the need for a USB.
To transfer iPhone pictures to your PC with Windows 10's Photos app, simply connect your iPhone to your PC using a USB cable, and the Photos app should automatically open, allowing you to view and transfer your iPhone photos to your computer. If the Photos app doesn't open, you can open it manually from your Start menu, and then click on the "Import" button to select the photos you want to transfer.
Step 1. To transfer photos from your iPhone to your PC, open the Photos app on your PC, and while that's open, connect your iPhone to your PC using a USB cable. This will allow your PC to recognize your iPhone and access its photos. Once connected, you can select the photos you want to transfer and they will be copied to your PC.
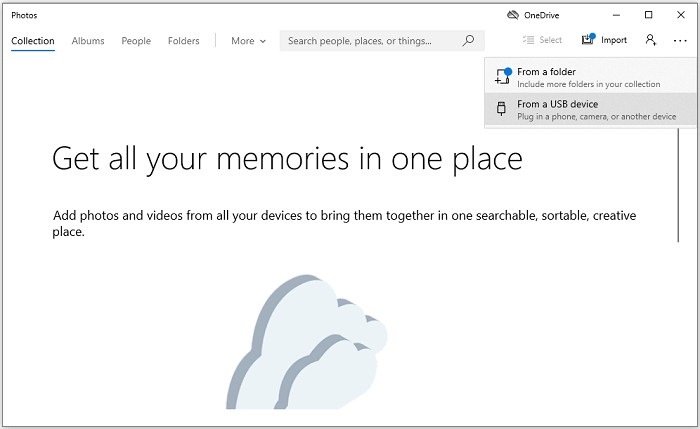
Step 2. Click "Import" in the upper-right corner.
Step 3. Click "From a USB device."
Step 4. Choose the photos you'd like to import.
Step 5. Click "Continue."
How to Transfer Photos from iPhone to PC via iCloud Wirelessly
iCloud for Windows is another application worth trying. Before using it, note that several things should be considered, such as the need to sign in with your Apple ID and password, the ability to access your iCloud content on your Windows device, and the potential for syncing issues if not set up correctly.
- Make sure you've installed the iCloud application on your computer
- To ensure a stable internet connection for both your iPhone and computer, make sure they are connected to a reliable network, such as Wi-Fi, and that the signal strength is strong. You can check the signal strength on your iPhone by going to Settings > Wi-Fi and looking for the network name and signal strength.
- Make sure your iCloud has enough storage
To transfer photos from iPhone to PC via iCloud:
Step 1. To get started, enable iCloud Photo Library on your iPhone by going to Settings > [your name] > iCloud > iCloud Photos. This will sync your iPhone's photos with your iCloud account, allowing you to access them from any device connected to your account.
- Go to your Settings.
- Tap [your name].
- Tap "Photos."
- Enable "iCloud Photo Library."
Step 2. Then you can download photos from iCloud to your PC.
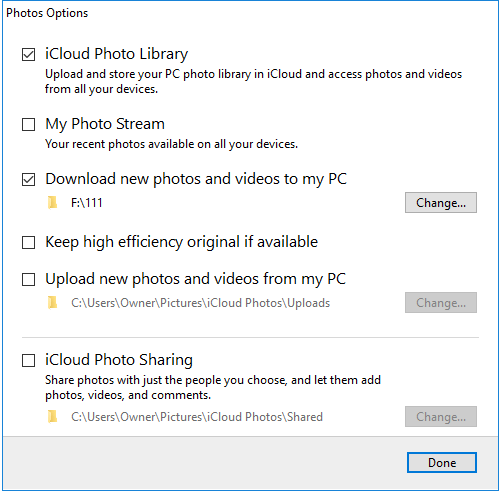
- Open the iCloud Control Panel on your computer.
- Click "Options" next to Photos.
- To enable iCloud Photo Library and download new photos and videos to your PC, simply check the box next to "iCloud Photo Library" and "Download new photos and videos to my PC."
- Go to your computer to check the photos and videos from your iPhone.
If you didn't install the iCloud Control Panel on your computer, you could go to the iCloud website to access your account and enable two-factor authentication.
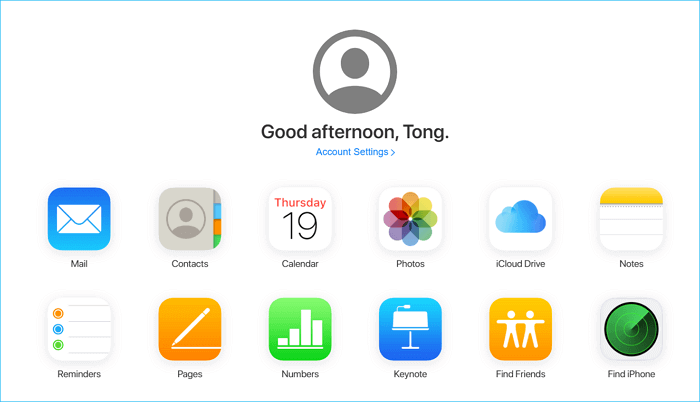
Step 1. To access your iCloud account on your computer, go to iCloud.com, then sign in with your Apple ID and password.
Step 2. Select "Photos" to view all photos stored in your iCloud.
Step 3. Choose and download the items to your PC.
How to Transfer iPhone Photos to PC via iTunes
iPhones can also help you make a copy of your photos to the computer. However, the images you backed up with iTunes are not viewable unless restoring them to your iPhone or iPad, which will erase your current data on the iPhone.
Step 1. Plug your iPhone into your computer using a USB cable, and then launch iTunes on your computer.
Step 2. Find the device icon on the menu and click the "Photos" tab under the Settings section.
Step 3. From the right side of iTunes, tick the "Sync Photos."
Step 4. Select the desired files, such as all photos and albums or specific files, and click the "Apply" button.
Step 5. Wait for the syncing process to complete, and then click "Done."
Step 6. Then, you can find your backup on the computer.
The Bottom Line
We hope you've successfully transferred photos from your iPhone to your PC using the five software options outlined in this post. If you have any questions or need further assistance, feel free to contact us. If you encounter any issues, such as data loss, don't worry - you can also find ways to recover your lost photos.
Related Articles
- How to Transfer Apps from iPhone to iPhone in 5 Ways
- How to Back Up iPhone Before Getting a New One
- How to Transfer Contacts from iPhone to iPhone
- How to Set a Song as a Ringtone on iPhone XR/XS/XS Max