How to Back Up iPhone to Mac With/Without iTunes
Backing up your iPhone on a Mac is a straightforward process that can be done in multiple ways, whether you use iTunes or not. You can use iTunes to create a local backup of your iPhone, which includes all of your data, settings, and apps.
Backing up your iPhone regularly is a good habit to avoid unexpected data loss. You can choose to back up your iPhone to a computer, either a Mac or PC, or make a backup in iCloud. To back up your iPhone to a Mac, you have options: you can use iTunes or explore alternative methods that fit your preferences. Whether you prefer using iTunes or not, you'll find a solution that suits your needs.
- How to Back Up iPhone to iTunes on Mac
- How to Back Up iPhone Using iCloud
- How to Back Up iPhone to Mac Without iTunes or iCloud
- How to Back Up iPhone on Mac with an iOS Content Manager
Method 1. How to Back Up iPhone to iTunes on Mac
If your Mac is running macOS Mojave or earlier, iTunes is the official way from Apple to back up your iPhone to a computer, whether it's a Mac or PC.
An iTunes backup is a comprehensive copy of your iPhone's data and settings, excluding only content purchased from iTunes or the App Store, data synced from iTunes, files stored in iCloud, and a limited set of settings. This makes it a suitable option for creating a backup of everything on your iOS device.
To back up iPhone to iTunes:
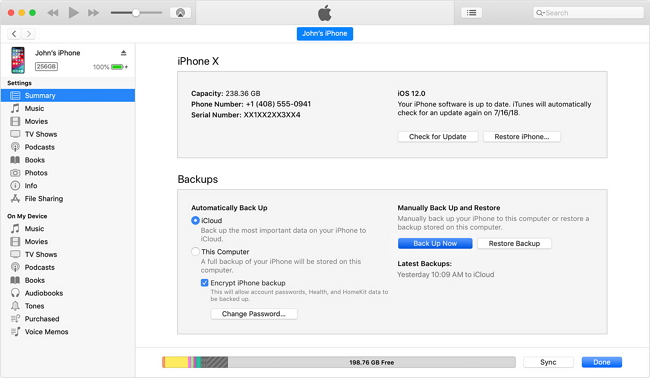
Step 1. Connect your iPhone to your Mac and wait for iTunes to launch automatically. If it doesn't, open iTunes on your Mac and select your iPhone from the top left menu.
Step 2. Click the "Device" button near the top left of the iTunes window.
Step 3. To back up your iPhone to iTunes, go to the "Summary" section in the left sidebar and click on "Back Up Now" to initiate the backup process.
Method 2. How to Back Up iPhone to iCloud
You can also sync your iPhone to a computer using iCloud, which backs up your iPhone content to the cloud storage over Wi-Fi, allowing you to make an iCloud backup regardless of the computer's operating system.
To back up iPhone to iCloud:
Step 1. To access iCloud backup settings, go to "Settings", select your name, and then choose "iCloud", followed by "iCloud Backup".
Step 2. To save your iPhone data to iCloud storage, toggle on "iCloud Backup" and click "Back Up Now".

To use iCloud backup successfully, ensure you have sufficient iCloud space and a stable Wi-Fi network and power connection on your device.
Unlike iTunes backups, iCloud backups are inaccessible, requiring you to restore your new iPhone with the backup in order to extract files.
Method 3. How to Back Up iPhone to Mac Without iTunes or iCloud
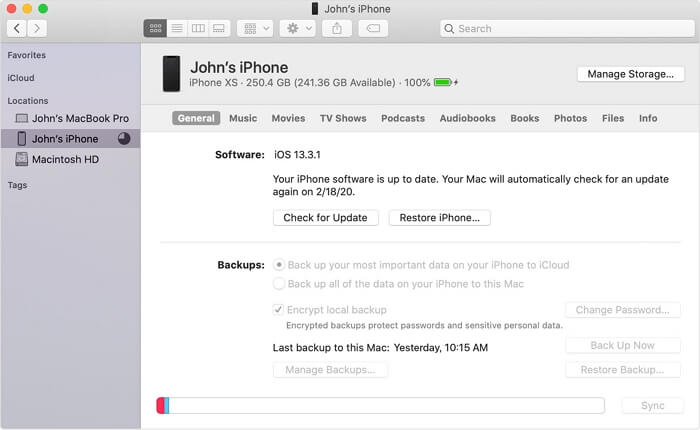
Since macOS Catalina, iTunes has been discontinued and Finder has taken over data syncing and device backup, making it a similar experience to syncing with iTunes.
Here's how to back up your iPhone to Mac without iTunes:
Step 1. Connect your iPhone to your Mac using a USB cable, then open Finder on your Mac.
Step 2. To trust a computer on your iOS device, go to Settings > General > Device Management. Tap on the computer you want to trust, then tap on "Trust" to confirm.
Step 3. In Finder, select your iPhone's name under "Locations" and click "Back Up Now" to initiate a backup of your iPhone to your Mac, eliminating the need to use iTunes.
When backing up your iPhone to Mac using iTunes or Finder, be aware that you shouldn't edit, move, rename, or extract content from the backup, as this can cause the files to become corrupted and prevent you from restoring your device.
The backup files from an iPhone are not stored in a readable format, making it impossible to view iPhone content in the same way as on the mobile device itself.
Method 4. How to Back Up iPhone to Mac with Qiling MobiMover
The app supports a wide variety of file types, including photos, videos, music, ringtones, audiobooks, contacts, messages, books, and more.
The three methods mentioned have one common limitation: they do not allow you to view or read iPhone files from a backup on a computer or cloud storage when needed.
If you want to access and view your iPhone backup at any time, you'll need a tool like Qiling MobiMover, a reliable iPhone transfer software.
The iOS data transfer software doesn't back up your iPhone files in an image file, but rather transfers supported files to the computer, allowing you to make an exact copy of your iPhone files, check them on the computer, and also transfer data between devices.
- Transfer files between iPhone and Mac (or PC)
- Sync data from one iPhone/iPad/iPod Touch to another
- Manage iDevice content from a computer
- To download videos from YouTube to your Mac, iPhone, or iPad, you can use a third-party app or browser extension. One popular option is 4K Video Downloader, which allows you to download videos in various resolutions and formats.
- Download audio files from websites to computer or iDevice
To back up your iPhone on a Mac without using iTunes or iCloud, you can use the Finder app, which is a built-in tool on Macs. Simply connect your iPhone to your Mac using a USB cable, and the Finder will automatically detect your device.
Step 1. Connect your iPad to your Mac with a USB cable, then tap "Trust This Computer" on your iPad if prompted. On your Mac, run Qiling MobiMover for Mac and select "Phone to Mac" on the main screen.
Step 2. MobiMover automatically loads all supported data on your iPad, allowing you to export all or select specific data types. You can choose the destination for saving exported iPad files on your Mac, or let MobiMover save them to a default desktop folder named "Exported by MobiMover".
Step 3. After transferring data from iPhone or iPad to Mac, you can view, edit, or delete the imported data on your Mac.
The Bottom Line
You can back up your iPhone to your Mac using various methods, including using Finder, iTunes, iCloud, and third-party software. Depending on your specific needs, the best way for you to back up your iPhone on your Mac may vary. Each method has its own advantages and can be used to back up your iPhone to your Windows PC as well. Choose the method that suits you best to make a backup of your iPhone with ease.
Related Articles
- 5 Easy Tips to Import VCF to iPhone
- How to Transfer Messages from iPhone to iPhone
- How to Transfer Calendar from Mac to iPhone 8/8 Plus/X with iTunes/iCloud
- 3 Free Methods for iMessage Backup on iPhone/iPad