How to Transfer Calendar from Mac to iPhone 8/8 Plus/X with iTunes/iCloud
Before syncing your iPhone calendar with your Mac, consider why you want to do so. Once you understand the purpose, you'll be able to find the most suitable method to achieve it.
Based on the cases we collected from the internet, syncing the iPhone calendar may be necessary in various situations. Depending on the specific case, different methods may be involved, such as using iCloud, Google Calendar, or a third-party app, to ensure that all devices and calendars are up-to-date.
To add someone as a delegate to edit events on your calendar, you can go to the "Settings" or "Account" section of your Google Calendar. From there, select "Settings" or "Account" and then click on "Add a delegate." Enter the person's email address and choose their permission level, such as "Make changes to events" or "See all event details.
To backup the calendar, contacts, and other iOS files to Mac, you can use the "iCloud Backup" feature on your iPhone or iPad. This will sync your calendar, contacts, and other data to iCloud, which can then be downloaded to your Mac using the "iCloud" app. Alternatively, you can use a third-party backup app like "iMazing" or "PhoneCopy" to transfer your iOS data to your Mac.
To share your calendar with someone else, go to the "Share" button on your calendar. You can choose who you want to share it with, and what level of access they should have. You can share it with anyone, whether it's a colleague, a friend, or a family member.
To create a shared calendar on a Mac, you can use the Calendar app. First, open the Calendar app and create a new calendar by clicking on the "+" icon in the bottom left corner. Name the calendar and click "Create".
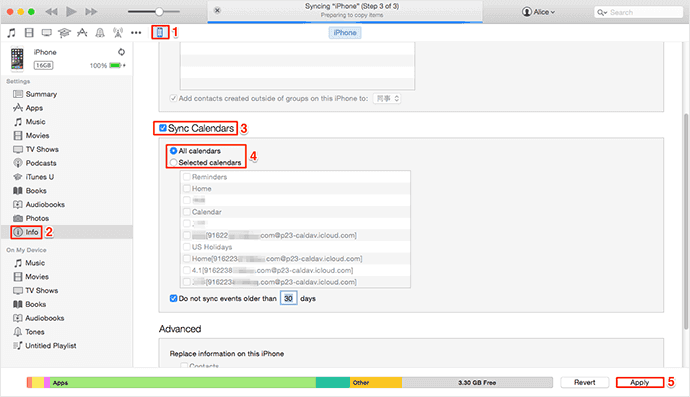
Part 1. Sync iPhone Calendar with Mac via iTunes
iTunes is a comprehensive music player that also serves as a reliable tool for backing up iPhone to Windows PC/Mac, restoring iPhone from iTunes backup, and syncing data between Mac/PC and iPhone.
Step 1. To sync your iPhone, download and install the latest version of iTunes on your computer, then connect your iPhone to the computer via a USB cable.
Step 2. To sync calendars on an iPhone using iTunes, click the iPhone device button within iTunes, then click "Info" and select "Sync Calendars" and "All Calendars" on the right-side panel.
Step 3. To transfer a calendar from a Mac to an iPhone using iTunes, click on "Apply" to initiate the transfer process. Once initiated, wait patiently for the process to complete, and then check the calendars on your iPhone to confirm that the transfer was successful.
Part 2. How to transfer calendars from Mac to iPhone with iCloud
Transferring calendars from Mac to iPhone with iCloud is a much easier process. Since you can backup and sync calendars on both Mac and iPhone with the same iCloud account, it's a wireless process that doesn't require any cables or software. Additionally, iCloud also offers features to back up and restore other data such as photos, contacts, reminders, and Safari on your iPhone.
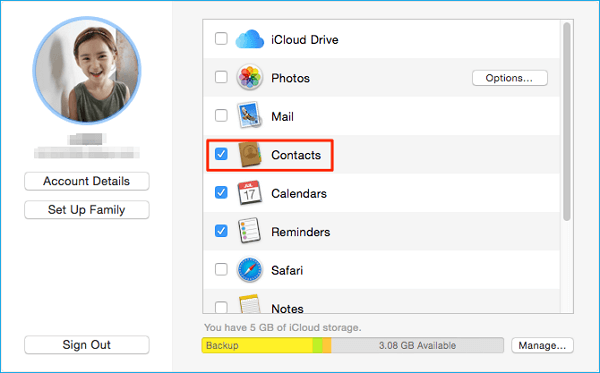
Step 1. To access iCloud on your Mac, go to System Preferences, then open the iCloud Control Panel, and sign in with your Apple ID.
Step 2. To sync your contacts from Mac to iPhone, go to your Mac's "iCloud" settings, uncheck all options except "Calendars", then go to your iPhone, go to "Settings" > "Your iCloud Account" > "iCloud", and turn on "Calendars". This will sync your contacts from Mac to iPhone via iCloud. Additionally, iCloud also allows you to transfer contacts, photos, mail, reminders, notes, and Safari bookmarks.
Part 3. Transfer Files from Mac to iPhone or Vice Versa
This method is a catch-all solution to transfer almost all iOS files between your iPhone and Mac/PC. Use a versatile iOS data transfer tool that won't erase any data on your iPhone, unlike iTunes and iCloud. This tool, which works with almost all iOS devices, including iPhone, iPad, iPod touch, and Mac/PC, allows you to share your iPhone data with your Mac/PC in just three simple steps.
You can use this tool to download movies to iPhone X, put music to iPhone 7 without iTunes, and add ringtones to iPhone 8/8 Plus in an easier way.
Download and install Qiling MobiMover Free on your computer (Mac or PC), then follow the steps to import files from your PC to your iPhone with simple clicks.
Step 1. To transfer data from your computer to your iPhone, connect your device to your computer and tap "Trust" on your iPhone. Then, open Qiling MobiMover and select the "PC to Phone" mode. From there, click "Select Files" to transfer the desired data from your computer to your iPhone, all without using iTunes.
Step 2. Windows File Explorer is now open, allowing you to browse and select the files you want to transfer. Once you've chosen the desired files, click "Open" to proceed.
Step 3. You can preview the details of selected files on the right pane, add more items to transfer using "Add Contents", or directly drag files to the designated area. Once ready, click "Transfer" to transfer data from your computer to your iPhone, ensuring not to disconnect your iPhone until the process is complete, as the transfer should be quick.
Part 4. How to Share iPhone Calendar with Mac
Sharing your iPhone calendar with others allows you to distribute event notifications to them, making it easier for them to stay informed about upcoming events and appointments.
Step 1. Launch the Calendar app on your iPhone.
Step 2. To share an event, either tap on "Create a new event" or select an existing event to share.
Step 3. Tap on the "Edit" button in the upper right corner.
Step 4. From the edit page, add the email addresses of the people you want to invite under the "Invitees" section.
Step 5. Tap the "Done" button in the upper right corner.
Step 6. To accept an event invitation on Mac, have your friend or workmate click on the invitation email, then click on the "Accept" button. If they're using a browser like Safari or Chrome, they can also click on the event title to open it in the calendar app, then click on the "Accept" button.
Step 7. To accept a calendar invite on your Mac, open the Calendar app and click on the "Inbox" at the bottom right corner, then click "Accept" to confirm the invitation.
Note: If your invitees aren't getting the event invitations, you can check if the email addresses are correct or refresh your calendars by going to the "View" menu and choosing "Refresh Calendars."
Part 5. Add a Calendar that Can be Edited by Multiple People
To turn on/off a person's ability to edit the calendar or stop sharing the calendar with them, follow these steps: go to the "Share with others" section, click on the three dots next to the person's name, and select either "Edit permissions" or "Stop sharing".
Step 1. To view your iPhone's calendar, open the Calendar app and tap the circle with an "i" in it. This will display your calendar's settings and preferences.
Step 2. Tap the person's name. Then you'll see some options.
- You can turn on or off "Allow Editing."
- Tap "Stop Sharing" to stop share the calendar with others.
In Conclusion
Syncing your iPhone calendar with your Mac is a straightforward process that can be achieved through both iTunes and iCloud. Not only can you sync your calendar, but also other iOS files with your Mac. Additionally, if you want to share your calendar or allow others to edit it, there are ways to do so, making it easy to manage your calendar across devices.
We hope this guide is helpful to you. If you have more questions related to this topic, you can contact us to help you out.
Related Articles
- How to Manage Contacts on iPhone
- How to Permanently Delete Text Messages on iPhone 5/6/7/8/X/XR
- How to Create New Partition from C Drive in Windows 7 Home?
This tutorial will introduce how to create partition from C drive in Windows 7 Home Basic using Disk Management and freeware Qiling Disk Master. - 4 Ways to Create Dell Windows 7 Recovery Media (Disk/USB)
Want to create a Dell recovery disk or USB drive in Windows 7? There are 4 effective ways you can try to create a Dell recovery media for system issues troubleshooting. Just keep reading and pick a method to perform.