How to Access iPhone Files on Mac or PC in 4 Ways
You can access your iPhone files on a PC or Mac through various methods, including iCloud, iTunes, Finder, File Explorer, and the iPhone data transfer tool. Each method supports different devices and data types, allowing you to choose the one that best suits your needs. By selecting the most suitable option, you can easily transfer and access your iPhone files on your preferred computer.
| Solutions | Device | Supported Data |
|---|---|---|
| Qiling MobiMover | Mac & PC | Almost all files on your iPhone |
| iCloud | Mac & PC | Mail, Contacts, Calendar, Photos, Documents, Notes, Reminders, Pages, Numbers, Keynote |
| iTunes | PC & Mac | Videos, Music, Films, TV programmes, Books, Audiobooks, Tones |
| Finder | Mac | Music, Movies, TV Shows, Podcasts, Audiobooks, Books, Photos, Files, Info |
Part 1. How to Access iPhone Files on PC or Mac with Qiling MobiMover
To manage and organize your media content, you can use the Photos and Albums feature, which allows you to create albums and add photos to them. You can also use the Movies and TV shows feature to keep track of your video collection, and the Music Videos and Music feature to organize your music library.
If you're looking to access iPhone files on a PC without iTunes, you can try using Qiling MobiMover, a reliable iOS data management software that allows you to view and transfer files to or from your iOS device, or download videos from YouTube to your computer or iPhone/iPad/iPad Touch. This tool enables you to access various files on your PC, including photos, videos, music, contacts, messages, and more.
- Photos: Photos and Albums
- Videos: Movies, TV shows, Music Videos
- Audios: Music, Ringtones, Voice Memos, Audiobooks
- Others: Contacts, Notes, Messages, Voice Mails, Books, and Podcasts
To access iPhone files on PC with Qiling MobiMover:
Step 1. Connect your iPhone to your computer with a USB cable, then open Qiling MobiMover, select "Content Management" and choose the desired category to view.
Step 2. After choosing the category, you can view all the items on your iPhone from your computer. You can also transfer files to or from your iPhone using MobiMover.
Step 3. To delete unwanted files, select the items you want to delete and click "Delete". Then, confirm the deletion by tapping "Yes".
Qiling MobiMover allows you to view files on your iPhone and transfer them to your PC if needed. For more information on transferring files, you can check out the article on how to transfer files from iPhone to PC with Qiling MobiMover.
Part 2. How to Access iPhone Files on Mac or PC via iCloud
Support files: Mails, Contacts, Calendar, Photos, Notes, Reminders, Pages, Numbers, Keynote
To view and access iPhone files on a Mac or PC, you can use iCloud as long as you've previously enabled it on your iPhone or iPad. This requires enabling iCloud on your device in advance, and the steps to access the files vary depending on whether you're using a Mac or PC. On both devices, you'll need to follow the respective steps to access your iPhone files via iCloud.
- Go to Settings on your iPhone or iPad.
- Tap [your name] > iCloud.
- To access the desired content, toggle the ON switch next to the type of content you want to view.
To access the data on your Mac or PC, follow the steps below depending on your operating system.
To access iPhone files on a PC:
Step 1. Open a browser on a PC and visit iCloud.com.
Step 2. Sign in with your Apple ID and passcode.
Step 3. To view iPhone files, select the data type you want to access, such as photos, contacts, or messages, and you will be able to see your iPhone files.
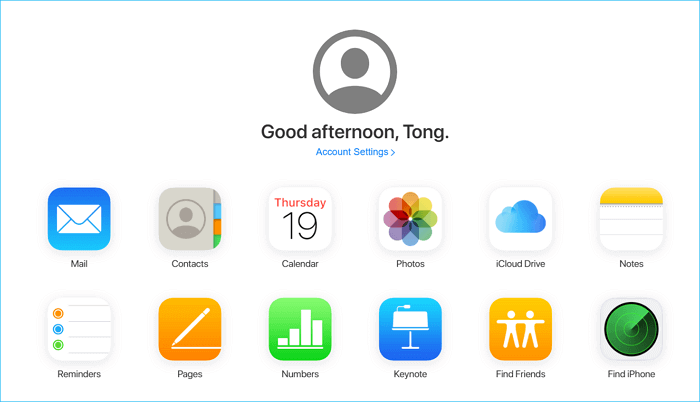
You can export contacts from iPhone or download iCloud photos to PC via iCloud.com.
To access iPhone files on a Mac:
To access synced data on your Mac, enable iCloud sync on your Mac and iPhone, and then you can access synced data on native apps on your Mac.
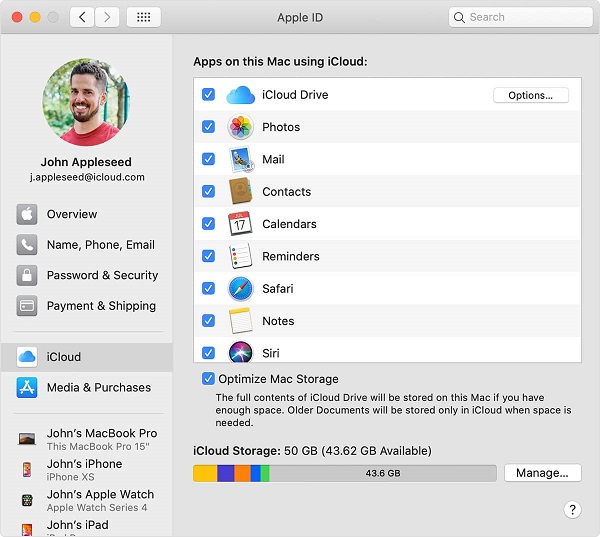
Step 1. To access System Preferences on your Mac, click on the Apple icon at the top-left corner of the screen and select "System Preferences" from the drop-down menu.
Step 2. To manage your iCloud account, click on the "iCloud" or "Apple ID" option.
Step 3. You'll see all the file types you can sync to your Mac. Just check the box next to the data you want to view.
Step 4. Once you've set up syncing, you can access your synced content across your devices by opening the apps you've synced, such as Photos, Notes, Calendar, and more.
Tips: iCloud Drive is a convenient cloud service that syncs your files and documents across all your Apple devices, including iPhones and iPads running iOS 13 or later, as well as PCs running Windows 10.
Part 3. How to Browse iPhone Files on Mac or PC via iTunes
Support files: Videos, Music, Films, TV programmes, Books, Audiobooks, Tones
Here are the steps to access your music, movies, books, voice memos, audiobooks, and more on your Mac with macOS Mojave or earlier or a PC using iTunes:
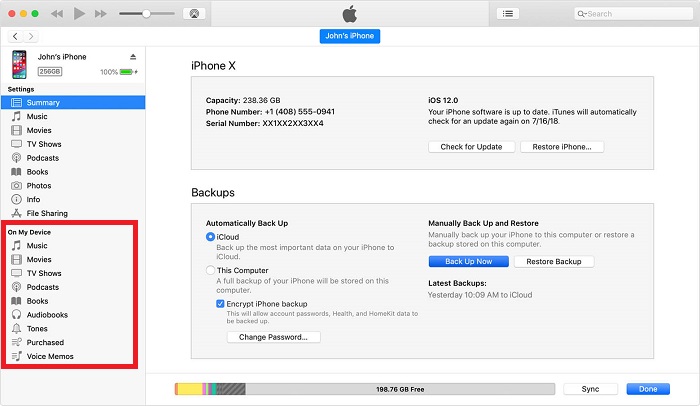
Step 1. To sync your iPhone with iTunes, start by opening iTunes on your computer. Once iTunes is open, physically connect your iPhone to the computer using a USB cable. This will allow iTunes to recognize your iPhone and initiate the syncing process.
Step 2. When iTunes detects your device, click your device icon in the left sidebar.
Step 3. Choose the file you wish to access.
There are multiple ways to access iPhone photos on a PC, but for more practical solutions, check out the guide on how to view iPhone photos on a computer.
Part 4. How to View iPhone Photos on PC or Mac via Finder
The iPhone has better compatibility with Mac compared to Windows PC. To access iPhone files on a Mac, using Qiling MobiMover or iCloud is recommended. If your Mac is running macOS Catalina, you can also use Finder to browse iPhone files.
With the introduction of macOS Catalina, iTunes is no longer available. This means that Finder now takes over the role of sharing files between your iPhone and Mac, allowing you to access your iPhone files directly on your Mac.
To view iPhone files on Mac via Finder:
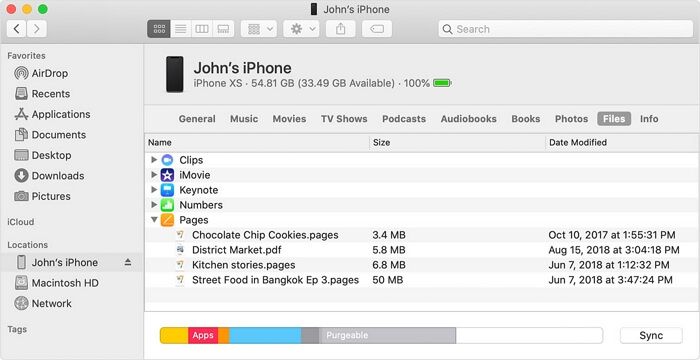
Step 1. Connect your iPhone to the Mac using a USB cable, then open a Finder window on your Mac.
Step 2. In Finder, select your iPhone in the "Locations" section.
Step 3. Choose the tab according to the type of files you want to view, such as music, movies, TV shows, podcasts, audiobooks, books, photos, files, and more.
To transfer files from an iPhone to a Mac or vice versa, you can use Finder, which allows you to easily move files between the two devices.
To copy files from iPhone to Mac, select the files you want to share and drag them to a folder on your computer.
To transfer files from Mac to iPhone, select the desired files and drag them to the corresponding app on your device.
The Bottom Line
Now you know how to access your iPhone files on a computer, whether it's a PC or a Mac, and how to transfer files between your iPhone and PC/Mac. These tips will come in handy when you need to transfer iOS data.
Related Articles
- How to Transfer PDF from iPad to Computer
- How to Download Music on iPhone With or Without iTunes
- How to Backup HP Recovery Partition in Windows 11/10/8/7
There are several ways to backup HP recovery partition, but all with many limitations. To backup recovery partition on any OS, here's an easier way. - Best Way to Backup PC to Cloud in Windows 10 or 11 (FREE)
Need the best free way to backup PC to cloud drive like Google Drive? Try Qiling Disk Master Standard, not only free, but also protect data continuously.