iPhone 8/8 Plus/X: Fixes to iPhone Black Screen in iOS 11
Quick Navigation:
- Fixes to iPhone 8/8 Plus/X black screen
- Tip 1: Free up your iPhone space
- Tip 2: Restart or force restart your iPhone 8/8 Plus/X
- Tip 3: Restore your iPhone to factory settings
If your iPhone screen is black and won't turn on, or black but the phone is on, or the screen went black but the phone still works, you may have encountered the common issue of an iPhone black screen. The causes vary, but you can try the following tips to solve your problem.
Fixes to iPhone 8/8 Plus/X black screen
If your iPhone shows a black screen but is still on, you can try to resolve the issue using the fixes outlined in this article.
Tip 1: Free up your iPhone space
If your iPhone is consistently running slow and suddenly turns black, it may be due to full storage on your iPhone 8/8 Plus/X. To prevent this, back up your iPhone contents to a computer and then delete the contents from your device to free up space.
Tip 2: Restart or force restart your iPhone 8/8 Plus/X
Restarting or force restarting your iPhone is a simple and useful solution to the "iPhone black screen" problem.
How to restart iPhone/iPad in iOS 11:
Method 1: To turn off your iPhone, press and hold the Sleep/Wake button until a slider appears. Then, drag the slider to the right to turn off your device.
Method 2: To turn off your iPhone/iPad in iOS 11, go to Settings > General > Shut Down, and move the slider to the right to turn it off. Then, press and hold the Sleep/Wake button to turn it back on.
How to reboot iPhone/iPad in iOS 11:
Method 1: For iPhone X, iPhone 8 and iPhone 8 Plus, quickly press and release the Volume Up button, quickly press and release the Volume Down button, and then press and hold the Sleep/Wake button until you see the Apple logo.
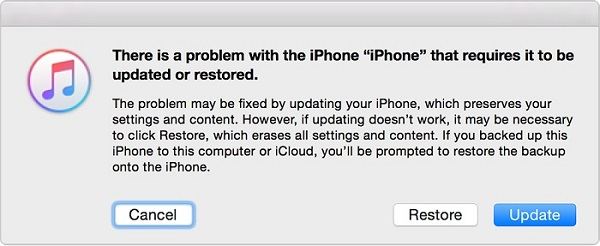
Tip 3: Restore your iPhone to factory settings
If your iPhone screen is black and unresponsive, you can still reset it to factory settings using iTunes, as the usual method of using the iPhone itself is not possible in this case.
Step 1: To get started, download and install the latest version of iTunes on your computer. This will ensure you have the most up-to-date software for managing your music, movies, and other digital media.
Step 2: Connect your iPhone 8/8 Plus/X to your computer and tap on "Trust" to establish a connection between the two devices.
Step 3: Click the Device button and select Summary.
Step 4: Go to Restore iPhone in iTunes, then select Restore, which will erase your iPhone and restore it to factory settings.
Notes:
As an iPhone user, you can't miss MobiMover Free, the world's first completely free iOS data transfer software. With MobiMover, you can transfer files from PC to iPhone/iPad (in iOS 8 or later), back up iPhone/iPad contents to PC, sync files from one iPhone/iPad to another, and manage your iPhone/iPad data from a computer without any cost or limitation. This allows you to easily transfer contacts from one iPhone to another, download photos from computer to iPad, back up iPhone messages to the computer, and delete all contacts on iPhone with a single click.
Step 1. Connect your iPhone or iPad to your computer with a USB cable, then tap "Trust This Computer" on the device screen. Run Qiling MobiMover on your computer, select "Phone to PC" to sync your device data, and click "Next" to continue.
Step 2. After MobiMover has loaded all data on your iDevice, you can start the transfer process directly. Before that, you can set the storage path for synced files on your iPhone/iPad, or MobiMover will export them to your desktop. Next, choose the desired data categories and click "Transfer" to begin the process.
Step 3. Wait patiently until all the selected files are successfully synced from your iDevice to your computer, then you can browse, edit and change the location for the newly added content.
Related Articles
- How to Clear Cookies on iPhone
- How to Fix iPhone X/8/8 Plus Touch Screen Not Working in iOS 11/11.1/11.2
- Samsung Recovery Solution and Free Alternative in Windows 10
Wanna use Samsung Recovery Solution in Windows 10 to recover your Samsung laptop? Learn a quick guide to the tool from this page. - How to Set up Automatically Backup in Windows 10
Setup backup is quite necessary in case of any problem happened to system or data. If there is a system crash, you can simply restore it with backup.