How to Export iPhone/iPad Contacts to Computer (Mac/PC)
How can I export contacts from iPhone/iPad to computer (PC/Mac)?
"You can export your iPhone contacts to an Excel file using a few methods. One way is to use the built-in "Contacts" app on your iPhone, go to "Settings" > "Contacts" > "Export Contacts", and then select the option to export to a CSV file. You can then transfer this file to your PC and import it into Excel. Alternatively, you can use a third-party app like "AnyTrans" or "PhoneTrans" to export your contacts to a CSV or Excel file. You can also use a cloud service like Google Contacts or iCloud Contacts, which allows you to export your contacts to a CSV file. Finally, you can use a USB cable to connect your iPhone to your PC and use a program like iTunes or a third-party app like "PhoneView" to export your contacts to a CSV file.export iPhone contacts to computer freely?"
A user may need all their contacts when traveling abroad without their iPhone, and this article provides free tips on how to export iPhone/iPad contacts and other data like photos, videos, and voice memos.
- Option 1. How to Export Contacts from iPad to Computer via iPad Data Transfer Tool
- Option 2. How to Export Contacts from iPad with iCloud
- Option 3. How to Export Contacts from iPad to Outlook
- Option 4. How to Export Contacts from iPad to Android Phone
Option 1. How to Export Contacts from iPad to Computer via iPad Data Transfer Tool
You can export iPhone/iPad contacts to your computer without using iTunes or iCloud by using a free tool called Qiling MobiMover. With Qiling MobiMover installed on your computer, you can export your iPhone/iPad files to your computer, add items from your computer to your iPhone/iPad, sync data from one iOS device to another, and even manage your iDevice content from your computer. This method allows you to back up your contacts without any data loss and is compatible with iOS 8 or later devices.
-
What can MobiMover do for you:
- The app allows for quick and easy export of contacts from an iPad to another iOS device or computer within minutes.
- It backs up data from the iPad/iPhone to the computer.
- This tool allows for the transfer of various types of data, including songs, videos, apps, contacts, and messages, from different iOS devices to a computer in a single click.
- It works perfectly with iOS 13.
As you can see from the list above, you cannot only export contacts from iPhone/iPad to computer but also do other things like transferring photos from iPhone to iPhone, saving iPhone text messages to computer and adding music to iPad without iTunes. Now, follow the steps below to export contacts from iPhone/iPad to computer (PC or Mac) via MobiMover to have a try.
Step 1. Connect your iPhone to your Mac, unlock your iPhone and click "Trust" in the prompt, then choose "Phone to Mac" in Qiling MobiMover to transfer contacts from your iPhone to your Mac.
Step 2. To transfer contacts from your iPhone or iPad to your Mac, check the "Contacts" option and click on the default storage path. If needed, you can set a custom path. Then, click "Transfer" to begin the transfer process.
Step 3. When the transfer process is complete, you can view the contacts on your Mac by opening the saved HTML file in a browser. This allows you to see the details of the contacts that were transferred.
You can transfer contacts saved on your computer back to your iPhone or iPad if needed. If you're unsure how to do this, refer to the article on transferring contacts from Mac to iPhone. MobiMover is a useful tool for iOS data transfer and file management that you shouldn't miss out on, so feel free to give it a try.
Option 2. How to Export Contacts from iPad/iPhone with iCloud
With an iCloud account, you can automatically sync your iPhone/iPad contacts with all your other iOS devices.
Step 1. Go to "Settings" on your iPhone/iPad.
Step 2. Scroll down and navigate to "iCloud."
Step 3. Activate the option "Contacts" here.
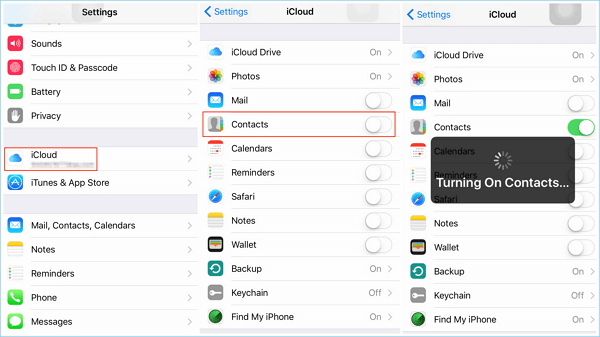
Step 4. Your contacts will be automatically reloaded to your iCloud account.
After syncing your contacts to iCloud, you can access them on iCloud.com and download them to your PC or Mac.
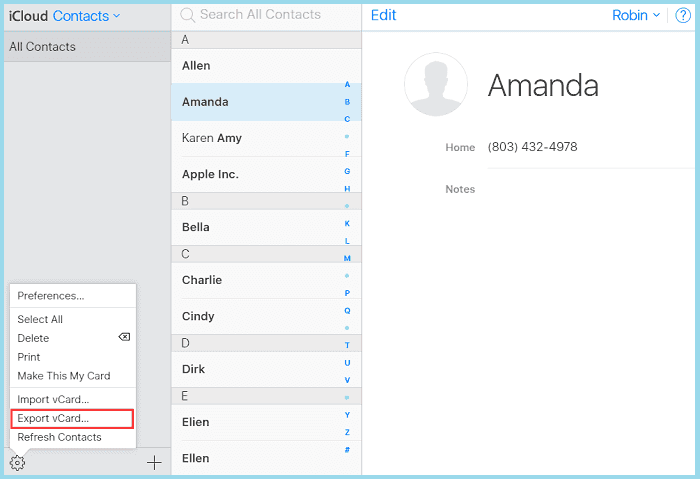
Step 1. On your computer, open icloud.com and log in with your Apple ID.
Step 2. To export all your contacts, click on "Contacts" to view a list of all your contacts, then click on the gear icon (Settings) at the bottom left of the screen, select "Select All" and choose "Export vCard" from the menu.
Option 3. How to Export Contacts from iPad to Outlook
Exporting contacts from iPad to Outlook can be easily done via iTunes, iCloud, and Exchange, with iTunes being the easiest option. To sync iPad contacts to Outlook using iTunes, you can follow the steps outlined in this guide. Alternatively, if iTunes doesn't work for you, you can also check out this detailed guide to transfer contacts from iPhone/iPad to Outlook using iCloud or Exchange.
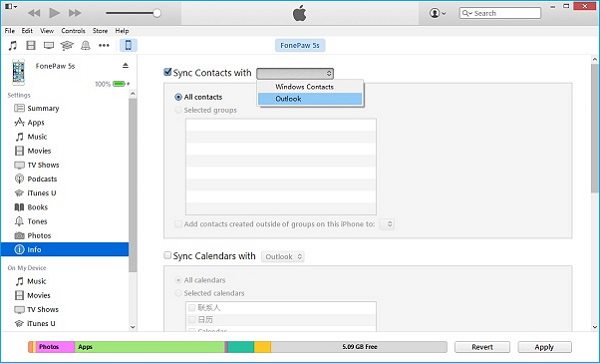
Step 1. To sync your iPad with your computer, download and install the latest version of iTunes on your computer, then connect your iPad to your computer using a USB cable.
Step 2. To sync contacts from Outlook to your iPad, open iTunes, click on the iPad device button on the left side, select the "Info" tab, and then choose "Outlook" under "Sync contacts with".
Step 3. After selecting the desired contacts, click on "Export" and choose the option to export all contacts or specific groups to Outlook. This will sync the chosen contacts to your Outlook account.
Step 4. After clicking "Apply" in iTunes, the contacts will be transferred from iPad to Outlook, and once the process is finished, you can run Outlook and access the "Contacts" section to see the newly synced contacts.
Option 4. How to Export Contacts from iPad to Android Phone
You can export contacts from your iPad to an Android phone using one of five methods: Google account, Email, SIM card, iTunes, and iCloud. Of these, iCloud is the easiest option, and we'll focus on that method. If you're unable to transfer contacts via iCloud, you can also try the other four methods to transfer contacts from your iPhone or iPad to an Android device.
Step 1. To enable the "Contacts" option, go to Settings, then tap on your name, followed by iCloud, and finally toggle the Contacts switch to turn it on.
Step 2. To access your iPad contacts on a computer, visit iCloud.com and sign in with the Apple ID used on the iPad. Then, select "Contacts" from the available options.
Step 3. To transfer contacts from the Android phone to the computer, select the contacts you want to transfer, click the gear icon, and choose the "Export vCard" option, which will export the selected contacts to a VCF file on your computer.
Step 4. To add contacts from a VCF file to your Android device, plug your phone into your computer, copy the VCF file to your local storage, and then import the contacts from your phone's Contacts or People app.
Conclusion
To export contacts from your iPad, you can choose from several methods depending on your needs. Whether you want to transfer contacts to a Mac, PC, another iOS device, Outlook, or even an Android device, we have a solution for you. Simply pick the method that suits you best and follow the steps to successfully export your contacts. If you have any further questions or need assistance, feel free to reach out to us for help.
Related Articles
- How to Convert HEIC to JPG on Mac in 3 Ways
- How to Transfer Contacts to New iPhone Without iCloud
- Windows 11 NVMe Not Detected? Top Ways to Fix It Now!
What if you encounter Windows 11 NVMe not detected due to various situations? You can refer to this post for effective help. - 5 Easy Ways to Access Windows 11 Recovery Environment
Windows 11 recovery environment can help you troubleshoot, recover or boot a device, but how to access it and run the recovery tools? Get them in this article.