How to Export Contacts from iPhone to Outlook with/Without iTunes
For users who don't want to manually sync iPhone contacts to Outlook one by one, there are alternative ways to transfer contacts from iPhone to Outlook, even without using iTunes. Our post collects 5 possible methods to help you do this, providing options for those who have iTunes available and those who don't.
- Part 1. How to Sync iPhone Contacts to Outlook with iTunes
- Part 2. How to Export iPhone Contacts to Outlook Without iTunes
- Method 1. Transfer Contacts from iPhone to Outlook via MobiMover
- Method 2. Import iPhone Contacts to Outlook via iCloud
- Method 3. Sync iPhone Contacts with Outlook via Settings
- Method 4. Transfer iPhone Contacts to Outlook via Exchange [Group Users]
Part 1. How to Sync iPhone Contacts to Outlook with iTunes
To export iPhone contacts to Outlook, the most commonly used tool is iTunes. If you have iTunes installed on your computer, follow these steps to sync your iPhone contacts to Outlook using iTunes.
Step 1. Connect your iPhone to the computer and run iTunes.
Step 2. Check your device icon on the left side of iTunes.
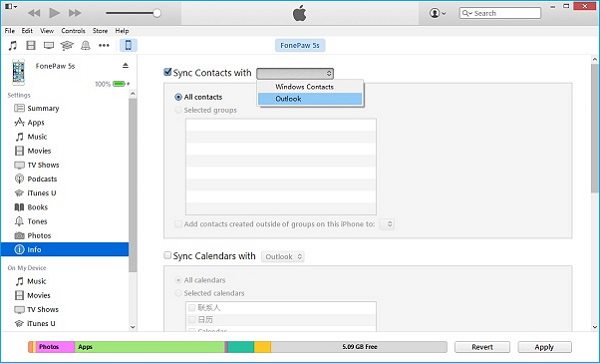
Step 3. To sync contacts with Outlook, click the "Info" tab and select the "Sync contacts with" option, then choose "Outlook" from the list of available options.
Step 4. To export contacts, select "All Contacts" to sync all contacts or choose "Selected groups" to sync specific groups to Outlook.
Step 5. To transfer contacts from iPhone to Outlook using iTunes, click the "Apply" button to initiate the process. This will sync your iPhone contacts with your Outlook account, allowing you to access and manage your contacts across both platforms.
Step 6. After completing the process, open Outlook and navigate to the "Contacts" section to verify that the contents have been successfully synced.
Part 2. How to Export iPhone Contacts to Outlook Without iTunes
Transferring data between devices can be tricky, and iTunes is no exception. When syncing iPhone contacts to Outlook using iTunes, you may encounter issues, such as errors or incomplete transfers, due to its strengths and weaknesses as a transfer tool.
- iTunes crashes frequently, resulting in potential data loss during syncing.
- Newly exported contacts will replace your original contacts stored in Outlook.
If you prefer not to use iTunes due to its limitations, there are four alternative methods to transfer your iPhone contacts to Outlook without iTunes, detailed below.
Method 1. How to Transfer Contacts from iPhone to Outlook via Qiling MobiMover
Qiling MobiMover is a perfect iTunes alternative that offers similar (even more) functions with iTunes, allowing you to transfer files, including contacts, messages, notes, calendars, voice mails, and more from iPhone/iPad/iPod touch to PC/Mac/laptop with several steps. Additionally, it provides other useful functions such as WhatsApp management, video download, and backup & restore.
Qiling MobiMover allows you to transfer contacts from iPhone to Outlook in just a few steps. You can easily select the contacts you want to transfer, and the software will handle the rest, ensuring that your contacts are safely and accurately transferred to your Outlook account.
Step 1. Connect your iPhone to your PC, unlock your iPhone and click "Trust" in the prompt, then launch Qiling MobiMover and select "Phone to PC" to transfer contacts from your iPhone to PC.
Step 2. Select "Contacts" and click the default path to set a custom storage path if needed, then click "Transfer".
Step 3. When the transfer process is complete, you can view the contacts on your computer as an HTML file, which can also be transferred to your iOS device if needed.
To import contacts from your PC to Outlook, follow these steps:
Step 1. Go to outlook.com > log in with your Outlook account.
Step 2. To import contacts, click the small people icon in the toolbar at the bottom, then select "Import Contacts."
Step 3. Choose the contacts you just imported from your iPhone.
Method 2. Import iPhone Contacts to Outlook via iCloud
If the above method is too complex for you to operate or if you don't want to install any third-party software on your computer, then you can use iCloud, Apple's recommended solution, to get this job done. Here're the steps.
Step 1. Go to iCloud.com on a new browser and log in with your Apple ID.
Step 2. To export contacts, click the "Contacts" tab and select the item you'd like to export.
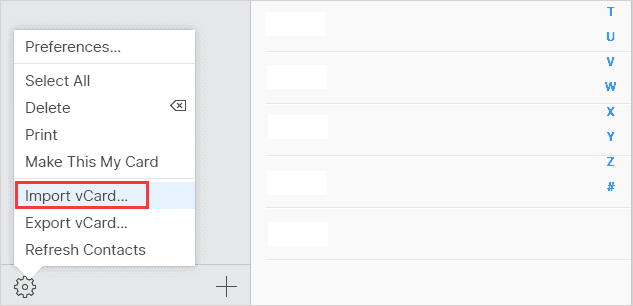
Step 3. To export your contacts as a vCard, click the gear icon located in the bottom-left corner of the screen, then select "Export vCard" from the pop-up menu that appears.
Step 4. Select a location you'd like to save your vCard and give it a name.
Step 5. After making your selection, click "OK" to import your contacts.
Method 3. Sync iPhone Contacts with Outlook via Settings
To sync iPhone contacts to Outlook, go to Settings, select "Passwords & Accounts", tap "Add Account", choose "Other", select "Contacts" and then "Sync".
Step 1. Open "Settings" on your iPhone.
Step 2. To add an Outlook.com account, go to your device's settings, scroll down to find "Password & Account," then select "Add Account" and "Outlook.com."
Step 3. Log in with your Outlook account.
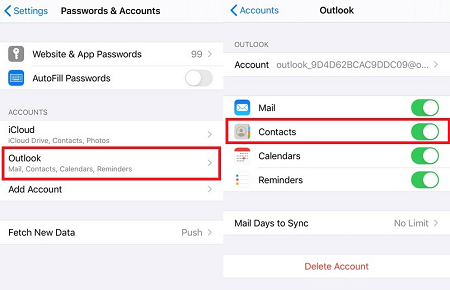
Step 4. Enable Contacts or Email, Calendar, and Reminders, and all contacts will be synced to your Outlook account.
Method 4. Transfer iPhone Contacts to Outlook via Exchange [Group Users]
This method only works when your iPhone or iPad is connected to an internal corporate network, and is particularly useful if your company has an Exchange server.
Step 1. From the Home screen, tap on "Settings" and then select "Mail, Contacts, Calendars."
Step 2. If this is the first time you set up items in this area, select "Exchange" to set up a new exchange account. Otherwise, select "Add Account" and then "Exchange" to add an existing exchange account.
Step 4. Enter your email, username, and password, then click "Next" to proceed.
Step 5. Your iPhone will contact the Exchange Server, and it requires you to fill in the server's address in the Server field, where you need to enter the address of your Exchange Server.
Step 6. After entering all details correctly, you can select the contacts you want to sync with your Outlook account and then tap Save to sync iPhone contacts with Outlook.
Related Articles
- How to Put CDs onto iPod with or Without iTunes
- How to Transfer Playlists from iPhone to iTunes 12
- How to Transfer iPhone Videos to Computer without iTunes