How to Transfer Playlists from iPhone to iTunes 12
You can copy your iPhone playlists to iTunes by connecting your iPhone to your computer, opening iTunes, and going to the "Devices" tab. From there, you can select your iPhone and click "Sync" to copy the playlists to your computer. Alternatively, you can also use the "Restore from this iPhone" option in iTunes to copy the playlists to your computer. If you're using a Mac, you can also use the "iCloud Music Library" feature to sync your playlists across devices.
If you're facing issues transferring playlists from your iPhone to iTunes, don't worry - there are practical methods to resolve this. Ensure you have the latest version of iTunes installed on your computer and have your iPhone ready. Then, follow these step-by-step instructions to successfully transfer your iPhone playlists to iTunes.
How to Transfer Playlists from iPhone to iTunes
Transferring playlists from iPhone to iTunes is a straightforward process, but you may encounter issues like iPhone not connecting to iTunes or iPhone playlists not showing up in iTunes, which can be resolved quickly before proceeding.
Step 1. Connect your iPhone to the computer and run iTunes.
Step 2. Under the "On My Device" section, choose "Playlist."
Step 3. From the right panel, select the playlist you want.
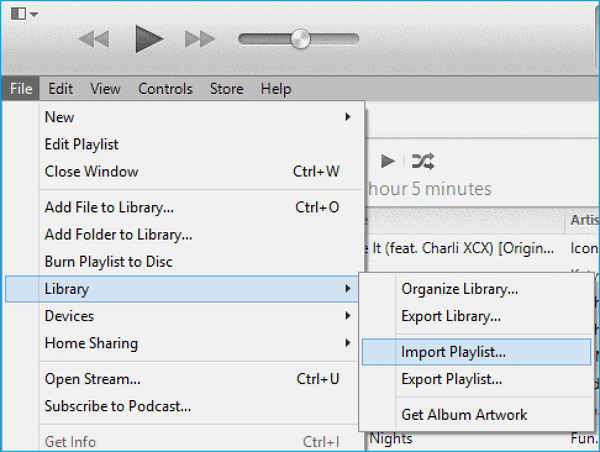
Step 4. To export a playlist in iTunes, go to the "File" menu, select "Library", and then choose "Export Playlist...". A window will appear where you can give the export file a name and select "Save".
Step 5. To import the playlist, return to the iTunes interface and select "File" in the upper-left corner of the screen, followed by "Library" and then "Import Playlist...". From there, select the file you created.
How to Export Playlists without iTunes
You can't directly export playlists without using iTunes, but you can achieve the same goal by transferring music from your iPhone using a tool like Qiling MobiMover. This tool allows you to transfer music, as well as other data such as contacts, messages, notes, and calendars, from your iPhone to your PC without any effort.
To transfer music from iPhone to Windows with Qiling MobiMover, simply connect your iPhone to your Windows computer using a USB cable, then open MobiMover on your computer and select the "Music" option from the "Transfer" tab. Next, select the songs you want to transfer and click "Transfer" to start the process.
Step 1. To transfer music from your iPhone to your PC/Mac, connect your iPhone to your computer and tap "Trust" on your iPhone if prompted. Then, open Qiling MobiMover and click on "Content Management". From there, select the "Audio" option and choose "Music" to transfer your iPhone's music to your computer.
Step 2. Select the desired songs to transfer, choose a safe location on your PC to transfer them, and consider navigating to a new and secure location to save the selected songs.
Step 3. To complete the transfer, click the "Transfer to PC" button, and the process will be finished once it's done.
In Conclusion
Our guide on transferring playlists from iPhone to iTunes is now complete. The process is straightforward, and you can easily follow the steps to transfer your playlists. If you also want to transfer music or other data from your iPhone to iTunes or your computer, Qiling MobiMover is here to help you do it quickly and efficiently.
Related Articles
- How to Convert MP4 to MP3 on Windows 10
- How to Download an Entire YouTube Playlist with Proven Solutions
- How to Access iPhone Files on Mac or PC in 4 Ways
- Deleted File Not in Recycle Bin | Proven Fixes
If you've accidentally deleted a file and it's not in the Recycle Bin, don't worry! This tutorial will cover three tested solutions to help you restore the deleted file with ease.