How to Get Photos Off iPhone (Easy Tips)
Quick Navigation:
- Why Do You Need to Get Photos Off Your iPhone
- How to Get Photos Off Your iPhone via a PC
- Method 1. Get Photos Off an iPhone with File Explorer
- Method 2. Transfer Photos from iPhone to PC with iPhone Transfer Software
- Method 3. Get Pictures Off iPhone via iCloud
- How to Get Pictures Off iPhone on Mac
- Method 1. Get iPhone Photos to Mac via Photos
- Method 2. Import Photos from iPhone to Mac with Image Capture
- Method 3. Send Photos from iPhone to Mac with AirDrop
- The Bottom Line
Why Do You Need to Get Photos Off Your iPhone
Your iPhone photos, which hold precious memories, can also be a storage hog, taking up a significant portion of your iPhone's storage and potentially causing issues like a slow iPhone or running out of space.
To free up space on your iPhone, you can transfer photos to a computer, making a backup, and then deleting them from your device. This process helps to clear up storage space on your iPhone.
To get photos off your iPhone, you can use a computer, either a PC or Mac, depending on your device. If you're using a PC, you can connect your iPhone to the computer using a USB cable and use the Photos app to transfer your photos. On a Mac, you can simply connect your iPhone to the computer and use the Photos app to access and transfer your photos. Alternatively, you can use cloud services like iCloud, Google Photos, or Amazon Drive to upload your photos from your iPhone to the cloud, where you can access them from any device.
How to Get Photos Off Your iPhone via a PC
While a PC may not integrate as smoothly with an iPhone as a Mac does, there are still several ways to upload photos from an iPhone to a Windows computer, including using third-party data transfer tools.
Method 1. Get Photos Off an iPhone with File Explorer
If you want to transfer all your iPhone photos to your computer without using any third-party software, using File Explorer is a good option. As long as your iPhone is recognized by the computer, you can access and copy your photos freely.
To transfer your iPhone photos to your computer, you'll need a USB cable. Simply plug the cable into your iPhone and computer, and follow the on-screen instructions to set up the connection. This will allow you to transfer your photos from your iPhone to your computer using the built-in Photos app.
Step 1. Connect your iPhone to the PC with a USB cable.
Step 2. Unlock your iPhone and click "Trust" to trust the computer.
Step 3. To access the DCIM folder on your iPhone, go to File Explorer, click on "This PC," then select "Apple iPhone" and navigate to "Internal Storage" and finally click on "DCIM."
Step 4. To free up space on your phone, select the photos or folders you want to remove and copy them to your computer.
If you want to free up more iPhone space, you can delete photos from your iPhone after the data transfer is complete.

To import photos from your iPhone to Windows using Photos, you can either import all photos at once or select specific ones. Additionally, you have the option to delete the original items from your iPhone after the import process is complete by checking the "Delete original items after import" box. This allows you to free up space on your iPhone while also having access to your photos on your Windows computer.
Method 2. Transfer Photos from iPhone to PC with iPhone Transfer Software
File Explorer is effective in transferring iPhone photos to a PC, but it's not helpful when trying to add photos to an iPhone or transferring other types of content between an iPhone and a computer.
To better manage your iPhone data, consider using Qiling MobiMover, an all-in-one iPhone toolkit that offers features such as iPhone data transfer software. This user-friendly tool allows you to easily transfer files, manage your iPhone data, and more, making it a convenient solution for anyone looking to optimize their iPhone experience.
- Data transfer
- Device backup
- WhatsApp management
- HEIC to JPG conversion
- Video to MP3 conversion
With Qiling MobiMover installed on your PC or Mac, you can easily transfer photos from your iPhone to your computer, as well as manage and organize your data more efficiently.
To transfer photos from your iPhone to a PC:
Step 1. Connect your iPhone to your computer with a USB cable and launch Qiling MobiMover. From the main screen, choose "Phone to PC" and click "Next" to transfer all content, or go to "Content Management" > "Pictures" > "Photos" to select and transfer photos individually.
Step 2. To transfer files from your iPhone to your PC, select the "Pictures" category, then choose the files you want to transfer, such as photos, videos, and other supported files. You can also change the destination folder on your PC to house the transferred files.
Step 3. To transfer photos and other files from your iPhone to your PC, click the "Transfer" button, which may take seconds or a while to complete, depending on the size of the files.
If you prefer to transfer photos from your iPhone to an external hard drive, you can use Qiling MobiMover to do it directly. Before the transfer starts, you can select a folder on the external drive as the destination to safely transfer photos from your iPhone.
Method 3. Get Pictures Off iPhone via iCloud
Both iCloud and other cloud-based services allow you to transfer your iPhone photos to a PC. Simply turn on iCloud Photos on your iOS device to sync your photos with iCloud, then access them on iCloud.com and download them to your computer. Once your photos are safely stored on your PC, you can clear them from your iPhone to free up storage space.
Step 1. Go to the Settings app to enable iCloud Photos.
Step 2. Go to iCloud.com and sign in with the Apple ID you use on your iPhone.
Step 3. To save all photos from Google Photos to your PC, go to the "Photos" tab, select all the items by clicking the box at the top left corner, and then click the "Download" button in the top right corner to save them to your computer.
How to Get Pictures Off iPhone on Mac
Since both iPhone and Mac are Apple devices, it's easy to transfer photos from iPhone to Mac using built-in apps or third-party tools like Qiling MobiMover, which is compatible with macOS.
Method 1. Get iPhone Photos to Mac via Photos
The Photos app on Mac allows you to manage and transfer photos, both from your Mac and from an iPhone, without the need for any additional software installation. This pre-installed app enables you to easily get pictures off your iPhone.
Step 1. Unlock your iPhone and connect it to your Mac.
Step 2. To access the settings on your iPhone, click "Trust" and enter your passcode.
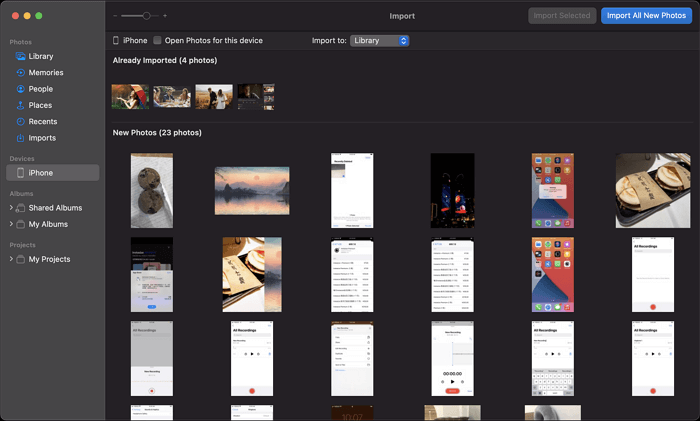
Step 3. Launch Photos and click on your iPhone from the left panel. This will display all the photos and videos from your iPhone.
Step 4. Now you can see all your photos on your iPhone. To transfer them to your Mac, click "Import All New Photos" to transfer all new photos or select the specific photos you want to transfer and click "Import [number] Selected".
Method 2. Import Photos from iPhone to Mac with Image Capture
On a Mac, you can use the Image Capture app to transfer photos from your iPhone to your computer. This app works similarly to Photos and only requires a USB cable to get the job done.
Step 1. To connect your iPhone to your Mac, start by plugging the iPhone into the Mac using a USB cable. Once connected, open the Finder on your Mac, which is the default file manager.
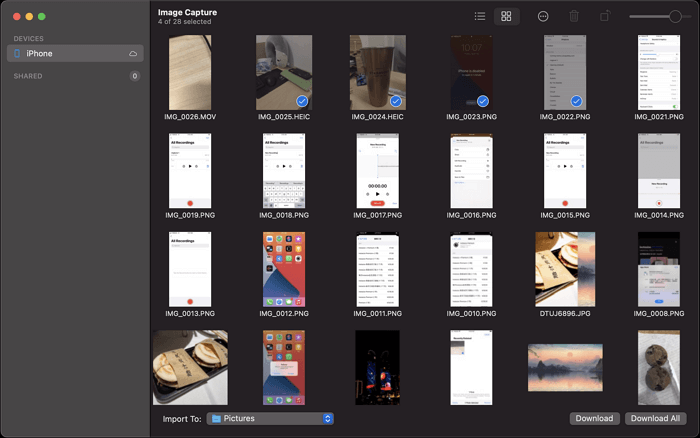
Step 2. Open Image Capture and select your device in the window.
Step 3. To import photos from your iPhone to a Mac, select the desired photos and click the "Download" button or click "Download All" to import all photos at once.
Method 3. Send Photos from iPhone to Mac with AirDrop
AirDrop allows Apple devices to share files, including photos, with each other, enabling wireless transfer from an iPhone to a Mac, but may take time due to network speed.
To transfer pictures from your iPhone to a computer without using a cable, you can use a wireless solution. This can be done by installing a wireless transfer app on your iPhone, such as AirDrop, and then accessing the app on your computer.
Step 1. Enable AirDrop and Bluetooth on your iPhone and Mac.
Step 2. To transfer photos from your iPhone to another device, open the Photos app on your iPhone and select the photos you want to transfer.
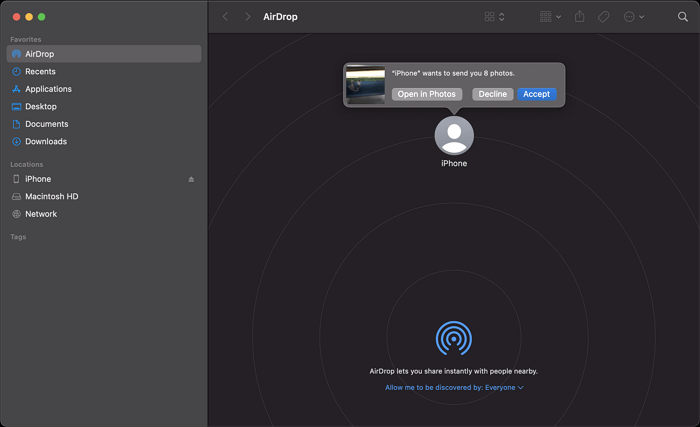
Step 3. To share a file with your Mac, tap the "Share" icon, select the "AirDrop" option, and then tap the name of your Mac from the list of nearby devices.
Step 4. To receive pictures from your iPhone via AirDrop on your Mac, click "Accept" in the AirDrop window and then locate the photos in the "Downloads" folder.
The Bottom Line
You can transfer photos from your iPhone using either a wired or wireless method. It's also a good idea to regularly back up your photos, even if you don't need to free up space on your iPhone, as data loss can occur unexpectedly.
Related Articles
- How to Transfer Data from Android to iPhone in 5 Ways
- How to Turn a Video into Audio
- How to Sync Contacts from iPhone to iPad With/Without iCloud
- Free Photo Transfer App Helps Download Pictures from iPhone to Windows