How to Transfer iPhone Photos to PC in 3 Simple and Quick Ways
Losing cherished iPhone photos can be frustrating, as they hold memories and feelings. To prevent this, it's essential to make a copy of your photos on a PC. Fortunately, there are various apps and services that allow you to transfer photos from your iPhone to a PC, making it easy to preserve your memories and keep them safe.
If you're experiencing issues like not being able to import photos from your iPhone, iPhone not showing up, or the Windows 10 Photos app not displaying photos, resolve these problems before attempting to transfer photos.
Pro tips: You should also make a digital backup of your photos. This way, you can still access them in a cloud-based account even if your computer is damaged or lost.
Part 1. How to Transfer iPhone Photos to PC with Qiling MobiMover
If you're looking for a quick way to transfer many photos without losing quality, Qiling MobiMover is a great option. This iPhone data transfer software offers various options to suit your specific photo-transferring needs, including advanced features for transferring photos.
- Transfer iPhone photos to a PC by category
- Select individual images or entire albums to transfer to your PC
- Transfer your photos in a snap! With this feature, you can quickly and easily transfer pictures from your iPhone to another iPhone or even a PC.
- View photos before transferring
- Batch convert HEIC pictures to JPG
Here is how to transfer photos from iPhone to Windows PC with Qiling MobiMover:
Step 1. Connect your iPhone to your computer, launch Qiling MobiMover, and select "Browse & Transfer" > "Pictures" > "Photos" to access the photos on your iPhone.
Step 2. Select all photos by checking "Select All" or choose specific images, then click on the "To PC" icon on the top toolbar.
Step 3. Qiling MobiMover will automatically transfer photos from your iPhone to your PC, and you can then check the transferred photos on your computer.
Qiling MobiMover is more than just a tool for exporting iPhone photos. In reality, it offers a range of additional features and capabilities, making it a versatile and useful app for various tasks.
- Back up your iPhone with one-click
- Transfer photos, contacts, messages, and other data from one iOS device to another with ease.
- Transfer WhatsApp messages in your preferred way
- Download videos from almost all popular sites
Sounds great, right? Don't hesitate to install this feature-rich program on your computer and start managing your iPhone or iPad.
Method 2. Copy iPhone Photos to PC via iCloud
You can use iCloud to transfer files wirelessly without installing any third-party programs on your computer. It serves as an online external hard drive, allowing you to transfer files without needing a USB cable. The whole process can be completed wirelessly.
Apple offers 5GB of free storage space, but users may need to purchase more storage space as photos consume all available space. However, iCloud storage is worth the cost for those who need to transfer data regularly.
If your iCloud is not syncing, don't worry, you can fix it by following some simple steps. Firstly, check if you're connected to the internet. If not, connect to Wi-Fi or mobile data.
Follow these steps to use iCloud to transfer photos.
Step 1. To enable iCloud Photos, open the Settings app, tap on "Photos", and then toggle the switch next to "iCloud Photos" (or "iCloud Photo Library") to the "on" position. This will save a copy of all your photos and videos to iCloud.
Step 2. To access your iCloud account, open a web browser and navigate to iCloud.com. Then, enter your Apple ID and password to sign in and access your iCloud account.
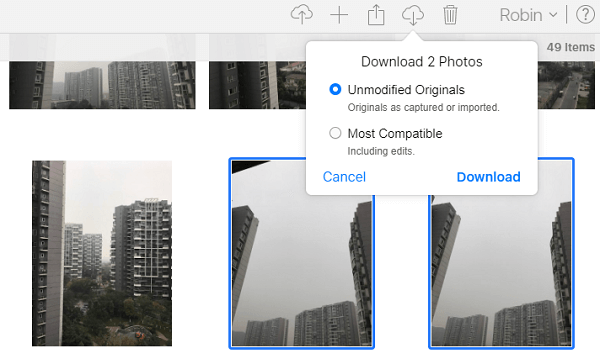
Step 3. From iCloud.com, click on "Photos."
Step 4. Select the photos you wish to download by tapping on them, then tap the cloud icon with a downward arrow.
Method 3. Transfer iPhone Photos to PC with a USB
To transfer iPhone photos to a PC with a USB, there are three methods to choose from, depending on the computer system. Each method allows you to complete the transfer task efficiently.
- Using the Windows Photos app (Windows 8/10)
- Using Windows AutoPlay (Windows 7)
- Using Windows File Explorer/Windows Explorer (Windows 7/8/10)
To check if you have the latest version of iTunes on your PC, open iTunes, click "Help," and then click "Check for Updates."
To transfer photos from your iPhone to a PC, you can use the Photos app, AutoPlay, or Windows Explorer. First, connect your iPhone to the PC using a USB cable.
1. Transfer iPhone photos to PC Using the Photos app (Windows 8/10)
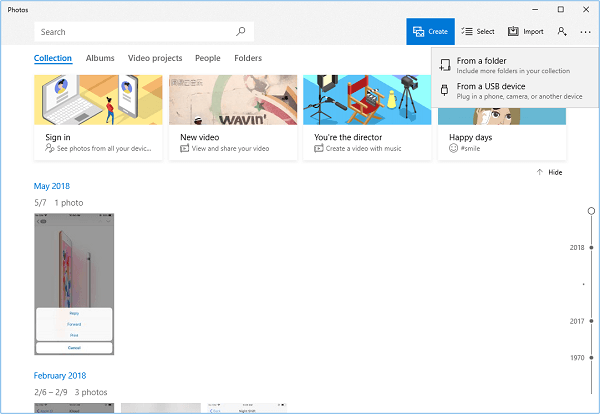
Step 1.Open the Photos app on your PC.
Step 2. After you connect your iPhone to your PC, you will receive a message to import your photos from your iPhone to your PC.
- On a Windows 10 computer, this option will be in the top right corner of the Photos app.
- To import photos on a Windows 8 computer, you'll need to right-click anywhere in the Photos app to access the "Import" option.
Step 3. To transfer photos, click "Import" and select the desired photos, then click "Import" again to initiate the transfer process.
2. Copy iPhone Photos to a PC Using Windows AutoPlay (Windows 7)
Step 1. Connect your iPhone to your PC.
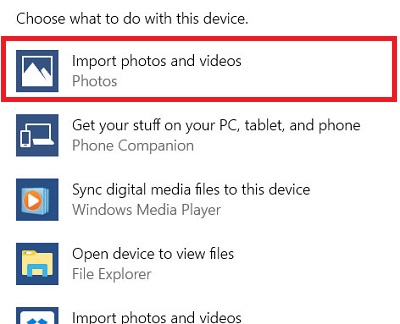
Step 2. When AutoPlay appears, click "Import pictures and videos."
Step 3. To save photos, select the folder where you'd like to save them in the "Import Settings."
Step 4. Select the desired photos and click the "Import" button to copy pictures from your iPhone to your PC.
3. Transfer iPhone Photos to PC Using File Explorer/Windows Explorer (Windows 7/8/10)
Step 1. To locate your iPhone in File Explorer on Windows, open File Explorer and navigate to the "This PC" section. Look for the "Apple iPhone" icon, which represents your iPhone. This icon will appear under "This PC" if your iPhone is connected to your Windows PC via a USB cable.
Step 2. Double-click on "Apple iPhone" and then double-click "Internal Storage."
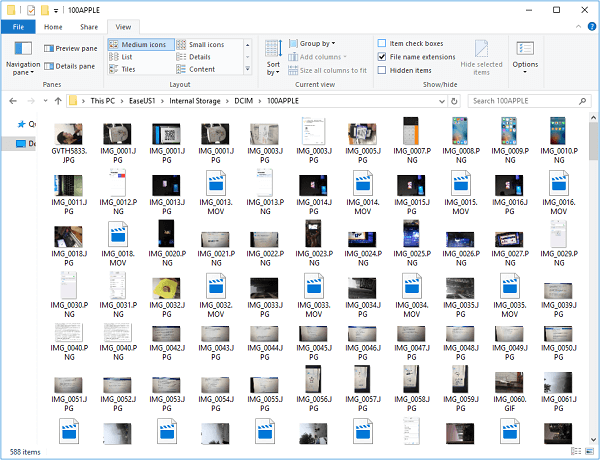
Step 3. Double-click to open the DCIM folder.
Step 4. Select the folder or pictures you wish to transfer.
The Bottom Line
Depending on your specific photo transfer needs, you can use different ways to get your photos from your iPhone to a PC, apart from the ways introduced above, such as using Google Photos or other cloud services.
iPhone photo transfer is a popular topic, and while today's guide didn't cover all demands for photo transfer, it's not a major concern if you're looking for a solution that meets your specific needs. For example, you may want to move iCloud photos to an external hard drive or upload photos and videos to iCloud from a PC.
FAQs About Photo Transfer Between an iPhone and a PC
Frequently asked questions about transferring photos from an iPhone to a PC include: what are the steps to transfer photos, how to transfer photos wirelessly, and what are the best methods for transferring photos. If you want to learn more about this topic, this section is a great resource.
1. What is the best app to transfer photos from iPhone to PC?
Users looking for a reliable app to transfer photos from their iPhone to their PC may find that the Photos app, which is free and easy to use, occasionally crashes within Windows 10 and more frequently within Windows 11, making it unreliable for some users.
If you don't mind, Qiling MobiMover can better solve the problem of transferring photos from iPhone to PC, as it runs more stably and quickly compared to the Photos app, eliminating the risk of crashes.
Qiling MobiMover supports offline data transfer, making it easy to transfer data without a network connection, ideal for quick transfers.
2. Why can't I transfer photos from iPhone to PC?
Importing photos from an iPhone to a PC can be a frustrating experience, and there are several reasons why it may not work. It could be due to compatibility issues between the iPhone and PC, or perhaps the photos are not being transferred properly due to a software glitch. Additionally, the iPhone may not be recognized by the PC, or the connection between the devices may be unstable, leading to failed imports.
- If something goes wrong with your USB cable, it's possible that it may be damaged or broken.
- To disable iCloud Photo Library, go to Settings > [your name] > iCloud > Photos, then toggle off the switch next to iCloud Photo Library. Alternatively, you can also go to Settings > Photos > iCloud Photo Library and toggle off the switch.
- You transfer too many photos at one time.
When you encounter issues with your iPhone's camera, try checking your connections and updating your device. If that doesn't work, disable iCloud Photo Library by going to Settings > Photos and toggle off iCloud Photo. This should resolve the problem.
3. How do I transfer photos to an iPhone from a computer?
To transfer photos to your iPhone, you can use the same steps introduced above, but since Windows Photos app or AutoPlay doesn't support transferring photos to your iPhone, you can use Qiling MobiMover or iCloud to transfer photos from your computer to your iPhone.
Related Articles
- How to Download Music from Bandcamp
- How to Fix iPod Nano Won't Sync with iTunes
- Fix Volumes Larger Than 2088958 Megabytes Cannot Be Protected
Learn the workaround to fix the error that volumes larger than 2088958 megabytes cannot be protected in Windows Server 2008 or 2008 R2 Backup. - Volume(s) OS Have an Unsupported File System-3 Ways to Fix
Learn the three different methods to fix the volume(s) OS have an unsupported file system error received when trying to backup dell computer. The last one is safer.