How to Transfer Music from iPhone to Mac in 5 Ways
Quick Navigation:
- How Do I Transfer Music from iPhone to Mac for Free?
- Method 1. Best App to Transfer Music from iPhone to Mac Without iTunes
- Method 2. How to Sync Apple Music to Macbook from iPhone
- Method 3. How to Get Music from iPhone to Mac Using iTunes
- Method 4. How to Airdrop Music from Mac to iPhone Wirelessly
- Method 5. How to Transfer Music from Mac to iPhone Without Cable
- The Bottom Line
How Do I Transfer Music from iPhone to Mac for Free?
You can transfer music from your iPhone to MacBook by using the built-in "Music" app on your Mac, which allows you to sync music from your iPhone to your computer for free. Simply connect your iPhone to your MacBook using a USB cable, open the Music app on your Mac, and select the "Sync" option to transfer your music collection to your MacBook. Alternatively, you can also use the "iTunes" app on your Mac to sync music from your iPhone to your computer. If you prefer not to use iTunes, you can also use the "Finder" app on your Mac to transfer music from your iPhone to your MacBook. Additionally, you can also use third-party apps like "iMazing" or "AnyTrans" to transfer music from your iPhone to your MacBook.
Transferring music from an iPhone to a Mac or vice versa can be a bit more complicated than sharing photos or videos, as music is typically protected by copyright. However, if you need to back up your music files or access them on your computer, you may need to transfer them between devices.
Fortunately, with the help of proper tools, syncing music from iPhone to Mac becomes easy. There are three common ways to copy music from iPhone to Mac, which can be achieved with the right tools.
Method 1. Best App to Transfer Music from iPhone to Mac Without iTunes
For transferring non-purchased music and other iOS data from an iPhone to a Mac, we recommend using Qiling MobiMover, a professional software that allows you to quickly transfer, delete, and add music and other data like contacts, messages, videos, and more on your iPhone from the computer.
This program is compatible with almost all Windows, macOS, and iOS systems, allowing for nearly all data transfer tasks between two iOS devices or between a Mac/PC and an iOS device.
In addition to its data transfer feature, the tool also offers some small yet useful tools to enhance your phone's functionality and organization. These include a WhatsApp Manager, a Backup Manager, and a File Converter, which can help you manage your WhatsApp chats, backup important data, and convert files with ease.
- Transfer or print your WhatsApp messages
- To back up your iOS data quickly and easily, go to the Settings app, tap on your name at the top, then select "iCloud" and turn on "iCloud Backup". This will automatically back up your iPhone or iPad to iCloud whenever it's plugged in, charged, and connected to Wi-Fi.
- Batch convert HEIC pictures to JPG
- Convert any local videos to MP3
Sounds great, right? If it does, download Qiling MobiMover on your computer and follow these steps to transfer music.
Step 1. Connect your iPhone or iPad to your Mac with a USB cable. If prompted, tap "Trust This Computer" on your device's screen. Then, open Qiling MobiMover for Mac and select "Phone to Mac" from the main screen.
Step 2. MobiMover allows you to transfer various types of data from iPhone to Mac, including contacts, photos, audio, videos, messages, and books, either in bulk or selectively. When exporting music, MobiMover saves the files on the desktop by default, but the user can customize the export path to suit their preferences.
Step 3. To transfer music from your iPhone or iPad to your Mac, click the "Transfer" button. This will copy your music to your Mac.
Many users also want to sync contacts from iPhone to Mac. If you are one of them, you can easily use the same steps to transfer contacts from your iPhone to your Mac. If you want to turn songs into a CD, read our guide on how to burn music to a CD.
Method 2. How to Sync Apple Music to Macbook from iPhone
If you're an Apple Music subscriber, your iPhone music will be synced to all your devices, including your Mac, without needing manual transfer. To set this up, simply turn on iCloud Music Library or Sync Library on both your iPhone and Mac, and sign in with the same Apple ID. This will allow your music to be transferred wirelessly and automatically between devices.
To sync music from iPhone to Mac via Apple Music:
Step 1. Subscribe to Apple Music.
- To view personalized music recommendations, go to the Music app on your iPhone, then click on the "For You" tab.
- Tap on "Try it Now" and choose a subscription plan.
- To confirm the billing information, go to Settings > [your name] > Password & Security, and make sure that you have a valid payment method on file. If you need to add or update your payment information, tap "Add Payment Method" or "Edit Payment Method" and follow the prompts.
Step 2. To sign in to your Mac with the Apple ID you use to purchase the Apple Music subscription, simply click on the Apple menu and select System Preferences. From there, click on Apple ID and then select the option to "Sign In".
- Open the Apple Music app or iTunes.
- Choose "Account" > "Sign In".
- Enter your Apple ID and password.
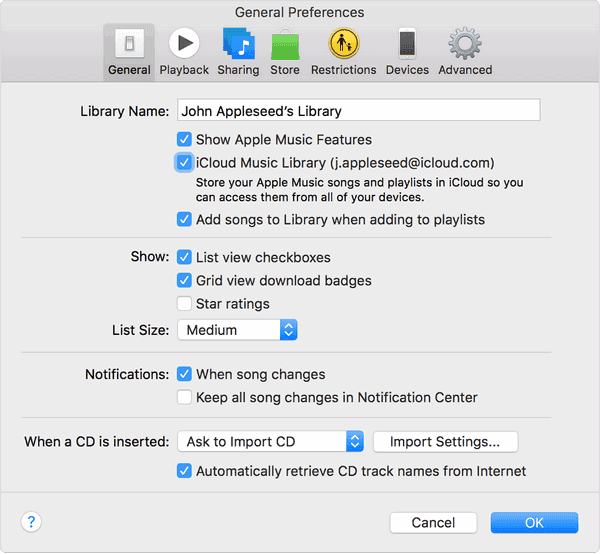
Step 3. To enable iCloud Music Library on your Mac, go to Music > Preferences > General, and check the box next to "iCloud Music Library." On your iPhone, go to Settings > Music > iCloud Music Library, and toggle the switch to the right.
- To enable iCloud Music Library on your iPhone, go to the "Settings" app, select "Music", and toggle the switch next to "iCloud Music Library" or "Sync Library" to the right. This will allow your music library to be synced across all your Apple devices.
- To enable iCloud Music Library on your Mac, open the Apple Music app, go to "Music" > "Preferences," select the "General" tab, and choose "iCloud Music Library" or "Sync Library." Click "OK" to confirm the change.
This method is only viable if you subscribe to Apple Music. If you have no budget for this, you can use Qiling MobiMover to transfer music files from iPhone to Mac for free.
Method 3. How to Get Music from iPhone to Mac Using iTunes
If you purchased music from iTunes, you can use iTunes to transfer it from your iPhone to your Mac, but note that iTunes is only available on macOS Catalina and earlier. However, if you have songs from other sources, it's not recommended to use iTunes.
Step 1. Connect your iPhone to the Mac via the USB cable.
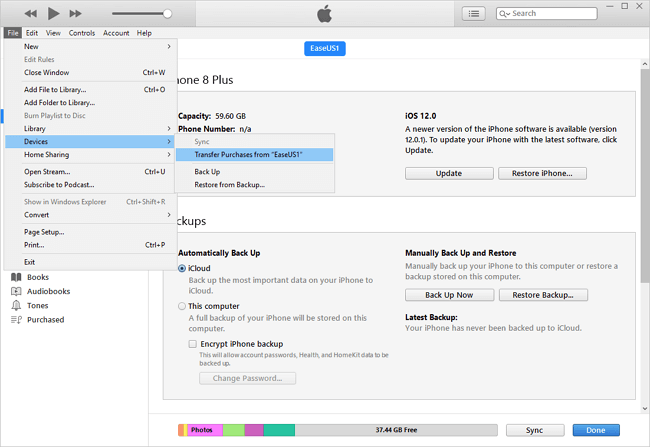
Step 2. To authorize your computer in iTunes, open iTunes on your Mac, navigate to the "Account" menu, select "Authorizations", then choose "Authorize This Computer" and finally click "Authorize".
Step 3. To transfer purchases from your device, go to the "File" tab, select "Devices", and click on "Transfer Purchases from [your device]" from the drop-down menu.
Method 4. How to Airdrop Music from Mac to iPhone Wirelessly
You can use AirDrop to transfer downloaded songs or MP3 files from your Mac to your iPhone wirelessly. To do this, open AirDrop on your Mac, select the song or file you want to transfer, and then tap the "Share" button. On your iPhone, go to the "Files" app, tap the "Browse" tab, and select the "On My iPhone" folder.
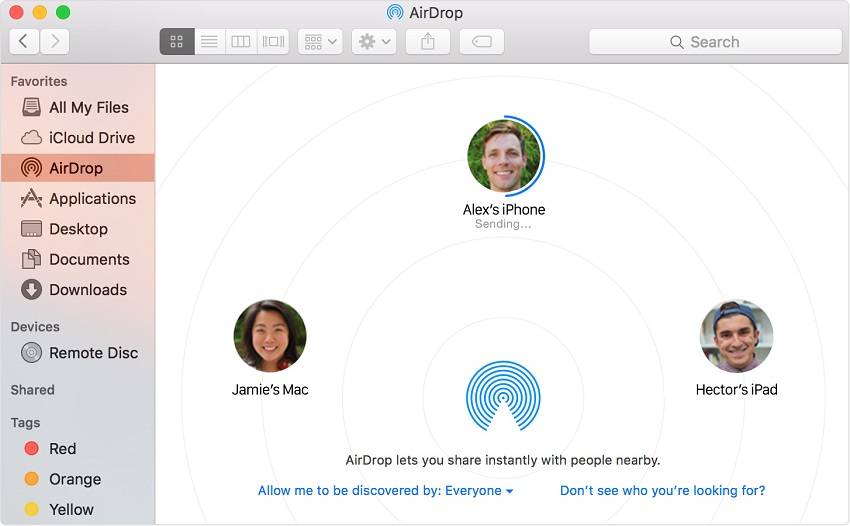
Step 1. Enable AirDrop on your Mac and iPhone.
- To make your Mac visible to everyone via AirDrop, go to the Finder, select AirDrop from the left sidebar, and change its visibility to "Everyone".
- To enable AirDrop on your iPhone, go to the Settings app, tap General, and toggle AirDrop to the "On" position.
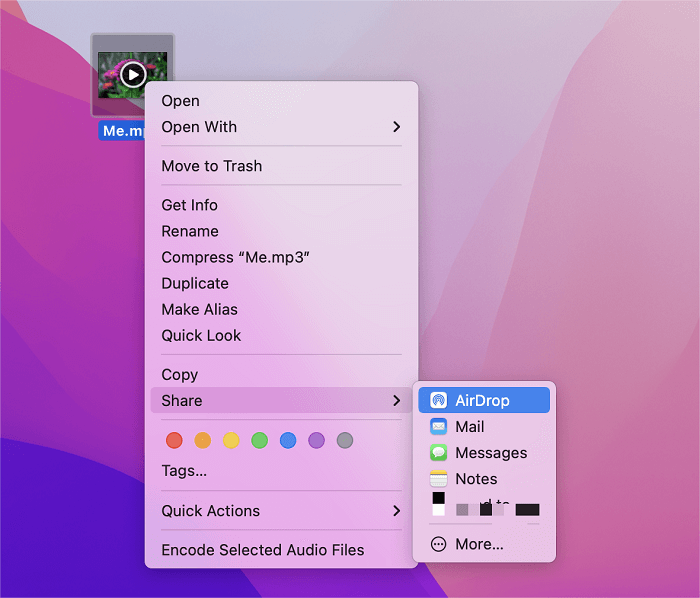
Step 2. To share a music file, locate the file, tap it with two fingers, and select "Share," then "AirDrop."
Step 3. Choose your iPhone as the target device.
Step 4. To open a music file on your iPhone, tap "Accept" on your device and select an available app that supports music playback, such as the Music app.
Method 5. How to Transfer Music from Mac to iPhone Without Cable
You can transfer music from a Mac to an iPhone wirelessly using AirDrop, Apple's built-in file-sharing feature. To do this, make sure that both your Mac and iPhone are connected to the same Wi-Fi network. On your Mac, select the music you want to transfer, right-click on it, and choose "Share" > "AirDrop." On your iPhone, go to Settings > General > AirDrop and select "Everyone" or "Contacts Only" depending on your preference.
You can transfer music from your Mac to your iPhone wirelessly using cloud services like Google Drive or third-party iOS apps. We'll focus on using Google Drive for this purpose.
Step 1. To access Google Drive on a web browser, go to drive.google.
Step 2. To upload your music file from your Mac, click the "New" button.
Step 3.To access your Google Drive account on your iPhone, download and launch the Google Drive app, then log in to your account.
Step 4. Find and download the music to your iPhone.
The Bottom Line
To transfer music from your iPhone to your Mac, you can use various methods. You can use the built-in feature in iTunes, which allows you to import music from your iPhone to your Mac. Alternatively, you can use the Music app on your Mac, which also allows you to import music from your iPhone. Additionally, you can use a third-party app or service, such as iMazing or AnyTrans, to transfer music from your iPhone to your Mac.
- Qiling MobiMover enables users to transfer music from their iPhone to their Mac, regardless of the source of the songs, making it easy to access and manage their music library across devices.
- Apple Music allows users to wirelessly sync music from their iPhone to their Mac, but this feature is only accessible with an active subscription to the service.
- If you've purchased music from the iTunes Store, iTunes can help you move those songs from your iPhone to your Mac.
- AirDrop and Google Drive only allow you to transfer music downloaded from the internet, not music from other sources.
To transfer music from iPhone to Mac quickly, use the built-in "Move to Mac" feature in the Music app on your iPhone, which allows you to wirelessly transfer music to your Mac. Alternatively, use a USB cable to connect your iPhone to your Mac and use the "iCloud Music Library" feature to transfer music.
Related Articles
- 3 Top Ways to Import Photos from iPhone 8/8 Plus/X to Mac
- [With Steps] How to Download MP4 File to iPhone Directly
- How to Back Up Music on iPhone
- How to Fix Can't Add Music to iPhone