How to Sync Notes from iPhone to Mac in 4 Ways
Quick Navigation:
- Part 1. How to Sync Notes from iPhone to Mac with iCloud
- Part 2. How to Sync Notes from iPhone to Mac with Qiling MobiMover
- Part 3. How to Sync Notes Between iPhone and Mac with Gmail Account
- Part 4. How to Import Notes from iPhone to Mac via AirDrop
- Bonus Tips: Fixes to Notes Not Syncing Between iPhone and Mac
- The Bottom Line
Apple's Notes app allows you to access your notes across different Apple devices by enabling the Notes option in iCloud, keeping notes in sync on any iPhone, iPad, or Mac signed in with the same Apple ID, and easily checking them without switching devices via iCloud syncing.
We listed the proven solutions to address issues like "iCloud Notes not syncing" and provided methods to sync notes between iPhone and Mac with different Apple ID.
Part 1. How to Sync Notes from iPhone to Mac with iCloud
To sync your Notes between your iPhone and Mac, make sure you've set up iCloud on both devices. Once set up, you can sync various data and documents, including Notes, photos, Mail, Contacts, Calendars, Reminders, Safari bookmarks & history, and more, between your iPhone and Mac. To specifically enable Notes sync on both your iPhone and Mac, follow the steps to turn it on.
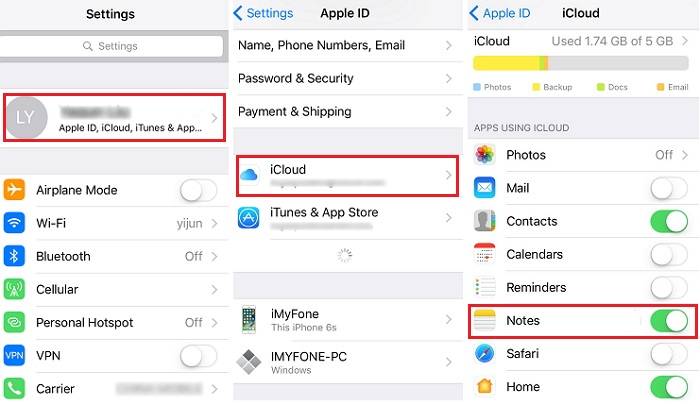
To enable iCloud sync for Notes on your iPhone or iPad, go to Settings > [your name] > iCloud, then toggle the switch next to Notes to the "on" position. This will sync your notes across all of your Apple devices.
Step 1. On your iPhone or iPad, open the Settings app.
Step 2. Tap [Apple ID], then choose "iCloud."
Step 3. Toggle on iCloud service for "Notes."
Step 4. Once you've set up iCloud syncing, any new notes or changes to existing notes on your iPhone will automatically be uploaded to iCloud and synced to your Mac with the same Apple ID, ensuring your notes are always up-to-date across all your Apple devices.
Steps to turn on iCloud sync for Notes on your Mac.
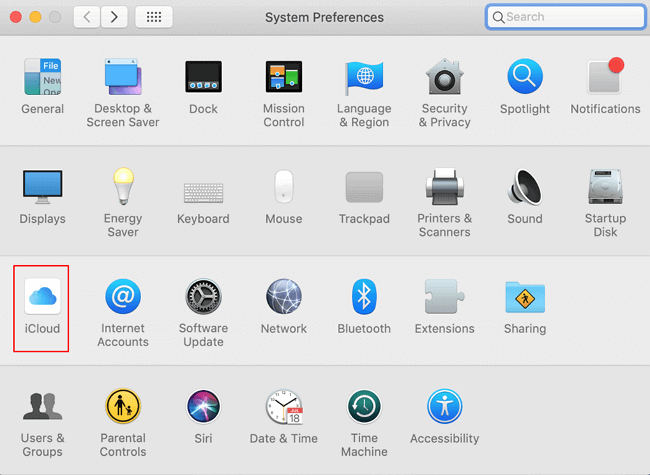
Step 1. To sync your Mac with your iPhone, launch System Preference on your Mac, which is similar to the Settings app on your iPhone. Sign in with the Apple ID you used on your iPhone. This will allow your Mac to access your iPhone's data and settings.
Step 2. From its screen, choose "iCloud."
Step 3. Sign in with your iCloud account.
Step 4. To sync notes from iPhone to Mac, check the box next to "Notes" in the list of options, and notes added on either device will be synced across both.
Part 2. How to Sync Notes from iPhone to Mac with Qiling MobiMover
Syncing Notes from iPhone to Mac or vice versa is usually convenient, but issues can arise if Notes were created on iPhone before iCloud was enabled or if syncing fails. In such cases, using a data transfer software like Qiling MobiMover can resolve the issue, allowing Notes to be transferred from iPhone to Mac quickly with just a lightning cable.
Qiling MobiMover is a professional tool that allows you to transfer files between your iPhone and PC/Mac, or two iOS devices, making it easy to share photos and videos. Additionally, it can be used to back up your iOS content, transfer WhatsApp data to your PC, and even convert HEIC files to JPG or videos to MP3 in bulk.
You can transfer notes from your iPhone to your Mac using Qiling MobiMover, a tool that allows you to transfer files between devices. By following similar steps, you can easily move notes and other files from your iPhone to your Mac.
Step 1. To transfer data from your iPhone to your Mac, connect your iPhone to your Mac using a USB cable and tap "Trust This Computer" on your iPhone's screen. Then, open Qiling MobiMover and select "Phone to Mac" on the main screen. Click "Next" to begin transferring data from your iPhone to your computer.
Step 2. MobiMover automatically loads all compatible files from your iPhone/iPad, allowing you to choose specific types of content, such as contacts, messages, pictures, audio, or video, to transfer. The transferred content is initially saved to your desktop, so you may need to change the default location before initiating the transfer.
Step 3. MobiMover will immediately begin to transfer data from iPhone to Mac without iTunes. Don't interrupt the USB connection during the transfer process. When it completes, you can open and check the transferred content, using a web browser for files like contacts and messages that are saved as .html files.
Part 3. How to Sync Notes Between iPhone and Mac with Gmail Account
To sync Notes tied to Google's Gmail on both your Mac and iPhone, you'll need a Gmail account connected to your iPhone/iPad and Mac. On your Mac, go to System Preferences > Apple ID > Account Settings > Notes, and toggle the switch to turn on syncing. On your iPhone/iPad, go to Settings > [your name] > Notes, and toggle the switch to turn on syncing.
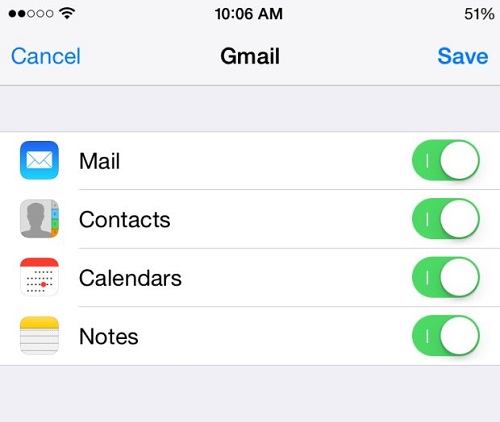
Enable Notes sync for Gmail on your iPhone
Step 1. On your iPhone, go to the Settings app.
Step 2. Scroll down to find the "Mail" option, tap it.
Step 3. To access your Gmail account, start by tapping on "Accounts" and then select "Gmail" from the options. If you haven't already added a Gmail account, you can do so by tapping "Add Accounts" and then selecting "Google" to sign in to your Google account.
Step 4. Toggle the "Notes" option on.
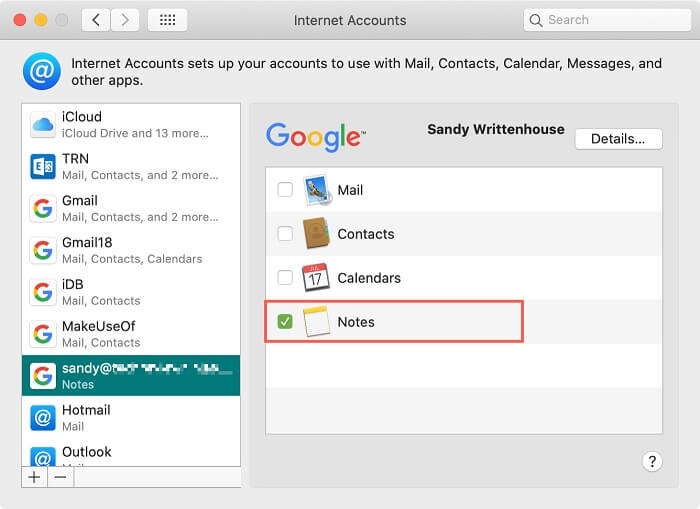
Enable Notes sync for Gmail on your Mac
Step 1. On your Mac, launch the Notes app.
Step 2. Click the "Notes" in the menu bar in the upper left corner.
Step 3. Select "Account" from the drop-down list.
Step 4. Select the "Google" option.
Step 5. Enter your username and password by following the prompts.
Step 6. Select "Notes" from the listed options.
Part 4. How to Import Notes from iPhone to Mac via AirDrop
To sync specific notes from iPhone to Mac via AirDrop, turn on AirDrop on both devices, ensure Bluetooth and Wi-Fi connections are active, and place them within 30 feet of each other. Then, follow the steps to Airdrop Notes.
Step 1. On your iPhone, open the Notes app.
Step 2. To sync a Note from iPhone to Mac, open the Notes app on your iPhone and select the Note you want to sync. You can do this by tapping on the Note in the list view or by searching for it in the search bar.
Step 3. To access the settings menu, tap the Options icon on the top right, which is a circle with three dots inside.
Step 4. Choose "Send a Copy," then choose "AirDrop."
Step 5. If you're having trouble finding your Mac with Airdrop, check your Airdrop settings to make sure it's discoverable.
Step 6. To save the Note on your Mac, tap "Accept" on the pop-up window that appears. This will sync the Note with your Mac, allowing you to access it from your computer.
Step 7. When the process is finished, open the Notes app on your Mac to check the synced files.
Note: Airdrop one Note at a time by opening the Notes app, tapping the "+" icon, selecting the Note you want to share, tapping "Share" and then "Airdrop", and selecting the recipient. If you want to share multiple Notes, repeat these steps for each Note.

Bonus Tips: Fixes to Notes Not Syncing Between iPhone and Mac
Syncing Notes from iPhone to Mac with iCloud is a straightforward process, but sometimes system problems, update issues, or iCloud server errors can prevent syncing between the two devices. However, with the solutions outlined in this guide, you can easily fix Notes not syncing between iPhone and Mac, and get back to accessing your notes seamlessly.
The Bottom Line
This guide lists all possible methods for syncing Notes from iPhone to Mac, and if you want to transfer Notes from one iPhone to another, you can refer to this guide on syncing Notes from iPhone to iPad. If you want to transfer more files than Notes from iPhone to Mac, we recommend trying Qiling MobiMover.
Related Articles
- Free | How to Transfer Music from iPod to Computer
- How to Download Myspace Videos for Free
- Everything You Need to Know about WhatsApp iCloud Backup
- How to Export Messages from iPhone with Qiling MobiMover